Modern Video Reel
WordPress
Thank you for purchase. If you have any questions that are beyond the scope of this help file, please feel free to email via my user page contact form on the link above.
Installation
How to install
Make sure you extract downloaded file from codecanyon, inside you will find file named: 'apmvp_reel.zip'. This is the plugin file you upload in WordPress panel!
Activate plugin
After you install plugin you will have to activate your license to start using the plugin.
To activate license you need to create account on the following link, where you will provide your PURCHASE CODE, and get TOKEN in return which you will then enter in plugin section to activate the plugin.
This is made to make sure customers use the license on a single project (as per Envato rules) and to help customers owning many licenses to easily track on which server licenses are being used.
How to update
1. Using FTP Client, delete old plugin files and upload new ones. Clear cache if necessary.2. Your previously created playlists and other data is going to be saved.
Quick usage
How to create the best looking reel?
The best reel will consist of mp4 videos and image poster for each video.
Although this plugin does supports Youtube and Vimeo videos, these videos are slower to start playing (because of needed communication with Youtube / Vimeo servers).
So you will get the best performance using mp4 videos. Also, image poster is recommended for each video and it should be the same size as the video itself. The best is the take screenshot from first frame of the video itself. This ensures image poster is the same size as the video and provides the best viewing experience (poster is shown on start until video starts playing, then video is faded in)
To get the fastest video loading speed, you should:
- use mp4 videos (not Youtube or Vimeo)

- use shorter videos (if possible), the shorter it is, the faster it will start playing

- make sure your videos are encoded properly. We suggest using this free program for video encoding:   https://handbrake.fr/

- make sure the server where your videos are located is able to deliver data fast. Using free servers like Google drive (or similar) will always probude weak results because you cannot expect free servers to provide fast speeds)

- if it some specific case, like maybe Safari on mobile, then its usually more related to annoying Safari bugs: https://stackoverflow.com/questions/49799456/html5-video-tag-not-playing-video-in-safari-untill-it-is-fully-downloaded
There are 2 ways to create a Reel
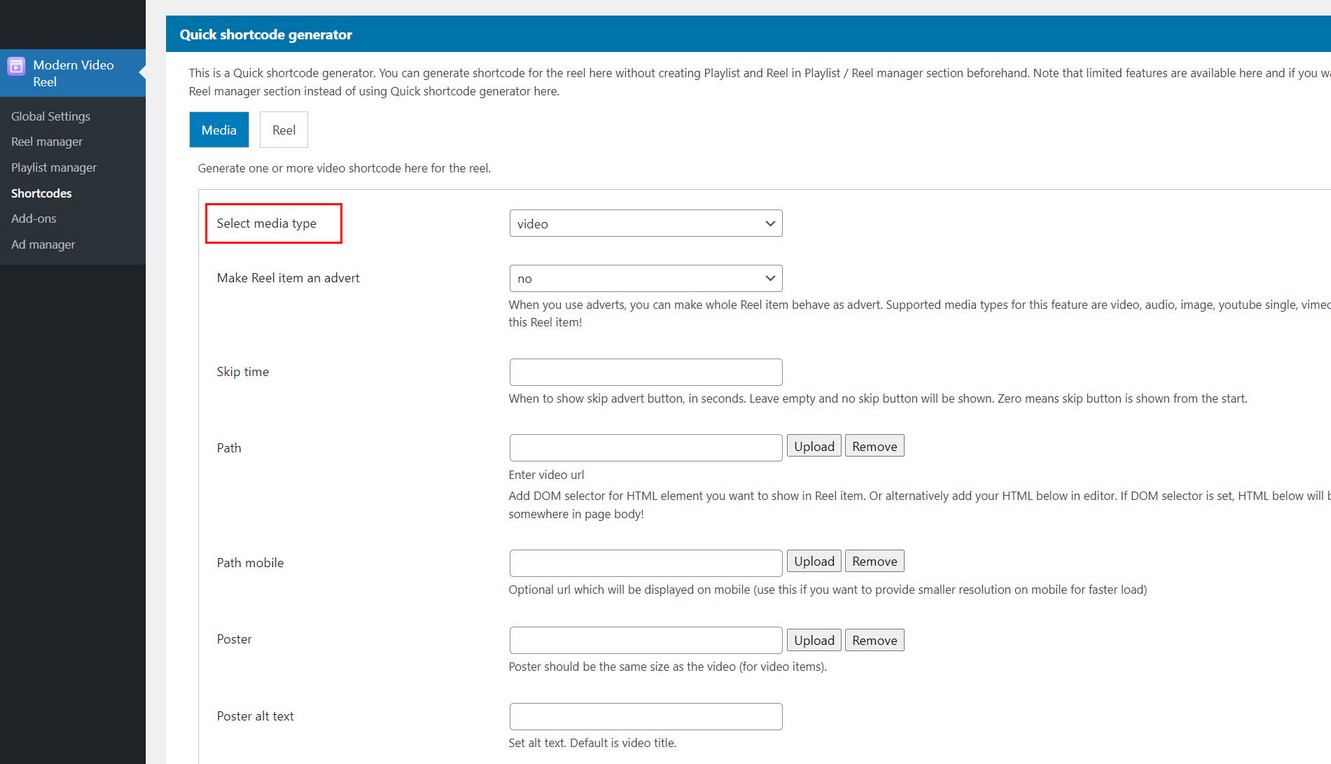
1. Using Quick shortcode generator
You can quickly create a Reel shortcode using Quick shortcode generator without needing to create a Reel and a playlist beforehand. Go to Shortcodes plugin menu and into Quick shortcode generator. Note that this is more of a temporary solution, and provides only basic configuration options.

2. Create new reel and playlist in Reel Manager / Playlist Manager
By creating new Reel in Reel Manager and new playlist in Playlist Manager section, this remains permanent, provides you with all the possible options and you can always access this at any point in the future, even export it to new domain or similar.
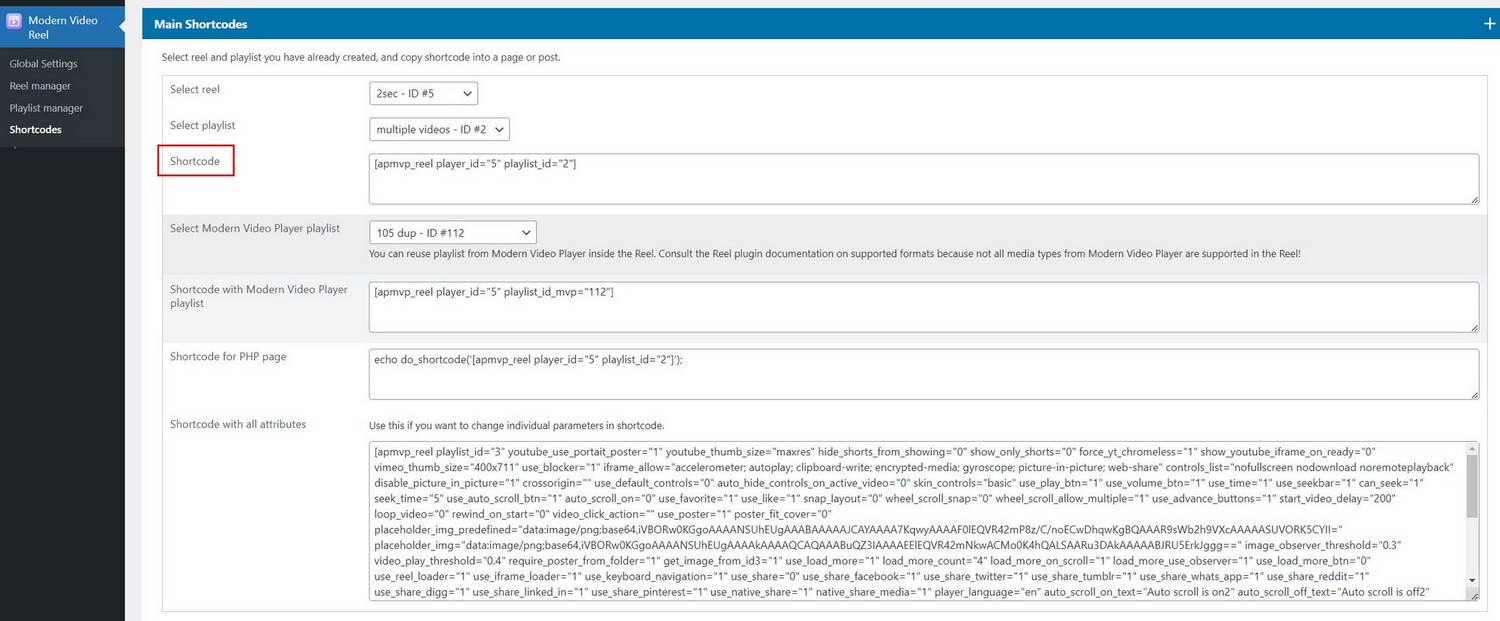
Once you have created new Reel and playlist, Go to Shortcodes plugin menu and get shortcode (choose reel and playlist for your shortcode):
HTML video
Displaying video in Reel (mp4)
Using mp4 videos in preferred in Reel because they will load the fastest (unlike Youtube and Vimeo which require communication with Youtube and Vimeo server before playing therefore taking longer to start).
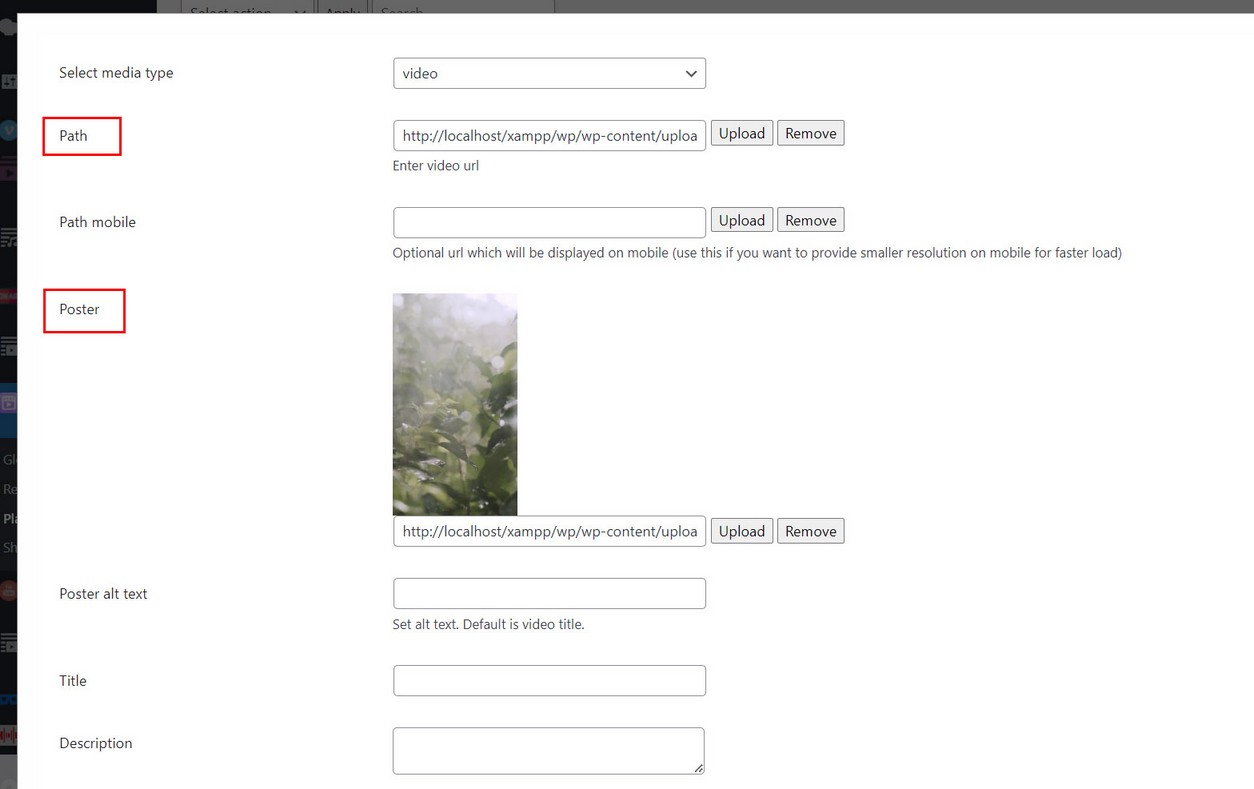
Add videos to Reel items in Edit Playlist / Add media dialog:
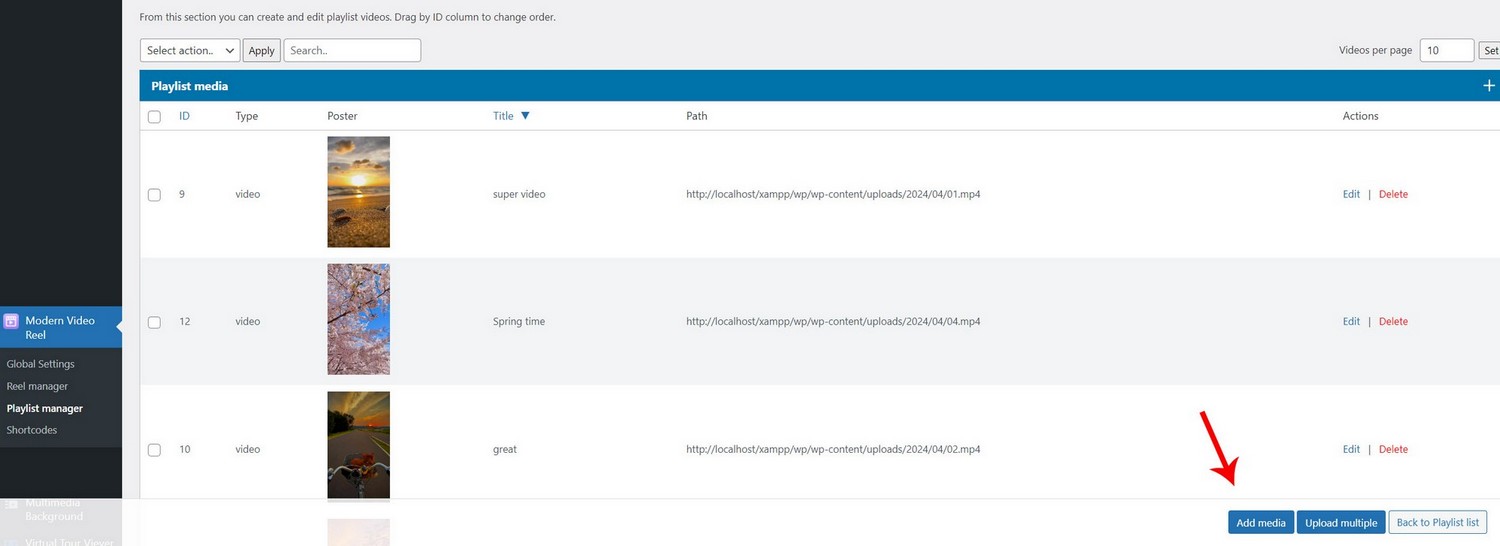
You can also upload multiple videos as once.
Adding image poster is recommended when using videos in Reel items. Poster serves multiple purpose, keeping aspect ratio until video loads, and faster loading since only image is loaded on start instead of video.
Trouble playing videos?
If your videos have trouble playing on some browsers or devices, it is most likely a video encryption problem.
We suggest using following video encoder for encodiong your videos:
https://handbrake.fr/How to load single video from Google Drive?
If you want to use single video (or audio) files from Google Drive, use the following method:
Go to Disc – My drive:

https://drive.google.com/drive/my-drive
right click on audio, Get shareable link and you get something like this:

https://drive.google.com/open?id=0ByzcNpNrQNpWZUlJVjZQVHoxWnM

use that audio ID to create google drive video URL:

https://www.googleapis.com/drive/v3/files/VIDEO_ID?alt=media

This is final URL how google drive audio URL should look:

https://www.googleapis.com/drive/v3/files/0ByzcNpNrQNpWZUlJVjZQVHoxWnM?alt=media – use this link in player as type video and data-path url:

 <div class="mvp-playlist-item" data-type="audio" data-path="https://www.googleapis.com/drive/v3/files/0ByzcNpNrQNpWZUlJVjZQVHoxWnM?alt=media"></div>

You can append you Google Drive api key as well if you are trying to play large files:

https://www.googleapis.com/drive/v3/files/0ByzcNpNrQNpWZUlJVjZQVHoxWnM?alt=media&key=YOUR_API_KEY

Use this url in Reel as type video.
How to load single video from One Drive?
If you want to use single files from One Drive, use the following method:
Right click on the file - Embed and copy link, you will get something like this:

<iframe src="https://onedrive.live.com/embed?cid=A237237B1FB33CFF&resid=A237237B1FB33CFF%21108&authkey=AB0A6YtJz9Bn7BA" width="320" height="133" frameborder="0" scrolling="no" allowfullscreen></iframe>

Use just the src part:

https://onedrive.live.com/embed?cid=A237237B1FB33CFF&resid=A237237B1FB33CFF%21108&authkey=AB0A6YtJz9Bn7BA

and replace 'embed' with 'download'

so you end up with:

https://onedrive.live.com/download?cid=A237237B1FB33CFF&resid=A237237B1FB33CFF%21108&authkey=AB0A6YtJz9Bn7BA

Use this url in Reel as type video.
HTML audio
Displaying audio in Reel (mp3, wav...)
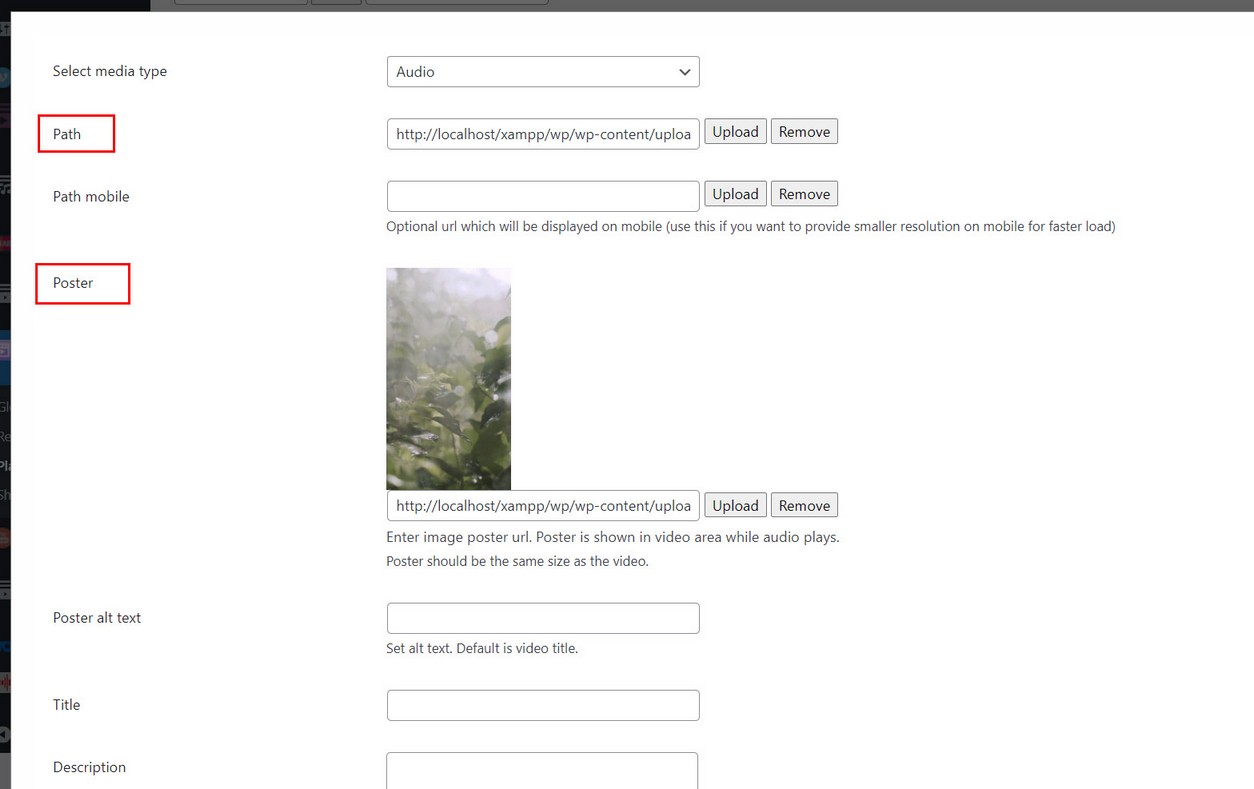
Add audio to Reel items in Edit Playlist / Add media dialog:
You can also upload multiple audios as once.
Display poster while audio plays
You should also provide poster image which is shown in video area while audio plays.
Image
Displaying images in Reel
Add image to Reel items in Edit Playlist / Add media dialog:
You can also upload multiple images as once.
Youtube
Youtube supports single videos, playlist, channel.
Youtube requires API key which needs to be entered in Global Settings / Credentails section:
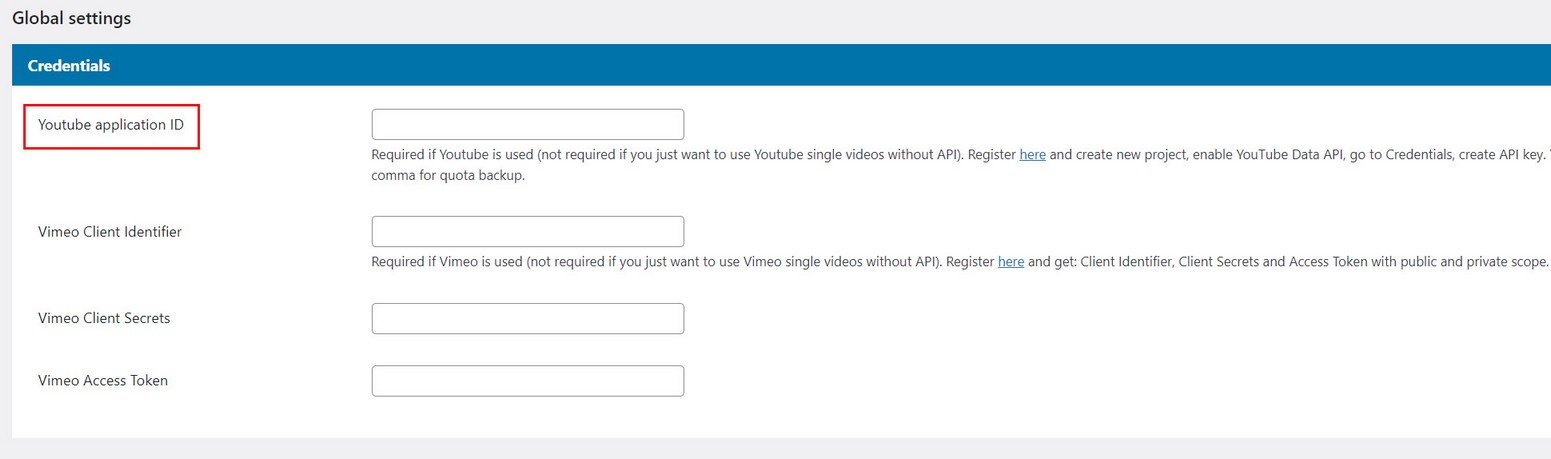
Go here for the API key: https://console.developers.google.com and create new project, enable YouTube Data API, go to Credentials, create Browser key and enter API key.
Tutorial on how to create Youtube API key: Get youtube api key
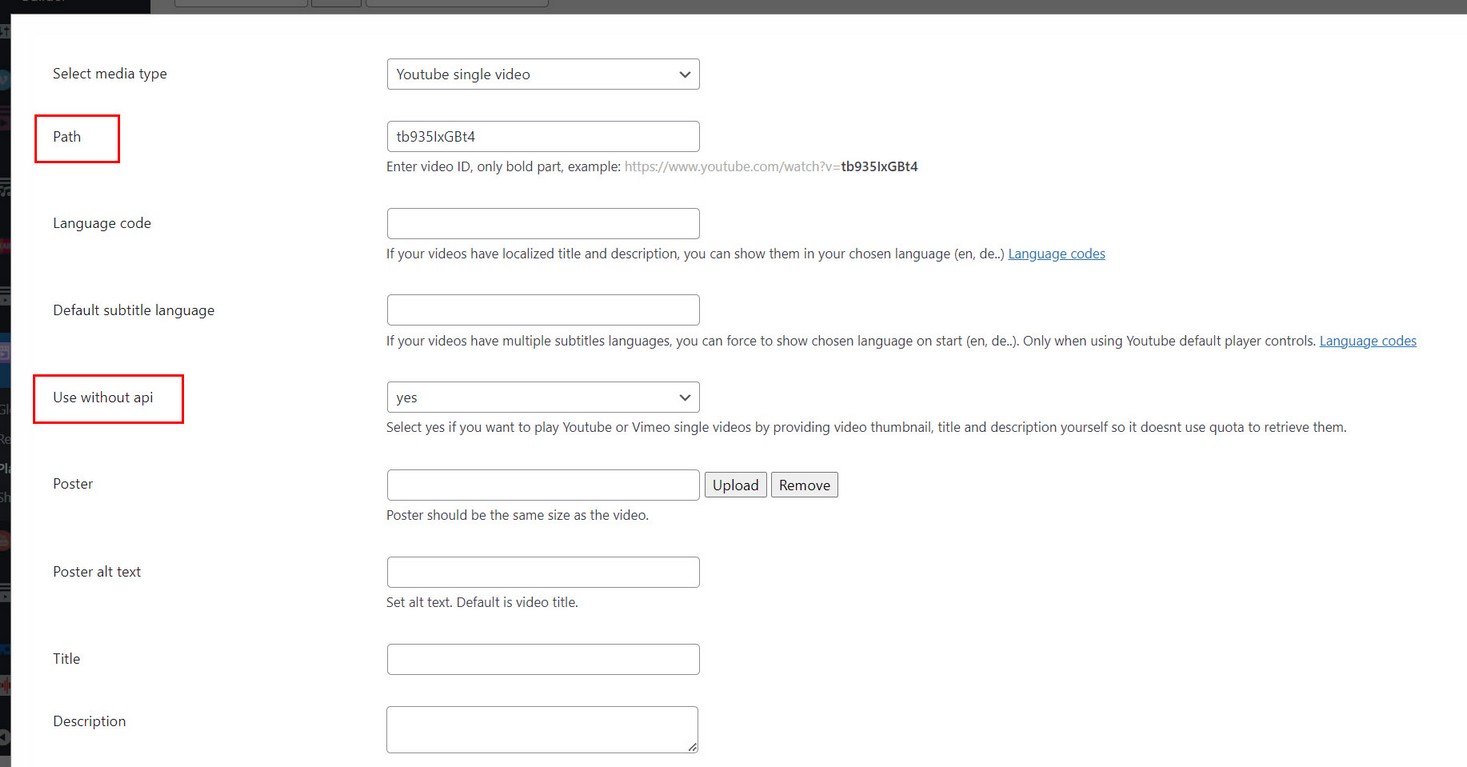
Using Youtube without API key
API key is not needed if you are going to use only Youtube single videos which you can load without the need for API.
When adding videos in playlist, set Use without api option. You can provide image poster, video title and optional description yourself.
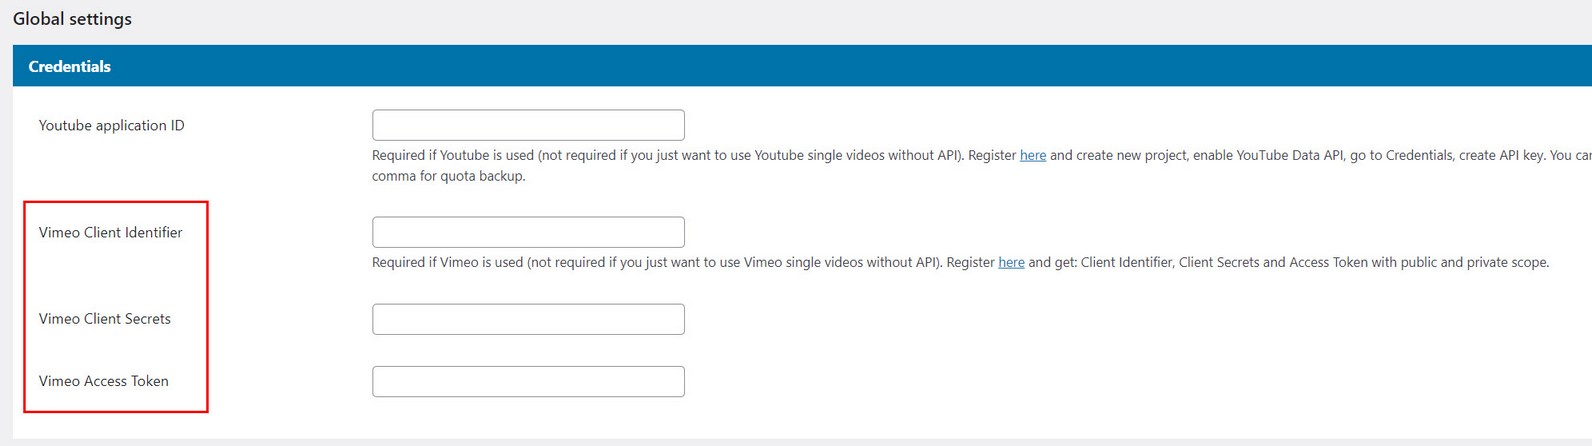
Vimeo
Vimeo supports single videos, group, channel, album (showcase), ondemand (collection), folder videos.
1. Vimeo requires API key, register new application: https://developer.vimeo.com/apps/new

3. Generate Access Token with Public and Private scope (copy token immediately while its still visible!).
4. Get Token
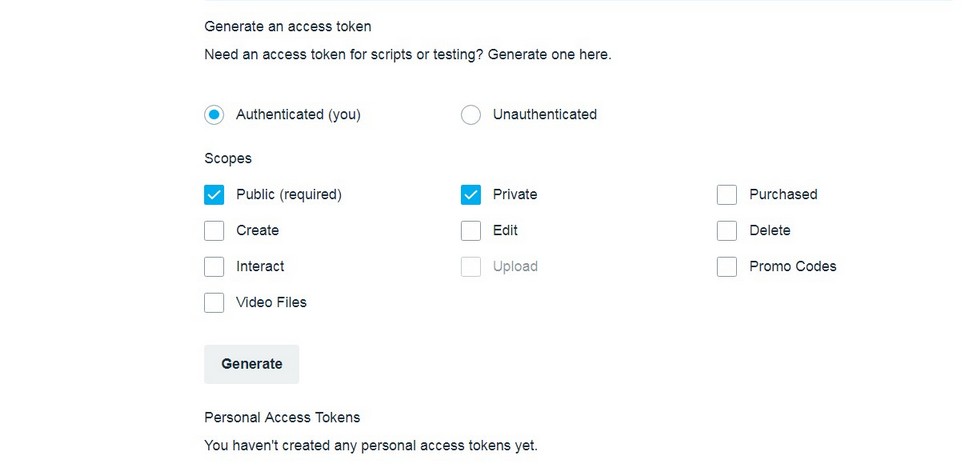
Enter Client Identifier, Client Secret and Access Token in Settings section:
Using Vimeo without API keys
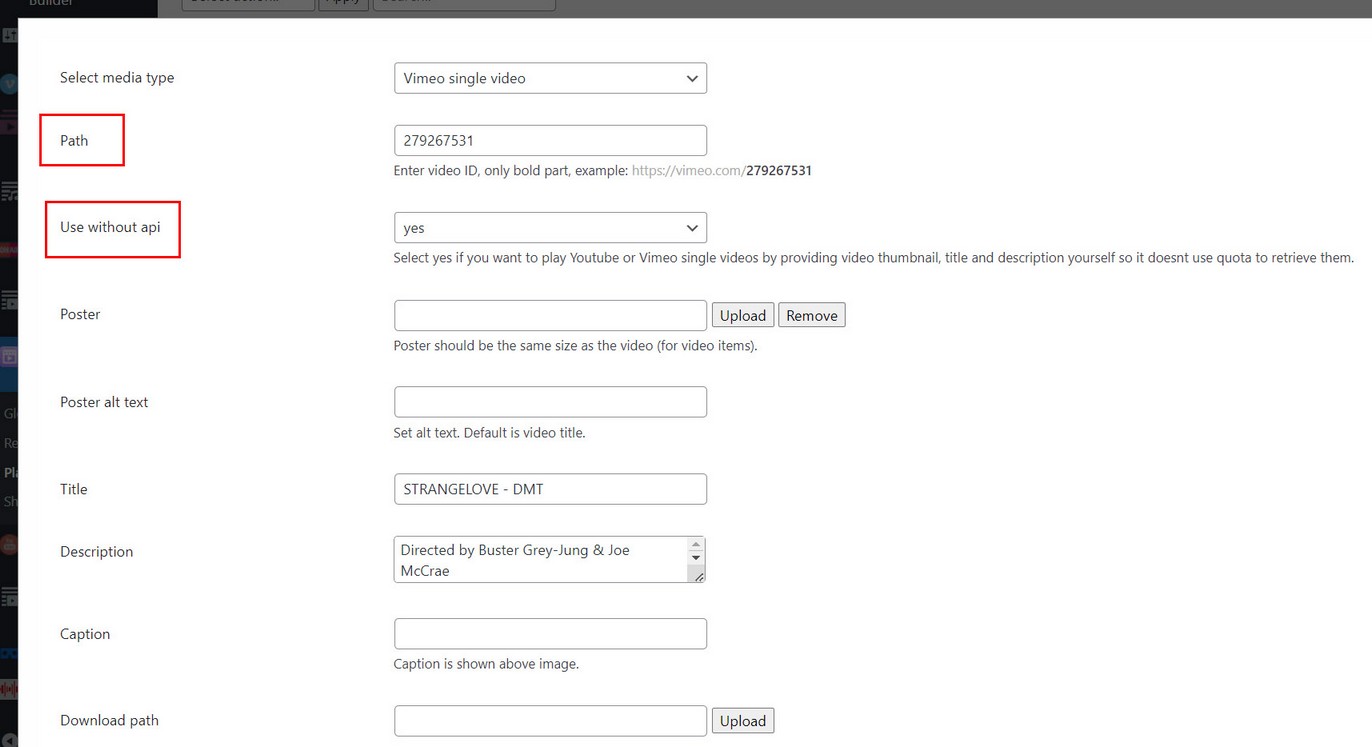
API key is not needed if you are going to use only Vimeo single videos which you can load without the need for API.
When adding videos in playlist, set Use without api option. You can provide image poster, video title and optional description yourself.
Reading files from directories
Creating Reel from folder of files
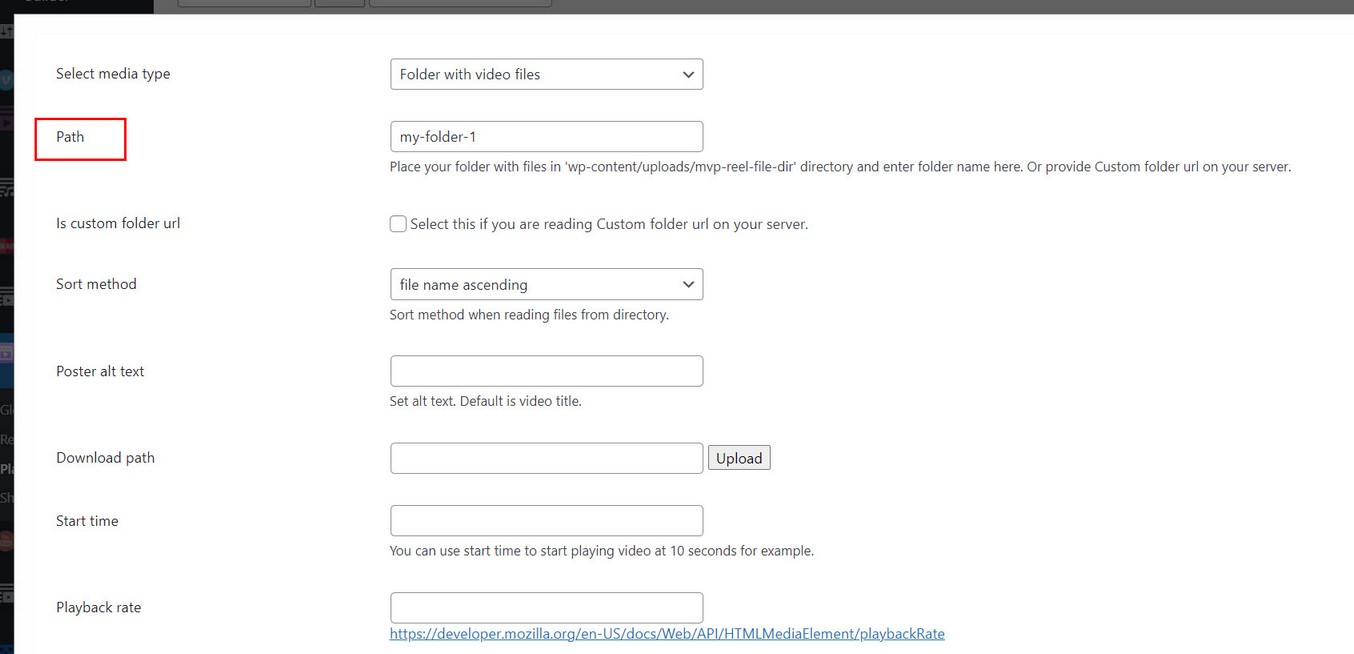
You can upload folder of videos (audio or images) located in WordPress uploads directory or folder on some custom location your server.
1. Read folder in WordPress uploads directory
Plugin creates wp-content/uploads/mvp-reel-file-dir folder inside WordPress uploads directory which will be used for reading video files.
Place folder in wp-content/uploads/mvp-reel-file-dir directory and enter folder name in field:
2. Read folder in custom directory on server
Place folder on some custom location your server and enter full url to your folder:
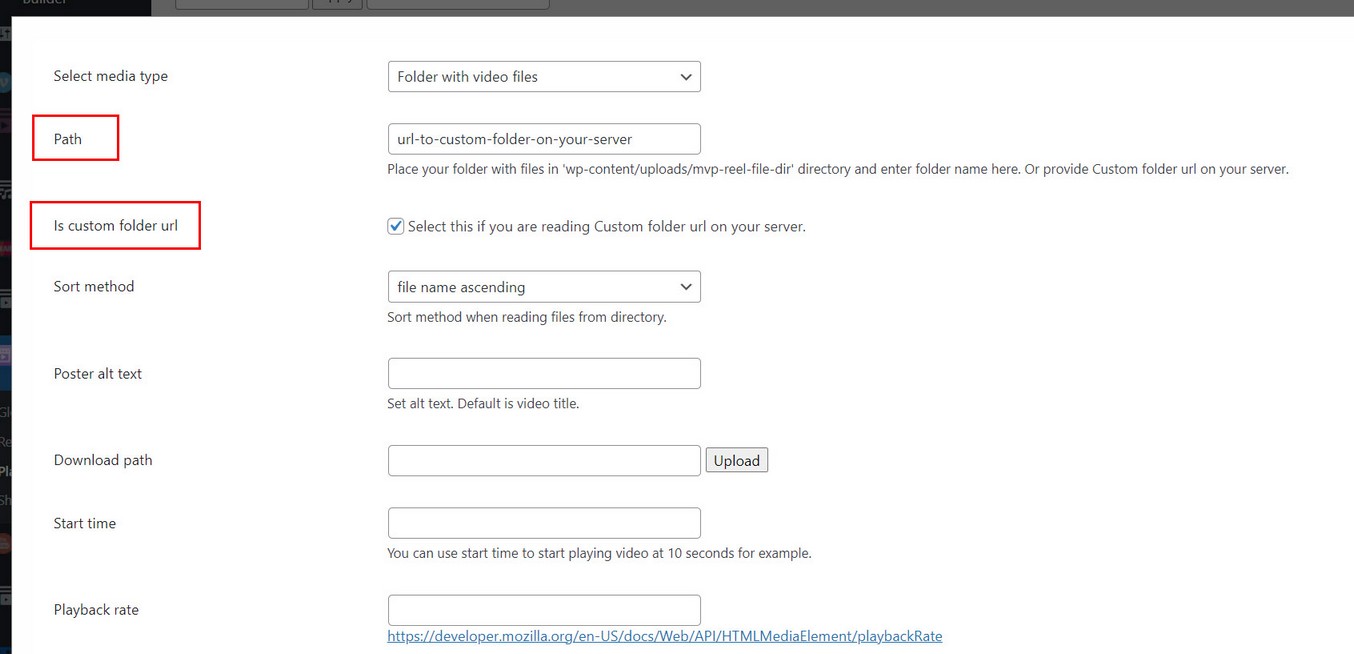
To get full url to your folder you can use locate_directory.php file located in (documentation / misc directory in plugin package). Copy this file to your custom directory, and open it in browser. You will get full url which you then enter in field.
Reading video files from folders
Required folder organization needs to look like this:
video folder
    -- video1.mp4
    -- video2.mp4
    -- video3.mp4

    poster folder (optional)
        -- video1.jpg
        -- video2.jpg
        -- video3.jpg
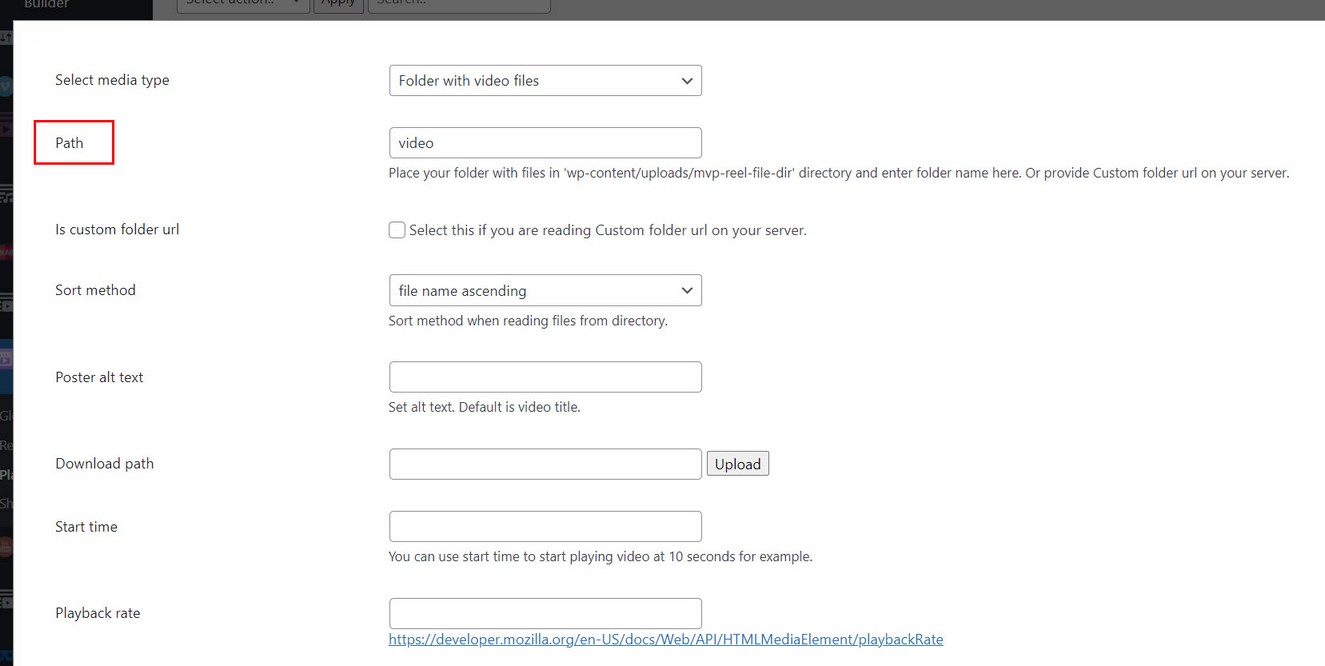
We have main folder (called "video" in our example, this can be named anyhow). Inside "video" folder are videos, poster directory (optional). Inside "poster" directory poster files are located.
Note: Equivalent video and poster file names need to be the same!
Put your "video" folder inside wp-content/uploads/mvp-reel-file-dir folder and enter "video" inside Playlist manager / Add media dialog:
Poster images are optional and can be customized in Reel manager / General tab / Folder section:

Using poster is recommended with video files. Make sure videos and poster images are the same dimensions.
Rules:
Supported extension for video files is mp4.
Supported extension for poster images is jpg.
Reading audio files from folders
Required folder organization needs to look like this:
audio folder
    -- audio1.mp4
    -- audio2.mp4
    -- audio3.mp4

    poster folder (optional)
        -- audio1.jpg
        -- audio2.jpg
        -- audio3.jpg
We have main folder (called "audio" in our example, this can be called anyhow). Inside "audio" folder are audio files, poster directory. Inside "poster" directory poster files are located.
Note: Equivalent audio and poster file names need to be the same!
Put your "audio" folder inside wp-content/uploads/mvp-reel-file-dir folder and enter "audio" inside Playlist manager / Add media dialog:
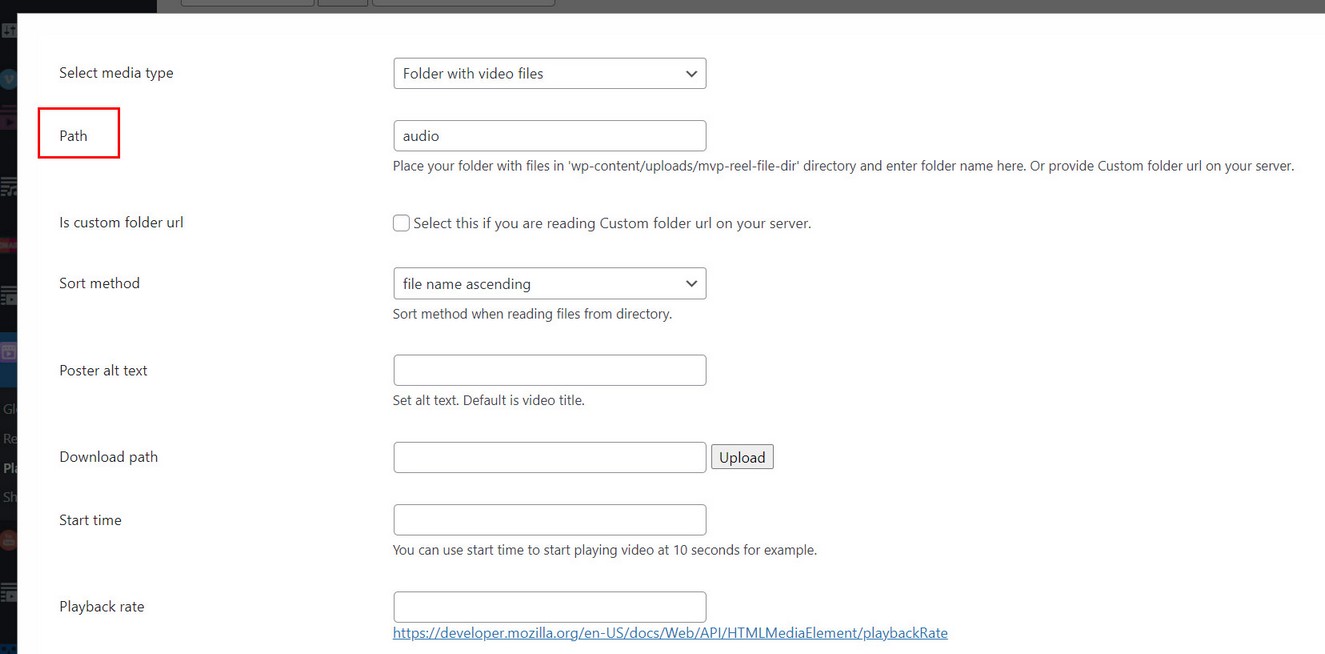
Poster images can be customized in Reel manager / General tab / Folder section:
Rules:
Supported extension for audio files is mp3, wav, aac, flac.
Supported extension for poster images is jpg.
Reading image files from folders
Required folder organization needs to look like this:
image folder
    -- image1.jpg
    -- image2.jpg
    -- image3.jpg
We have main folder (called "image" in our example, this can be called anyhow). Inside "image" folder are images.
Put your "image" folder inside wp-content/uploads/mvp-reel-file-dir folder and enter "image" inside Playlist manager / Add media dialog:
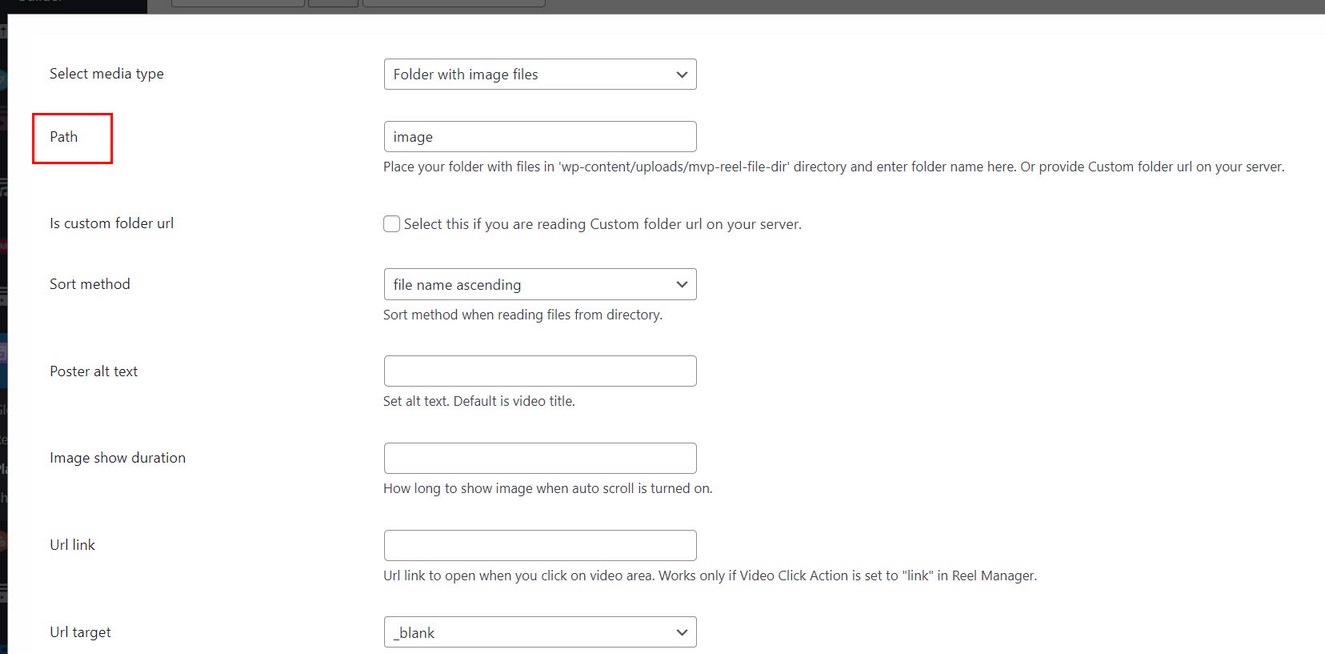
Rules:
Supported extension for image files is jpg, jpeg, png, gif, webp, avif.
Available settings for folders
requirePosterFromFolder - true / false. When loading folder playlist, whether to get poster for each video. Requires poster image files present in folder directory for each video. Its recommended to use poster for reel items.

getImageFromId3 - true / false. When loading folder playlist of audio files and reading ID3 tags, whether to get audio cover image for poster. Requires cover image set for audio files in ID3 metadata. Tends to slow down loading on start, especially if cover image is large in size. Better is to provide normal images instead and use Require Poster From Folder option above.
Live Streaming
Live Streaming is available ONLY with Live Streaming addon
Supported are Apple HLS and MPEG DASH live streams.
Displaying HLS or DASH items in Reel
HLS stream requires link to m3u8 file (for example https://bitdash-a.akamaihd.net/content/sintel/hls/playlist.m3u8 )
DASH stream requires link to mpd file (for example https://dash.akamaized.net/akamai/test/caption_test/ElephantsDream/elephants_dream_480p_heaac5_1_https.mpd)
Add HLS stream to Reel items in Edit Playlist / Add media dialog:

Individual link to HLS can be added to both vertical and horizontal media items in Reel.
Adding image poster is always recommended when using videos in Reel items. Poster serves multiple purpose, keeping aspect ratio until video loads, and faster loading since only image is loaded on start instead of video.

Loading folder of HLS or DASH media in Reel
You can load whole folder of HLS and DASH media inside the Reel. Folder can be displayed on vertical level (each item in folder will become one item in Reel).
Required folder organization needs to look like this:
hls folder

    01 folder
        01.m3u8
        ts files..
        poster folder (optional)
            01.jpg

    02 folder
        02.m3u8
        ts files..
        poster folder (optional)
            02.jpg

    03 folder
        03.m3u8
        ts files..
        poster folder (optional)
            03.jpg
We have main folder (called "hls" in our example, this can be called anyhow). Inside "hls" folder are folders, each folder is a hls video and it contains M3U8 file and all the TS files, and poster folder. Inside "poster" directory poster file is located.
Notes: this 01, 02 etc in our example is just the name of the videos. This can be named anyhow, for example:
hls folder

    super_video folder
        super_video.m3u8
        ts files..
        poster folder (optional)
            super_video.jpg

    summer_vacation folder
        summer_vacation.m3u8
        ts files..
        poster folder (optional)
            summer_vacation.jpg

    my_sister_wedding folder
        my_sister_wedding.m3u8
        ts files..
        poster folder (optional)
            my_sister_wedding.jpg
Also note that m3u8 and poster file are named the same!
Put your "hls" folder inside wp-content/uploads/mvp-reel-file-dir folder and enter "hls" inside Playlist manager / Add media dialog:
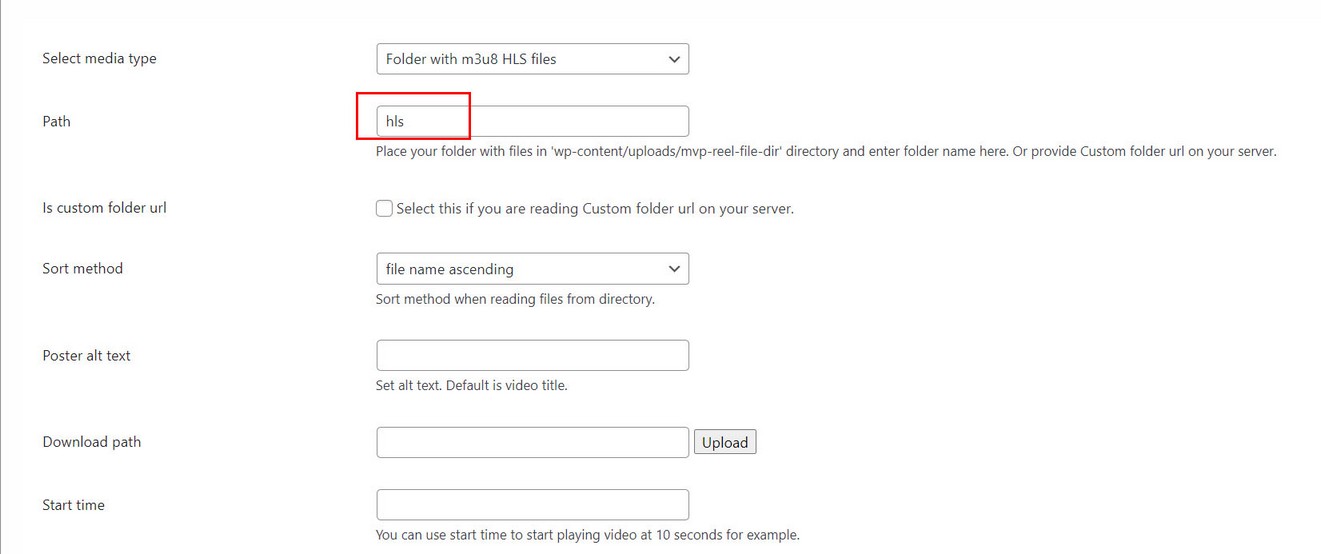
Poster images are optional and can be customized in Reel manager / General tab / Folder section:
Using poster is recommended with video files. Make sure videos and poster images are the same dimensions.
Rules:
Supported extension for poster images is jpg.
Additional settings
Hls
You can pass your own config parameters to hls in Reel Manager / Edit Reel / General tab / Live Streaming section:

For example:
hlsConfig:{
    maxFragLookUpTolerance: 0.25,
    liveSyncDurationCount: 3,
    liveMaxLatencyDurationCount: Infinity
}
Dash
You can pass your own config parameters to dash
For example:
dashConfig:{
    'streaming': {
        'stableBufferTime': stableBuffer,
        'bufferTimeAtTopQualityLongForm': bufferAtTopQuality,
        'abr': {
            'minBitrate': {
                'video': minBitrate
            },
            'maxBitrate': {
                'video': maxBitrate
            },
            'limitBitrateByPortal': limitByPortal
        }
    }
}
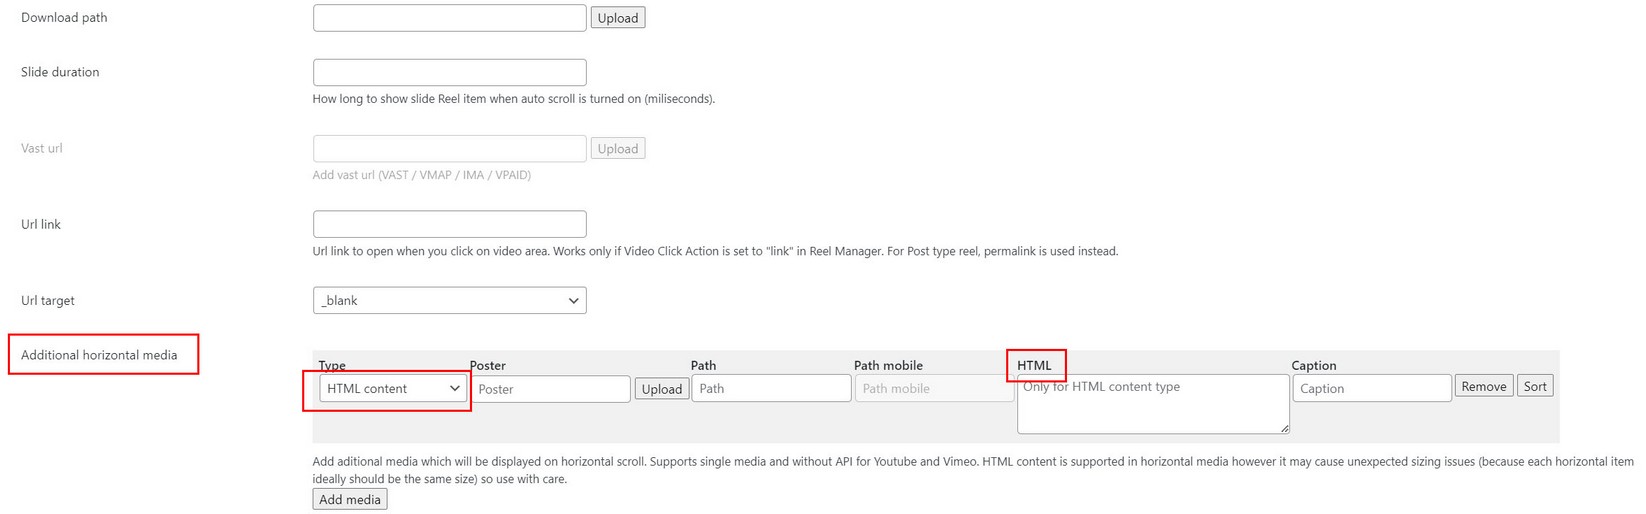
HTML content
Displaying custom HTML content in Reel
Add HTML content to Reel items in Edit Playlist / Add media dialog:
Select HTML content type and use either Path or HTML field:
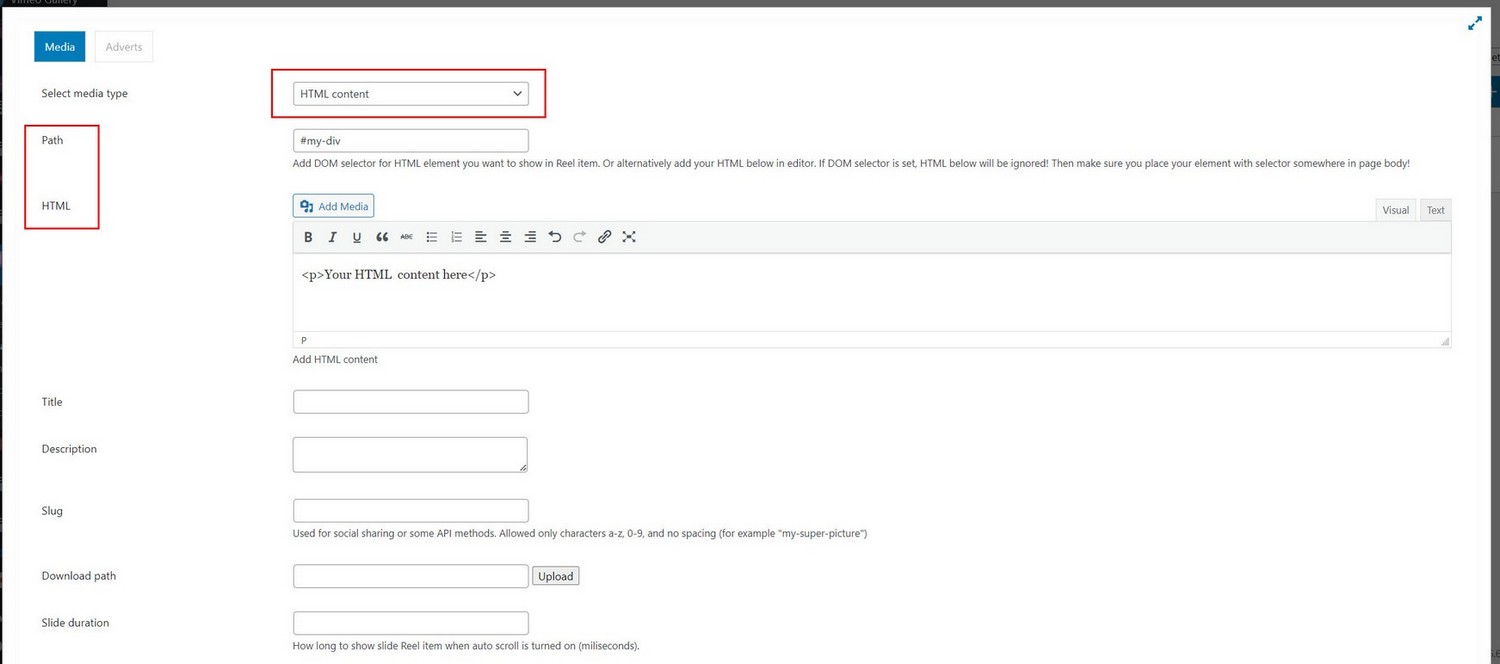
Use either Path or HTML field:
1. If you use Path field, then enter DOM selector to the element you want to show in Reel, for example "#my-div" or ".some-element",
This element (with DOM selector) needs to be present in page BODY where the shortcode for the Reel is located! Plugin will take this element and place it inside Reel item.
2. If you use HTML content field instead, then enter your HTML manually in editor.
HTML content in Horizontal Reel items
HTML content does work in Horizontal reel items however it may cause unexpected sizing issues (because each horizontal item ideally should be the same size) so use with care.
HTML content with Quick Shortcode Generator
Adding HTML content with quick shortcode generator is not supported. Using HTML content does require you to create a playlist in Playlist manager and add Reel items there.
Post type reel
Creating Reel from WordPress posts
Reel can be created from WordPress posts that contain featured image and embedded media. Featured image will become a image poster, and embedded media will become video in Reel. Each post will become one vertical item in Reel.
Supported embedded media are HTML video and audio, Youtube single video and Vimeo single video.
For best Reel experience, featured image and embeded video should be the same size. For more details see poster section.
Notes
If you have multiple embedded media in the post, Reel can only take single media from it.
If post does not contain embeded media, Featured image will still be used as Reel item (without having video).
Creating Reel from post with taxonomy
In Edit Playlist, Add media dialog under Post to display select type Post:

Creating Reel from specific posts
In Edit Playlist, Add media dialog under Post to display select type Specific Post:

Horizontal reel items
Showing horizontal items in Reel (inner media)
Default vertical items in reel can also have horizontal items inside (which are accessed by scrolling horizontally). To create such structure use the following format.
Horizontal items can be set in Playlist manager / Edit playlist / Add media dialog:

Add media dialog:

Settings available for Horizontal inner scroll
In Reel manager / Edit Reel / General tab:
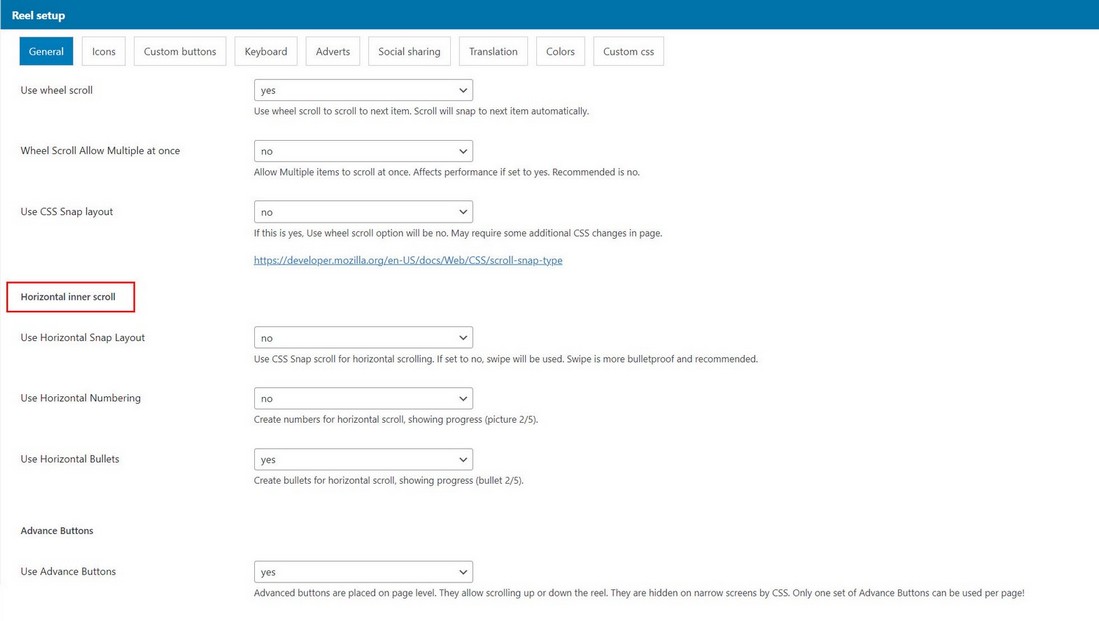
Notes
When Youtube and Vimeo single videos are used as horizontal media, no api key is required.
Video poster
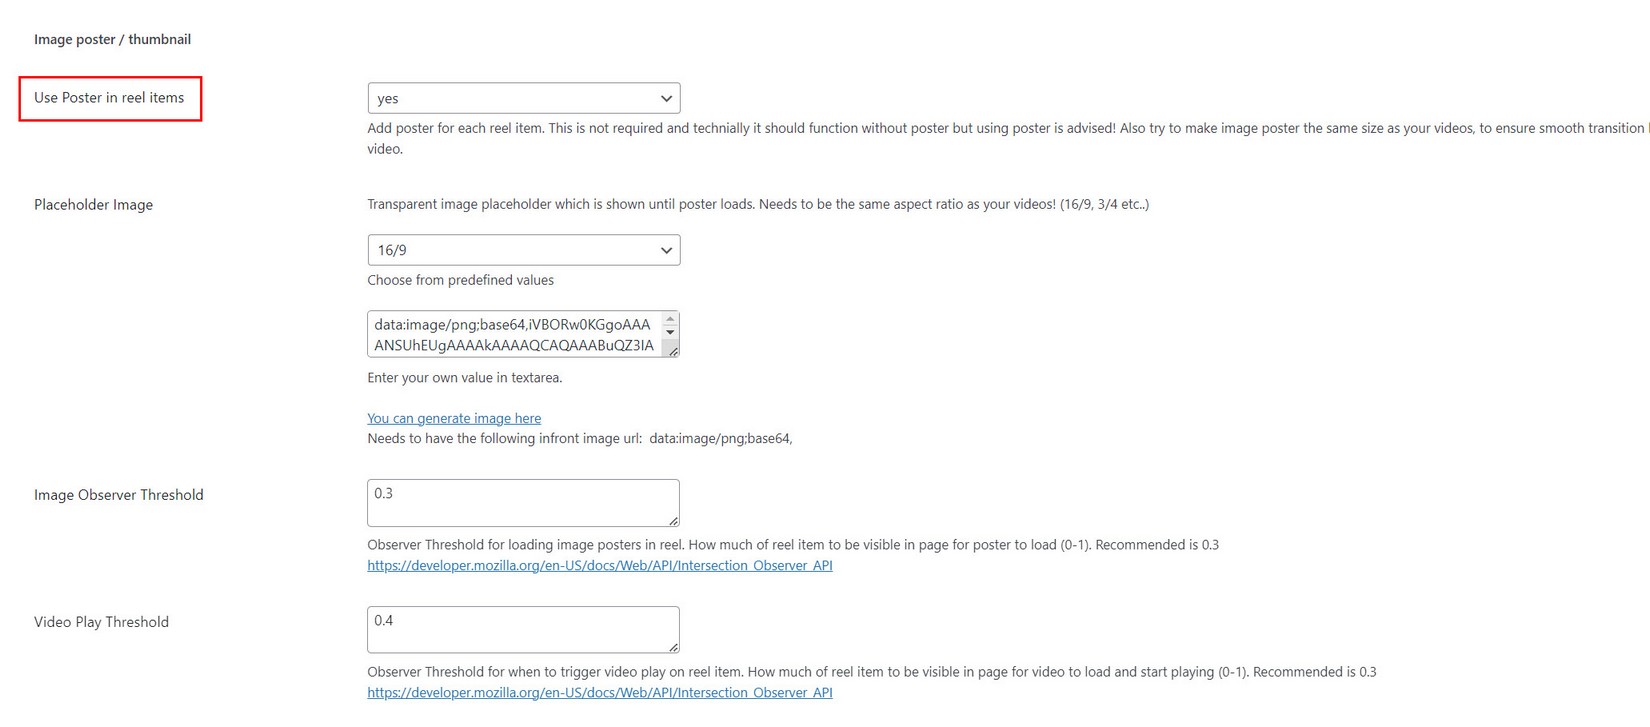
Although it is possible to have videos in Reel without image poster, its recommended to use image poster for each video. What is important that image poster and video have the same size (for example both are 400x711px or 6/19). Otherwise it can casue unexpected results in the Reel.
This can be controlled in Edit Reel / General section / Image poster section.
Poster with HTML video
For normal video (mp4) you can provide image poster yourself. To make sure it is the same size its best to take a screen capture from the video itself.
Poster with Youtube and Vimeo videos
For Youtube and Vimeo single videos you can provide image poster yourself, but it can also be retrieved using API. There are some limitations. Youtube for example does not have vertical (portrait) poster images, only landscape.
There is an option to create portrait poster image for Youtube, however this is experimental feature:
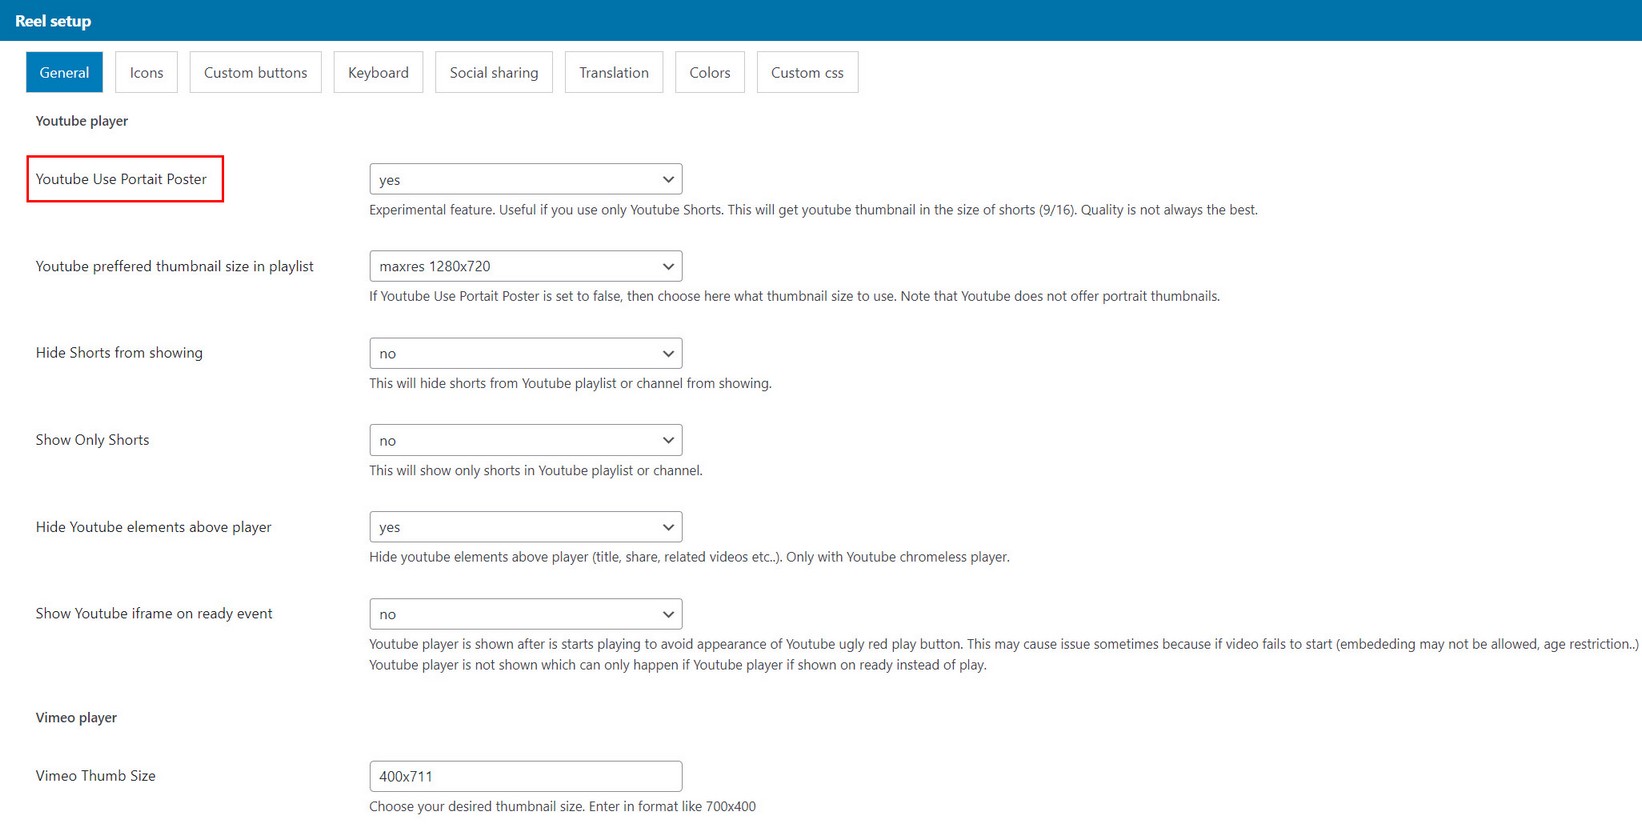
For Vimeo, you can specify some general poster dimensions suitable for your needs:

Media keywords
Adding keywords to reel items
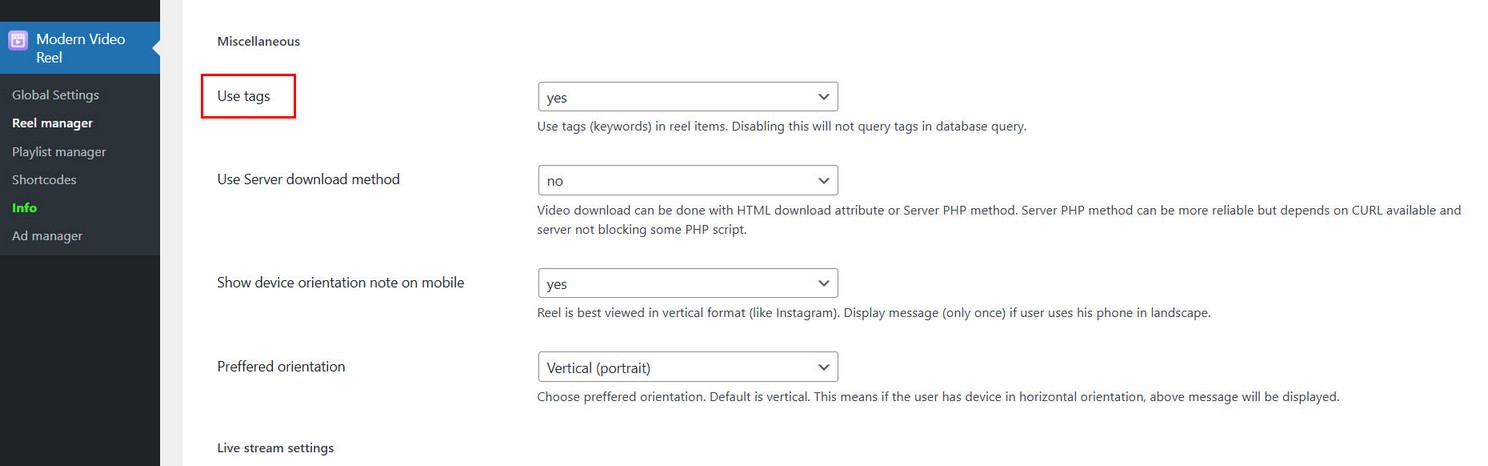
Keywords can be used to describe reel items. They are also used in search field.
Add keywords to Reel item in Playlist manager / Edit playlist / Add Media Dialog

If you dont use tags, you can deativate this option in Reel manager / Edit Reel / Miscellaneous section which will exclude tags from database queries.
Sorting videos in playlist
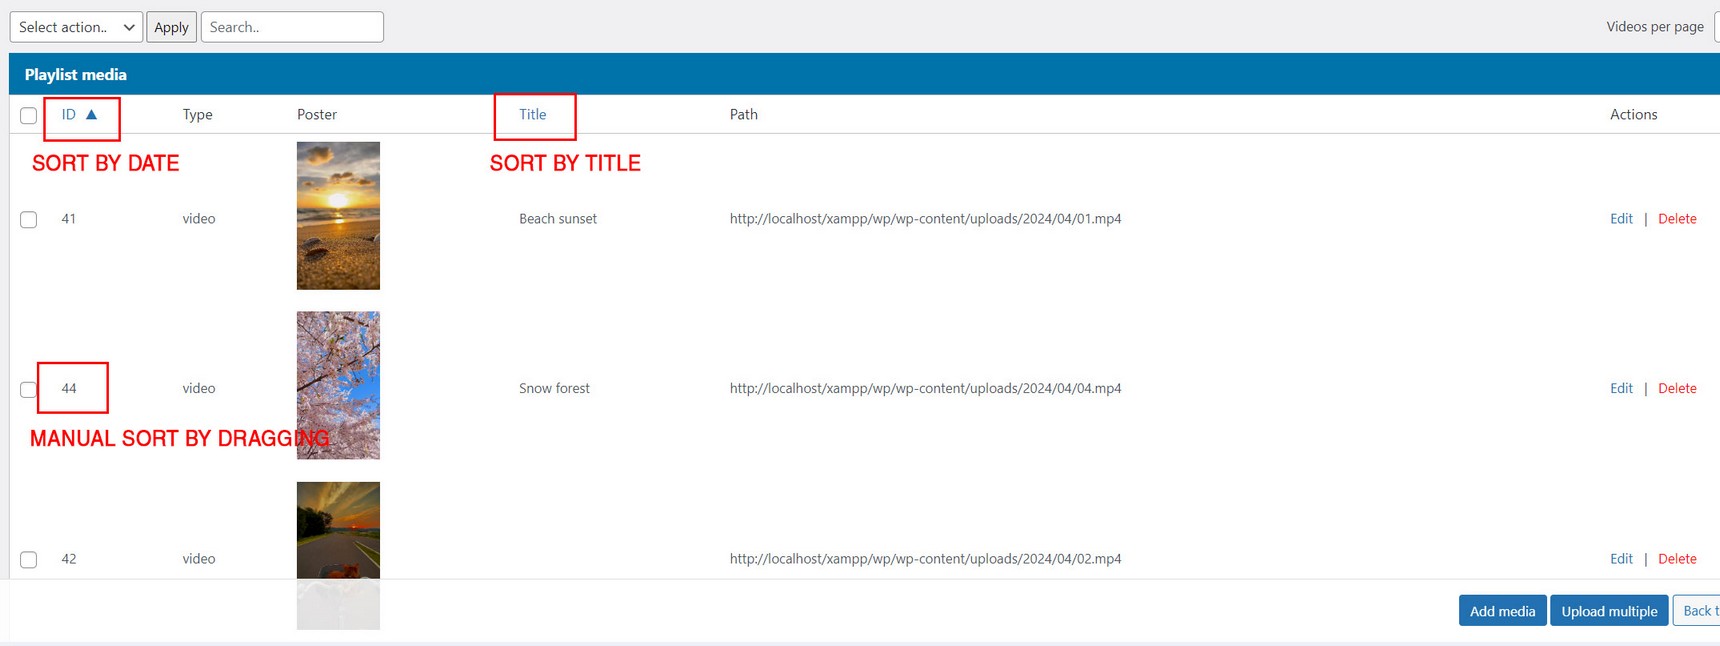
How to change video order in playlist?
Changing the order in which videos appear in the reel.
You can order videos by ID column (which equals order when video was added to the playlist), or manually dragging by ID column to change individual video order, or by title column to order videos by title.
Shuffle videos in playlist
How to randomize video order in playlist?
You can shuffle reel items in Playlist manager / Edit Playlist / Plalyist options.
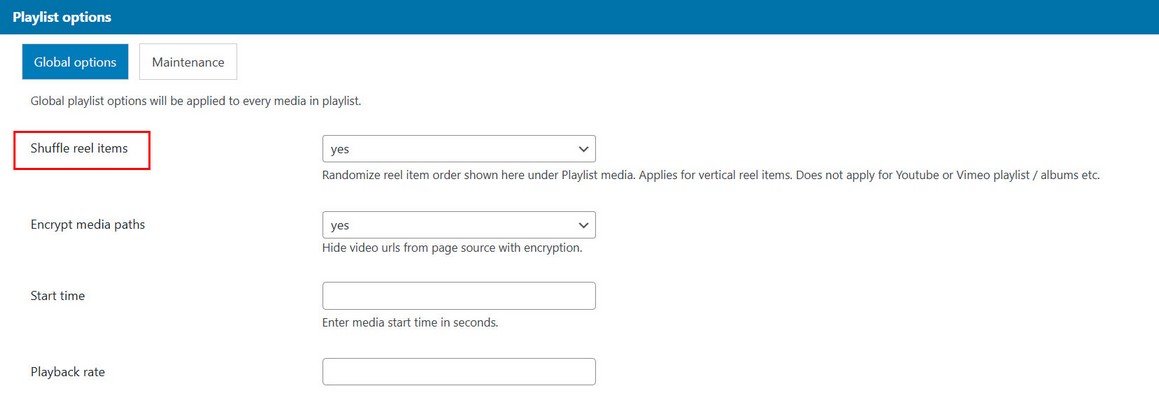
This will shuffle the order of items in Playlist media.
Shuffle folder media
If you have media type folder (video, audio or image) you can shuffle them in Playlist manager / Edit Playlist / Add media dialog using Sort method.

Notes
Shuffle does not apply to other mixed media type inside the playlist like Youtube playlist or Vimeo Album.
Playlist autoload
You can choose multiple playlists in Shortcode manager like so

[apmvp_reel player_id="1" playlist_id="1,2,3" playlist_auto_load="1" playlist_auto_load_shuffle="1"]
playlist_auto_load will show first playlist in reel on start, then when user scrolls to the bottom of the reel, next playlist will be loaded (appended) to reel end.
playlist_auto_load_shuffle will shuffle these playlists in which order they appear (including the first one).
Playlist structure
Note: this can be applied to any media type (single videos and grouped media like Youtube playlist or folder of videos for example).
If you use grouped source in playlist (Youtube playlist for example), then make sure you only have one grouped source per playlist in Playlist manager!
Example, there is only single Youtube playlist created in Playlist manager. Multiple are not supported when using playlist autoload feature.

If your playlist contains single videos, then there is no limit.
Auto scroll reel
Option to auto advance to next reel item automatically. Once the main video finished playing in the reel, it will continue to next reel item, if the autoscroll is turned on. For image type Reel items, you can set timer duration for how long you want item to be shown.
Set Auto scroll settings in Edit Reel / General tab / Controls section:

Notes:
This feature only applies to main video, not horizontal items in the reel. If the reel has horizontal items and we are scrolled in horizontal section, auto advance will not happen.
Autoscroll state is saved in browser so once set it will reflect last saved state in browser and changing this in settings will not have effect.
Snap scroll reel
How to achieve Snap scrolling feature like in following demo?
https://www.interactivepixel.net/env/mvp_reel/content/reel_snap.htmlActivate CSS Snap layout in Player manager / Edit Player / General tab section:
If you want to made this feature fullscreen like in following demo:
https://www.interactivepixel.net/env/mvp_reel/content/reel_snap_fs_contain.htmlUse the following CSS (copy to custom css section). Note this is the same CSS from mvp_reel.css file, its just that max-width: 5499px has been increased to something bigger to covers the full page. Also the object fit has been changed for video and poster (object-fit: contain)
@container mvp_reel_player_query (max-width: 5499px){

    .mvp-reel-info{
        left: 20px;
        margin: 0 80px 0 0;
        position: absolute;
        top: 20px;
        z-index: 4;
        color: #eee;
    }
    .mvp-reel-title{
        text-shadow: var(--mvp-reel-text-shadow);
    }
    .mvp-reel-icon-holder{
        position: absolute;
        right: 0;
    }
    a.mvp-reel-icon,
    button.mvp-reel-icon{
        background-color: transparent;
        color: #eee;
    }
    .mvp-reel-icon-title{
        color: #eee;
        margin: 0;
        text-shadow: var(--mvp-reel-text-shadow);
    }
    .mvp-reel-icon-wrap {
        margin-bottom: 5px;
    }
    .mvp-reel-icon-wrap .mvp-reel-icon{
        filter: var(--mvp-reel-icon-shadow);
    }
    .mvp-reel-menu-popup{
        left: auto;
        right:0;
    }
}

.mvp-reel-item .mvp-video,
.mvp-reel-snap-layout .mvp-reel-poster-img {
    object-fit: contain;
}
Keyboard navigation
Using keyboard navigation in reel
Adjust keyboard settings in Edit Reel / Keyboard tab:
Note that reel has to have focus for keyboard controls to work and keyboard only works when mouse is above the reel area.
Using fullscreen
When fullscreen button is used, setting fullscreen will make curent active Reel item to go fullscreen.
When Reel item is in fullscreen, the following is true
All advance controls are disabled (its not possible to advance to another Reel item in fullscreen)
Video size in fullscreen
When HTML video is in fullscreen, full video will be visible. You can alternate this feature with the following CSS. Does not apply to Youtube or Vimeo.
.mvp-reel-fs .mvp-video{
    object-fit: contain;
}
.mvp-reel-fs .mvp-video{
    object-fit: cover;
}
Advance buttons
Advance buttons enable navigating Reel using buttons up and down. Advance buttons are global and they are placed on the document level. This means only one set of buttons can exist in the page.
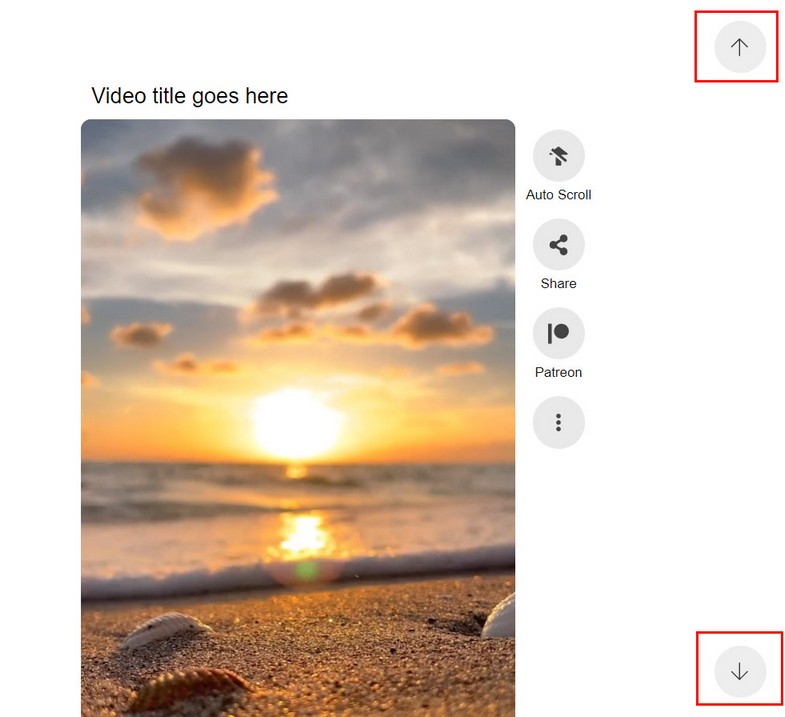
They can be activated in Edit Reel / General tab / Advance buttons section.
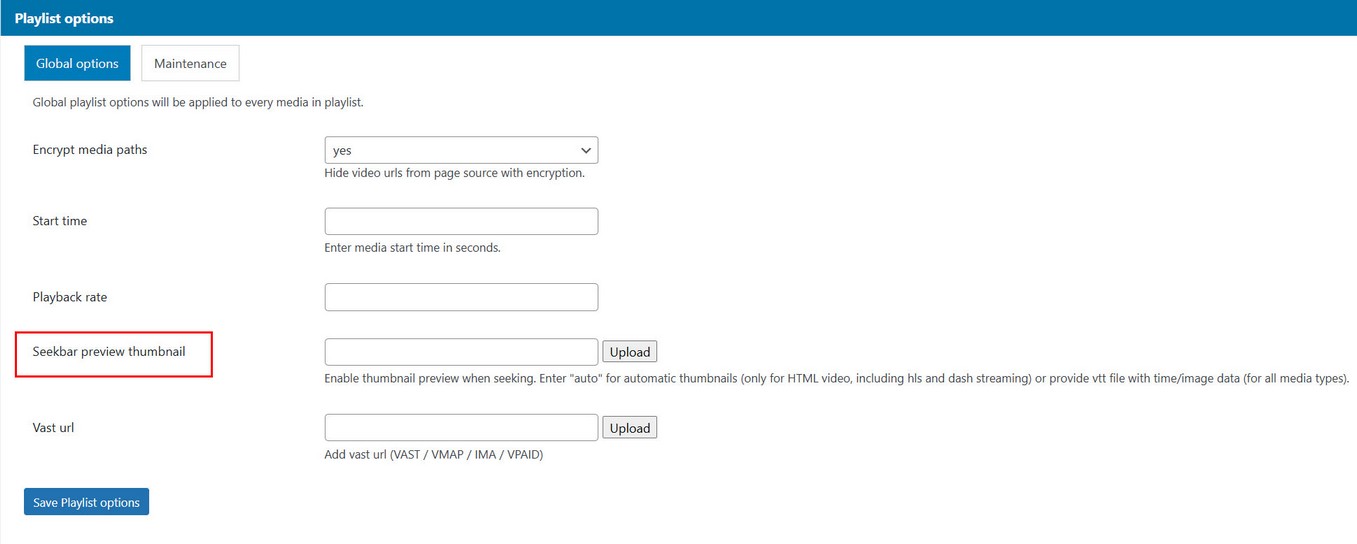
Preview seek
Show video preview when hovering progress seekbar
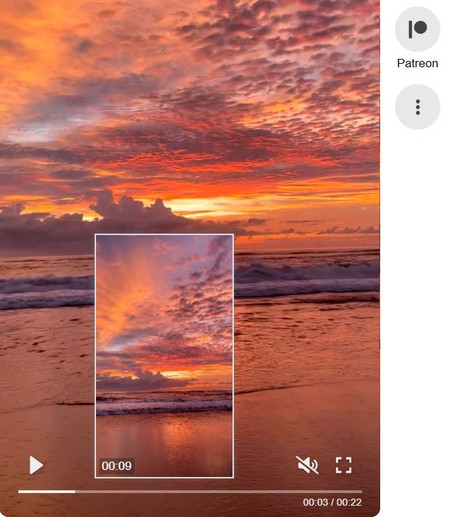
Rules
1. Preview seek only works with custom video controls
2. Preview seek can be type "auto" (only for media type video, including hls and dash streaming) or "url to vtt file" (for any media with duration).
How to use
1. Activate preview seek in Player manager / Edit Player / Controls section:

2. Add preview seek to videos in Playlist manager / Edit playlist / Add Media dialog:

If VTT is used, vtt file contains necessary data for preview seek. Example of vtt file located in Plugin package / documentation / misc / preview-seek directory.
preview seek examples (created with ffmpeg and ImageMagick)

Player supports Thumbnail Sprites; multiple thumbnails stitched together into a single image.

In the VTT file, the individual thumbnails can be identified by appending their coordinates to the thumbnail URL using a spatial Media Fragment, for example:

Player only supports pixel-based fragments, not percentage-based ones.

WEBVTT

00:00:00.000 --> 00:00:05.000
data/seek/01_seek.png#xywh=0,0,200,112

00:00:05.000 --> 00:00:10.000
data/seek/01_seek.png#xywh=0,112,200,112

00:00:10.000 --> 00:00:15.000
data/seek/01_seek.png#xywh=0,224,200,112


VTT files are subject to cross-domain security restrictions and therefore won't automatically load from another domain than the player.
Preview seek can also be added to all videos in playlist using globalPlaylistData
Song audio
Adding audio to Reel
Audio can be attached to each Reel item or globally to whole Reel playlist. Note: this is a song that just plays audio and is no related to any media type in Reel!
Enable song button in Reel and optionally show song title in Reel manager / Edit Reel/ General / Controls tab:
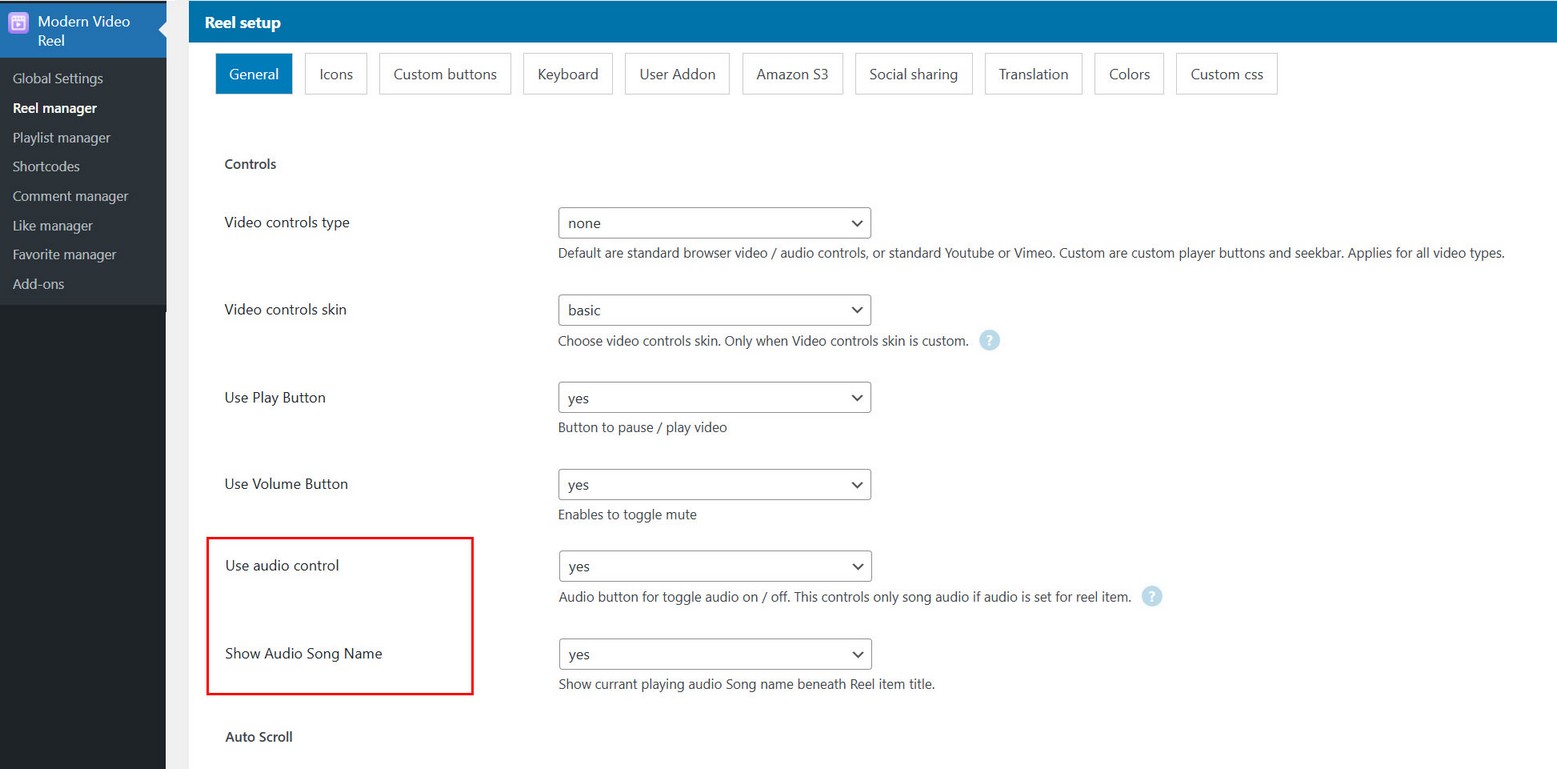
Global Reel audio
To set audio for all items in Reel go to Playlist manager / Edit Playlist/ Playlist Options tab:
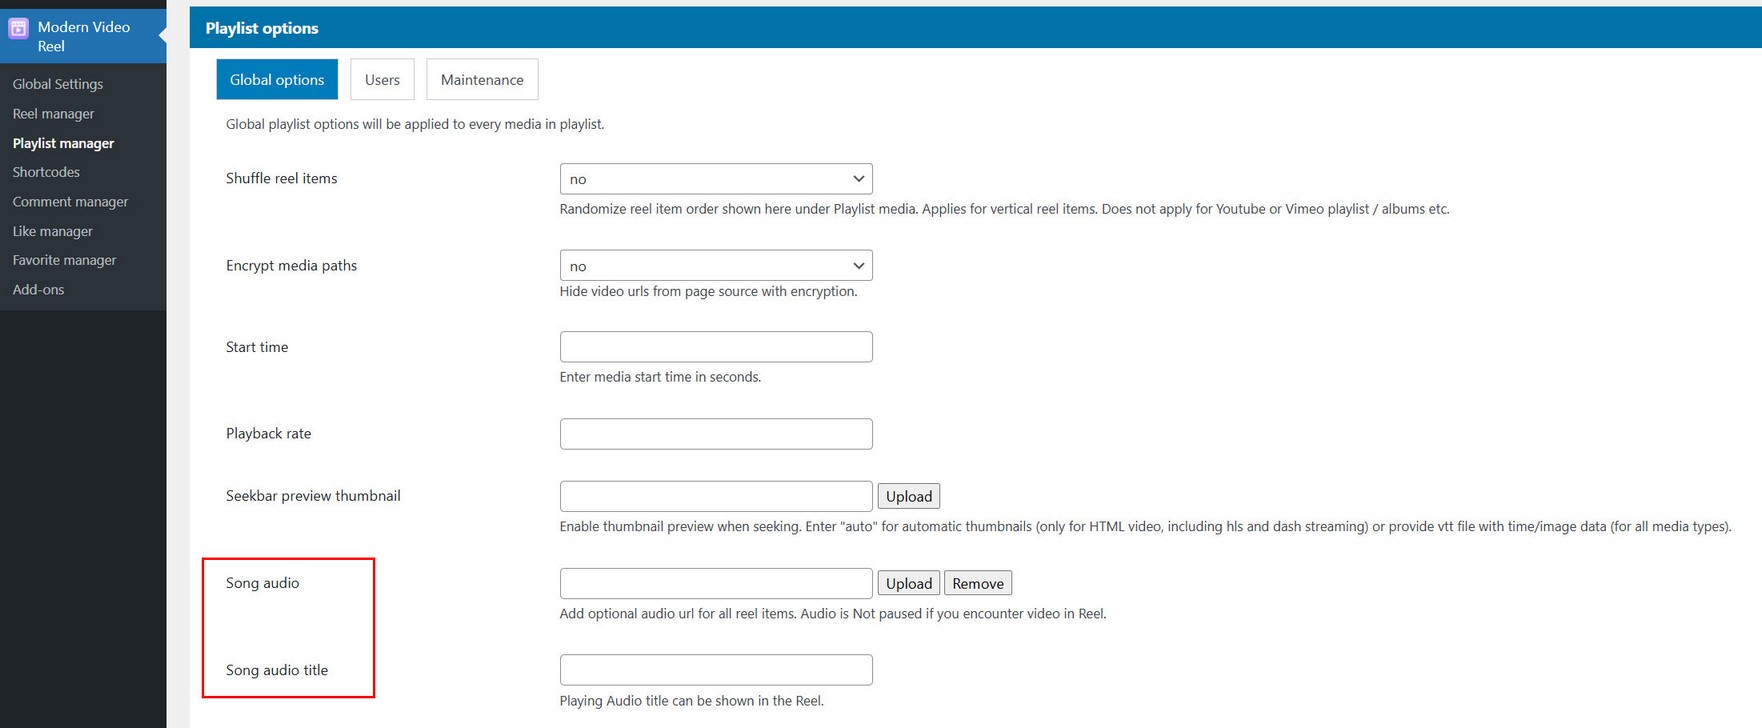
Individual Reel audio
To set audio for single Reel item go to Playlist manager / Edit Playlist / Add media dialog:

Note that if global audio is set per Playlist, this will overwrite individual, so you need to remove global song audio for individual to work.
Global playlist data
Some options for videos can be defined on global playlist level, which means these options will be applied to every video in playlist. These option will take precedence over options set when adding videos to playlist in Add media section.
Reel Icons
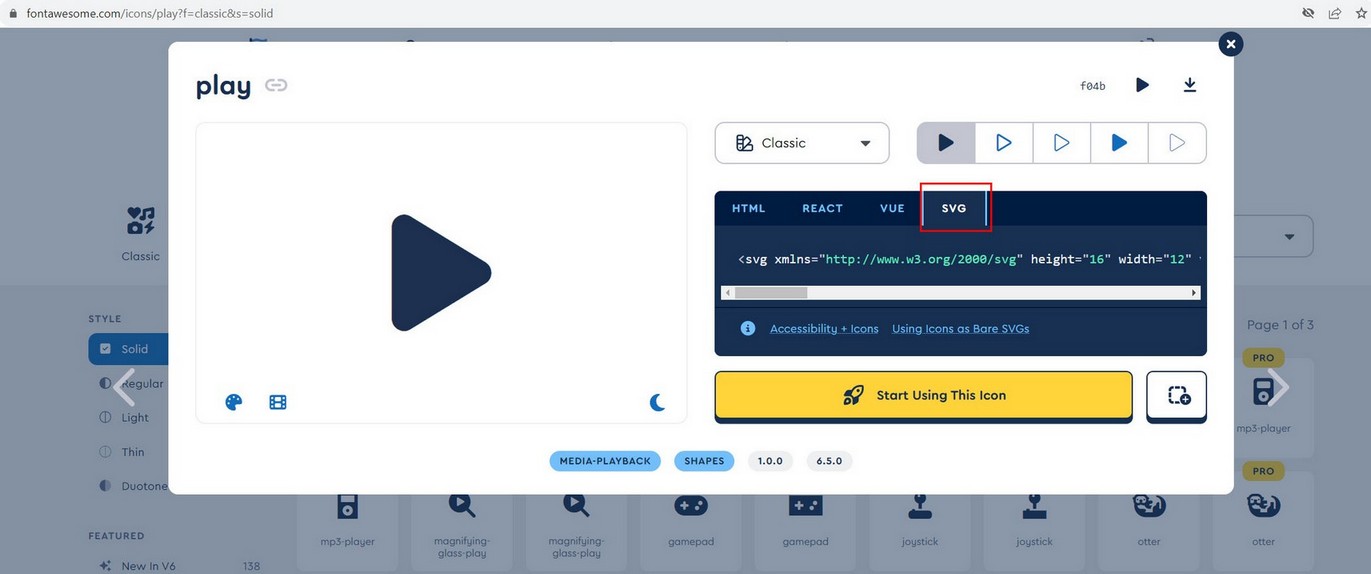
Reel icons are SVG format and can be changed in Edit Reel / Icons tab:
![]()
Using SVG for icons
To get SVG code, for example, go to Font Awesome page, choose icon and copy SVG code. Of course you can get SVG code from different websites.
Reel Custom Icons
You can add new icons in Reel items and attach url to each icon. Icons can be SVG format.
![]()
Icons can be located in icon list (like in above image) or in more menu (like below image):
![]()
You can add icons to Reel items in Edit Playlist / Add media section (in dialog when you add videos to Reel):
![]()
Note that you can also add global custom icons in Edit Reel / Custom buttons tab. Icons added in such way will be present in all Reel items (unlike above when they are added per specific video).
![]()
Using SVG for icons
To get SVG code, for example, go to Font Awesome page, choose icon and copy SVG code. Of course you can get SVG code from different websites.
Function call on icon click
If you want to call a function when some icon is clicked do the following.
Add icon in with chosen class attribute.
![]()
Add javascript code to listen for icon click:
 <script>
document.addEventListener('click', e => {
   if (e.target.closest('.my-custom-class')) {
   		var item = e.target.closest('.mvp-reel-item')
        console.log(item )
        alert('function is called')
   }
})
 </script>
Icon color
If you want to change icon colors you can target them with following css:
.my-custom-class{
	color:#aaaaaa;
}
Custom icons in player controls
You can add Custom icons in player controls and attach url to each icon. Icons can be SVG format.
![]()
You can add icons in player controls in Edit Reel / Custom buttons tab:
![]()
Using SVG for icons
To get SVG code, for example, go to Font Awesome page, choose icon and copy SVG code. Of course you can get SVG code from different websites.
Function call on icon click
If you want to call a function when some icon is clicked do the following.
Add icon in with chosen class attribute.
![]()
Add javascript code to listen for icon click:
 <script>
document.addEventListener('click', e => {
   if (e.target.closest('.my-custom-bell')) {
        alert('function is called')
   }
})
 </script>
Icon color
If you want to change icon colors you can target them with following css:
.my-custom-bell{
	color:#aaaaaa;
}
Load more
Reel has the option to use load more feature. This is advised if you have more than 5 - 10 videos in the reel. Using load more will enable reel to load faster on start and add new videos into the reel as user scrolls down the page.
Load more should be used with any media type (HTML videos, Youtube, Vimeo). This especially applies for Youtube and Vimeo which return lots of videos from playlist or channel.
You can activate Load more in Edit reel / General tab.
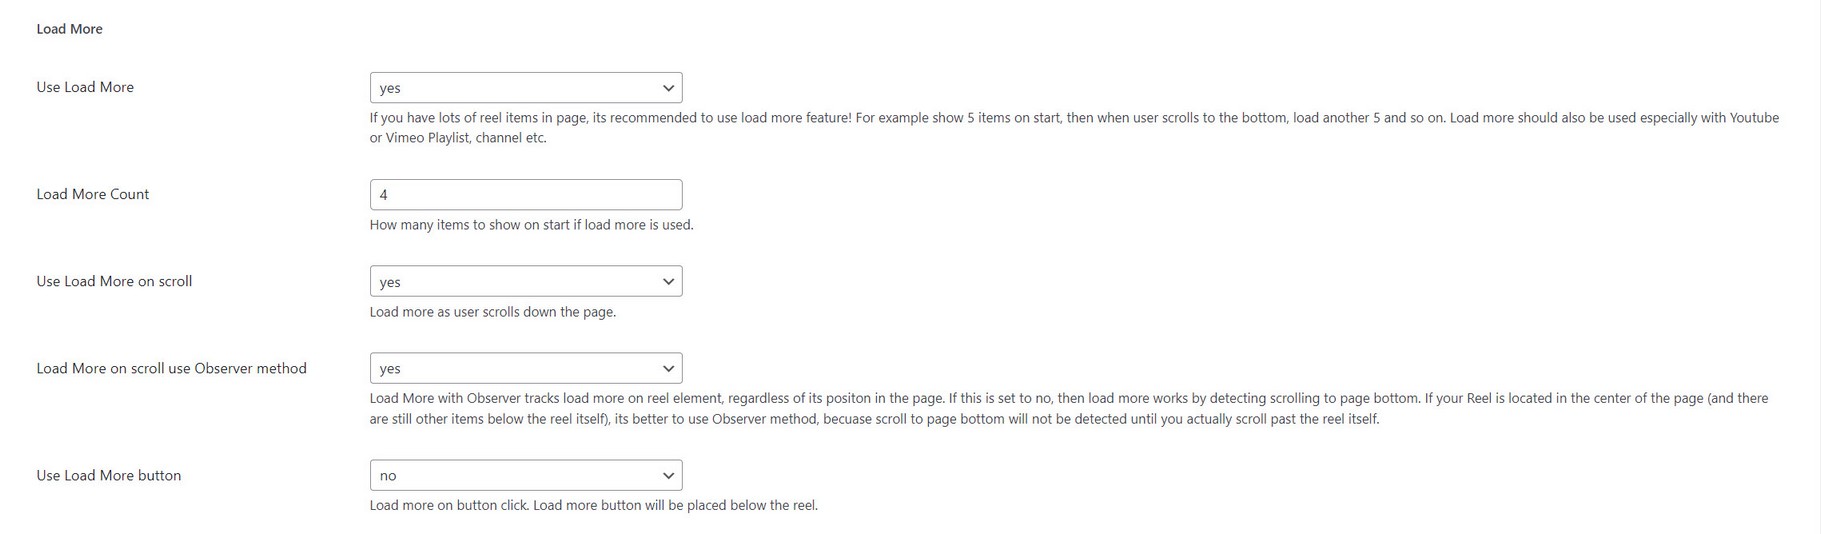
We advice keeping load more count low like 4 for example. This is enough for reel to display while keeping number of videos to minimum.
Load more using API
You can also call load more manually using api methods.
Search field
Using search field in reel
Activate search field in Reel manager / Edit Reel / General tab:

Search field will be visible in Reel:
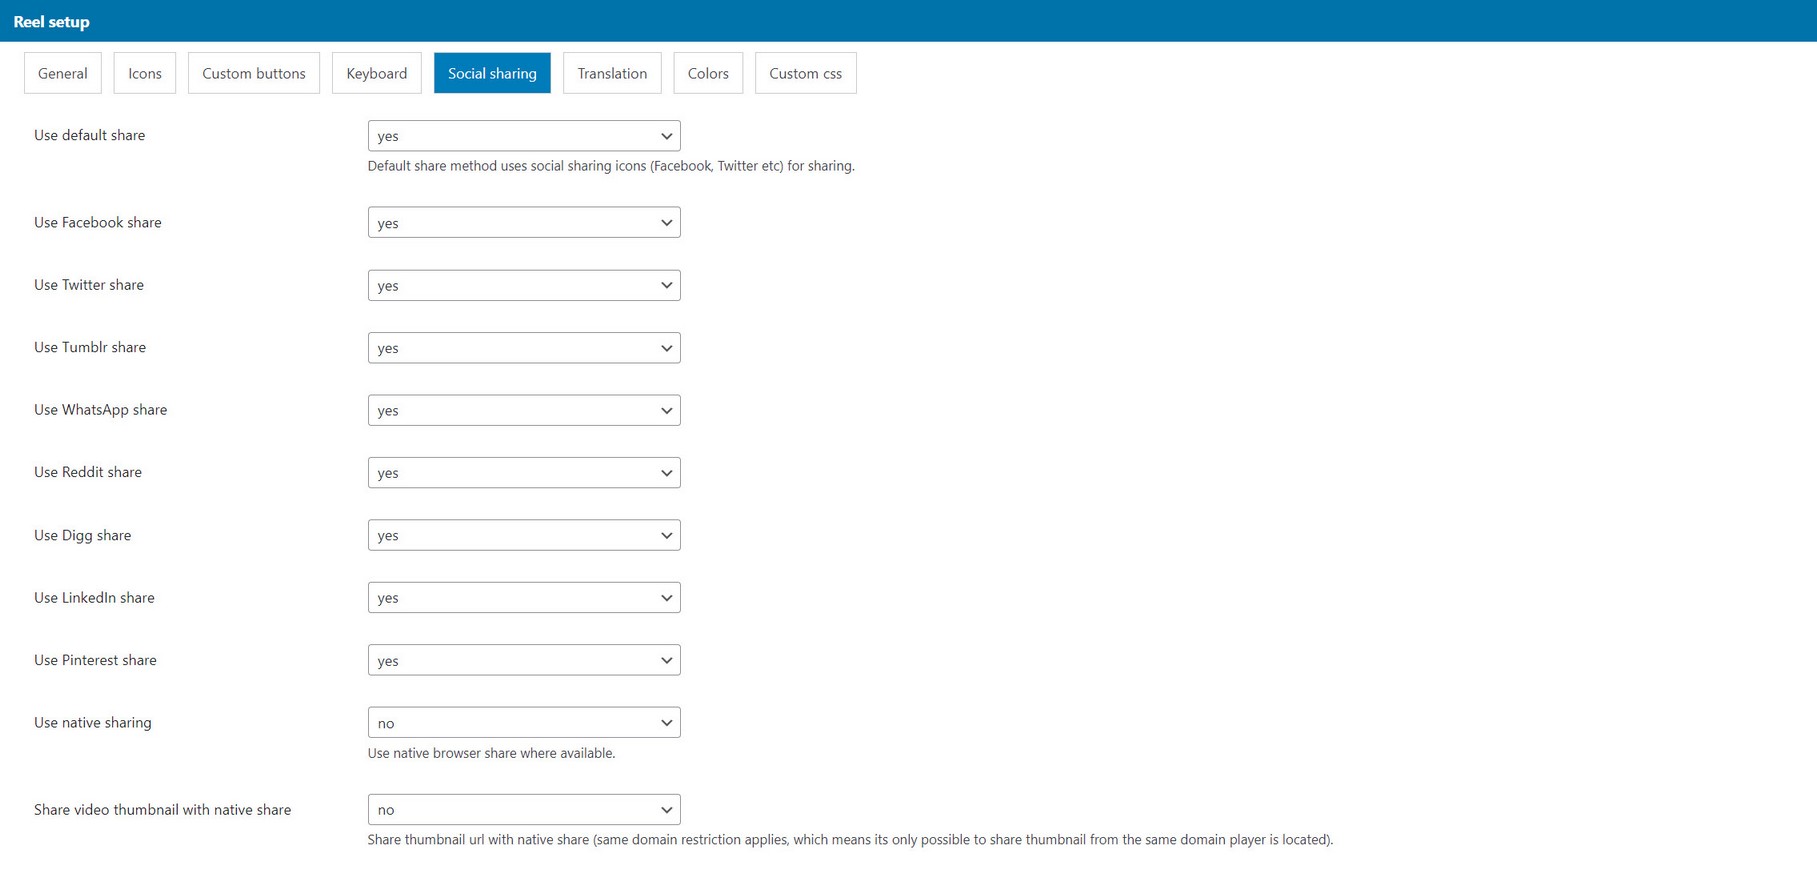
Social sharing
Using Share feature
Sharing can use default share method with icons or browser native share method (where supported).
This is controlled in Edit reel / Social sharing tab.
Default method uses social sharing icons (Facebook, Twitter etc). Native share does not require these icons.
If both default and native share are used, player will first try to use native share, then if this is not supported, will fallback to default share.
Social sharing details
Note that are some limitations when it comes to sharing a specific item in Reel.
You can share item in Reel containing of single videos (HTML, Youtube or Vimeo).
However if you are using for example Youtube playlist (which is a grouped source) it will not be possible to share some item directly, because its not yet loaded in Reel on start, unless you decide to load whole playlist on beginning (Which is not recommended!).
Only main item can be shared, not horizontal additional items in Reel.
Share item by slug
You can set slug for each individual Reel item and then get share url with slug.
Set slug to Reel item in Playlist manager / Edit playlist / Add media dialog.
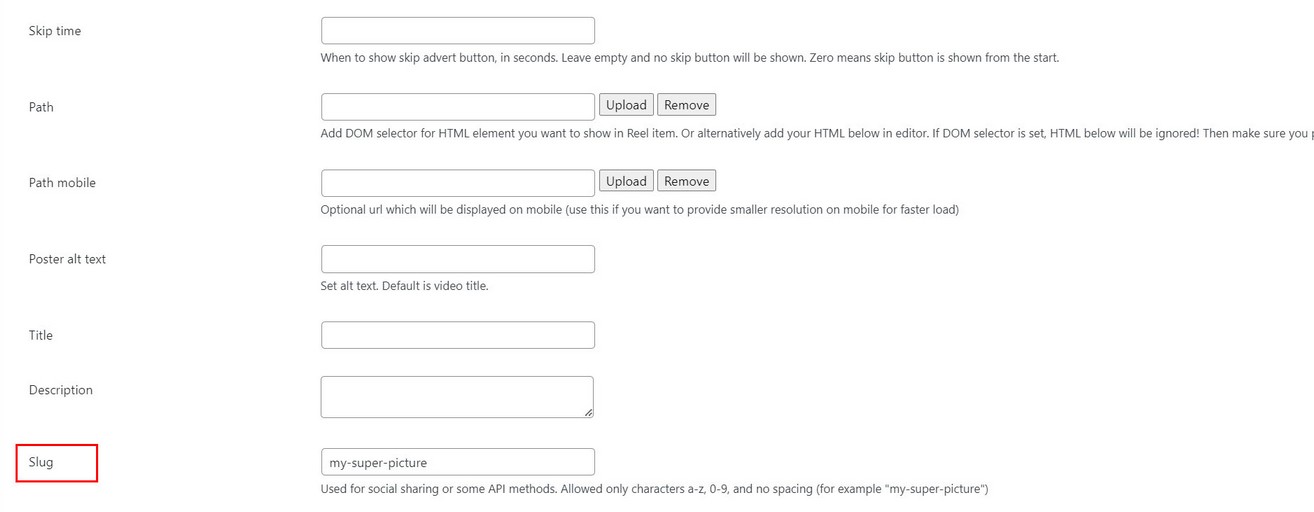
Slug is supported for individual items in Reel (type video, audio, image, Youtube single, Vimeo single). It does not work for grouped sources like Youtube playlist, video folder etc..
After you set slug, getting share url will contain slug in url:

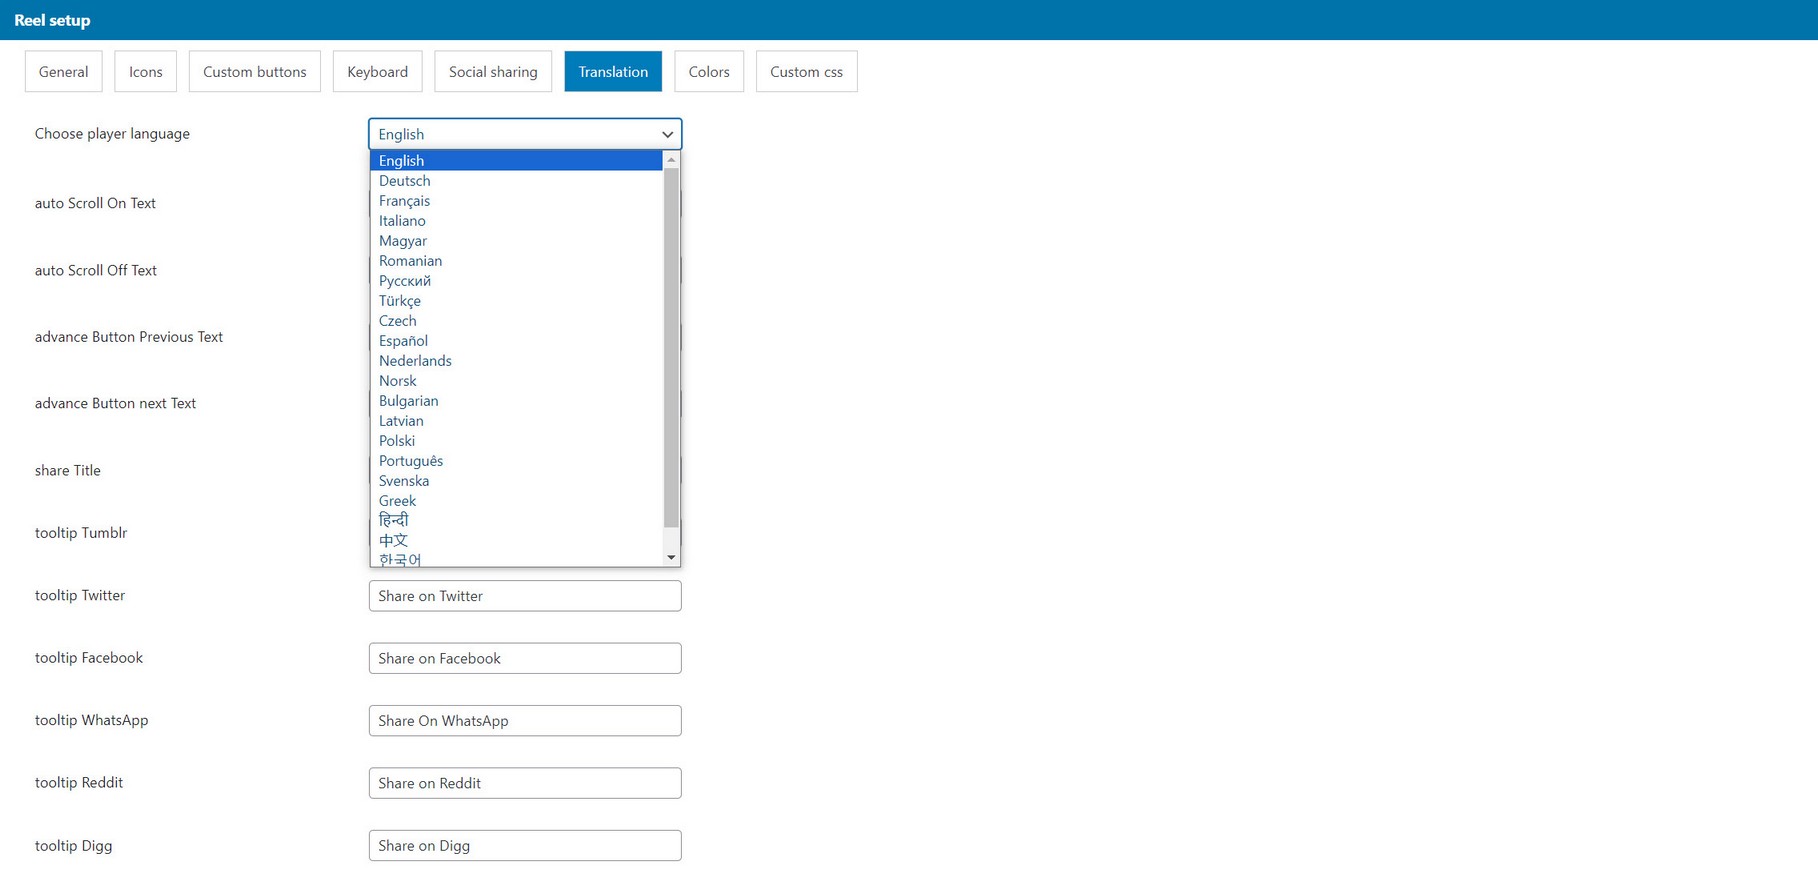
Languages / translation
Player offers a wide variety of language translations.
Language can be set in Edit Reel / Translation tab.
Colors
Changing colors in Reel
Colors can be changed in Edit Reel / Colros tab:
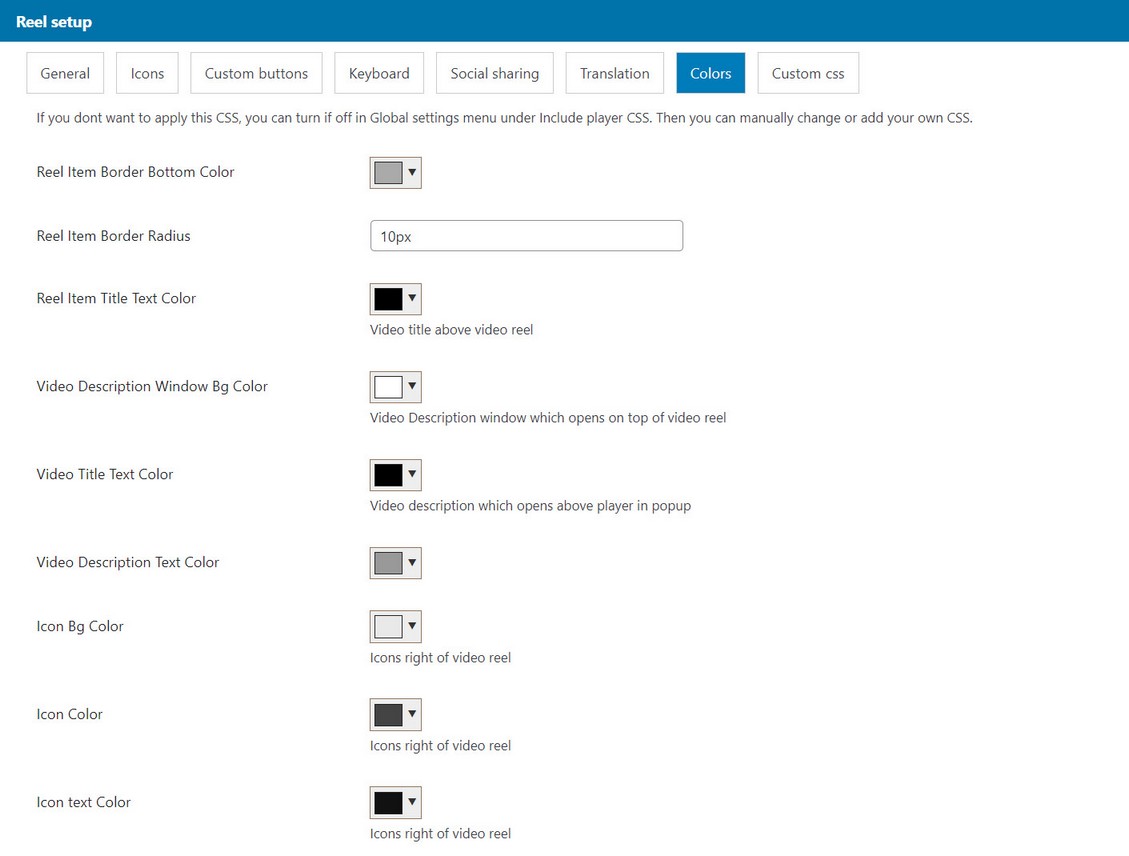
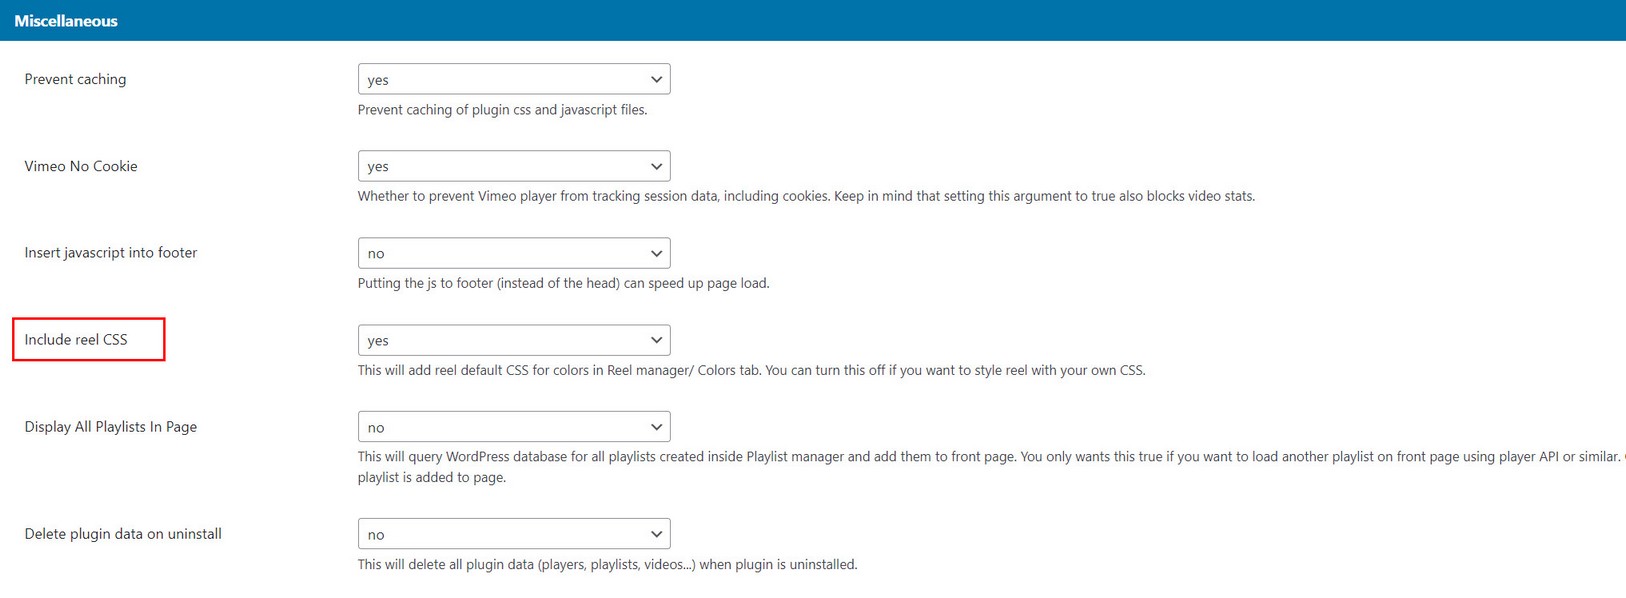
For this colors to apply, Include Reel CSS option needs to be set in Global settings / Miscellaneous tab:
Multiple reels in page
If you use multiple Reels in same page there are couple of rules to follow.
Using advance buttons can only work for 1 reel in the page
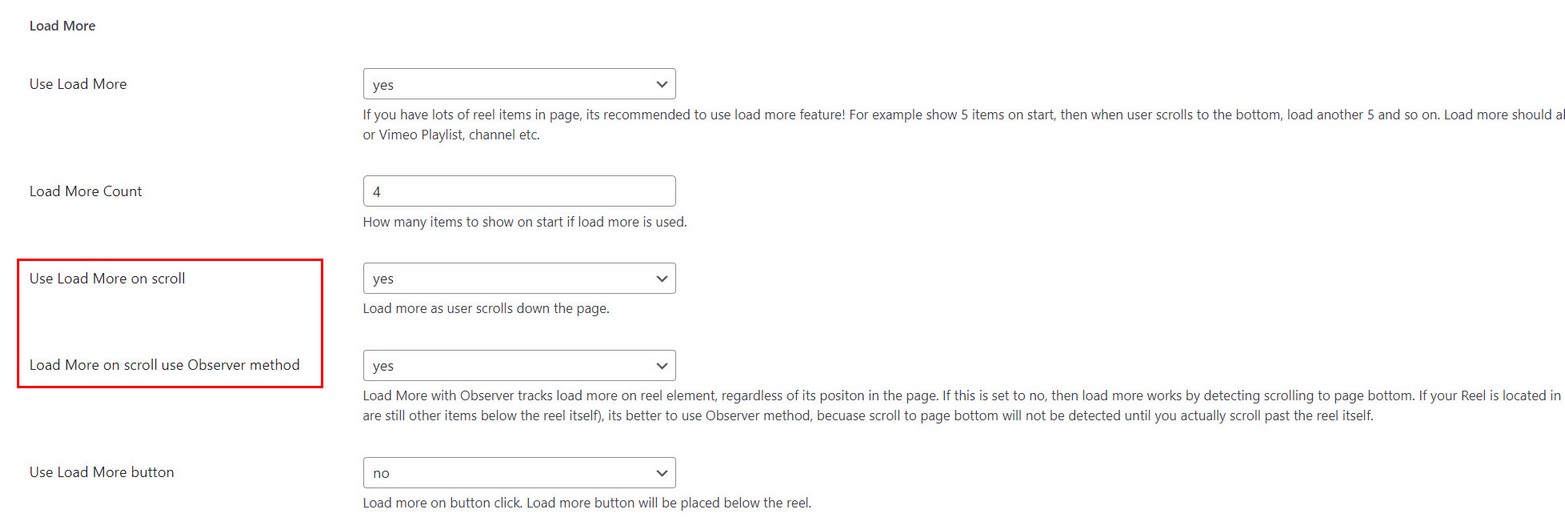
If you use load more on scroll in Reel, select use Observer method in Edit Reel / General tab / Load more section:
Callbacks / Events
Following callbacks are supported:
    mvp_reel_playerID.addEventListener("setupDone", function(data){

        //called when plugin has been instantiated and is ready to use api, returns (instance, instanceName)

    })
    mvp_reel_playerID.addEventListener("reelItemView", function(data){

        //called when new reel item has started, returns (instance, instanceName, item)

        //console.log(data.instance, data.instanceName, data.item);

    })
    mvp_reel_playerID.addEventListener("reelSubItemView", function(data){

        //called when new reel horizontal item has started, returns (instance, instanceName, item)

        //console.log(data.instance, data.instanceName, data.item);

    })
    mvp_reel_playerID.addEventListener("mediaEnd", function(data){

        //called on media end, returns (instance, instanceName, item)

    })
    mvp_reel_playerID.addEventListener("playlistStartLoad", function(data){

        //called on playlist start load, returns (instance, instanceName)

    })
    mvp_reel_playerID.addEventListener("playlistEndLoad", function(data){

        //called on playlist end load, returns (instance, instanceName)

    })
    mvp_reel_playerID.addEventListener("fullscreenEnter", function(data){

        //called on fullscreen enter, returns (instance, instanceName, item)

    })
    mvp_reel_playerID.addEventListener("fullscreenExit", function(data){

        //called on fullscreen exit, returns (instance, instanceName, item)

    })
mvp_reel_playerID is constructed from mvp_reel_player + ID.
ID is generated automatically starting from 0 for every new reel you place in page. For example, if you add one reel in page, ID will be 0 (so it becomes mvp_reel_player0).
You can also manually add instance_id in shortcode (then the plugin will use this as ID), example (This reel will have ID 1):
How to add event callback in WordPress post from Text editor:
API methods
Following api methods are included:
mvp_reel_playerID.showMedia(type, value); //Scroll to and Play reel item. Works only if them is already loaded (does not load more if not exist)
example:
mvp_reel_playerID.showMedia('media-id', 5);//provide media-id from Wordpress or from data-media-id attribute set on '.mvp-reel-item'
mvp_reel_playerID.showMedia('slug', 5);//provide slug from Wordpress or from data-slug attribute set on '.mvp-reel-item'
mvp_reel_playerID.nextMedia(); //Play next media
mvp_reel_playerID.previousMedia(); //Play previous media
mvp_reel_playerID.firstMedia(); //Play first media
mvp_reel_playerID.lastMedia(); //Play last (available) media. If load more is used, then last will be item before new items start loading with load more
mvp_reel_playerID.nextHorizMedia();//play next horizontal media (only if reel item has additinal horizontal media)
mvp_reel_playerID.previousHorizMedia();//play previous horizontal media (only if reel item has additinal horizontal media)
mvp_reel_playerID.clearPlayingItem(); //clear active playing media
mvp_reel_playerID.toggleMute(); //toggle volume of active playing media
mvp_reel_playerID.togglePlayback(); //toggle playback of active playing media
mvp_reel_playerID.toggleDescription(); //toggle description
mvp_reel_playerID.getCurrentTime(); //get current time of active playing media
mvp_reel_playerID.getDuration(); //get duration time of active playing media
mvp_reel_playerID.seekBackward(seconds); //seek backward active playing media by Seek Time (seconds)
mvp_reel_playerID.seekForward(seconds); //seek forward active playing media by Seek Time (seconds)
mvp_reel_playerID.getActiveMedia(); //get active playing media (returns dom element with classname 'mvp-reel-item')
/* load playlist on demand */
--------------------------
mvp_reel_playerID.loadPlaylist('.mvp-playlist-'+PLAYLIST_ID);
Note: player can only load playlists that exist in page. Playlist comes from shortcode playlist_id:
[apmvp_reel player_id="PLAYER_ID" playlist_id="PLAYLIST_ID"]
Example, playlist with ID 5 is loaded into the player on start (there are no other playlists in page!):
[apmvp_reel player_id="1" playlist_id="5"]
You can defined multiple playlist to exist in page (list them comma separated in playlist_id).
Example, playlists with ID 5,6,7 exist in page. Playlist with ID 5 is loaded into the player on start (because its first listed in playlist_id):
[apmvp player_id="1" playlist_id="5,6,7"]
In this case you can call to load playlist ID 6 later on demand:
mvp_reel_playerID.loadPlaylist('.mvp-playlist-6');
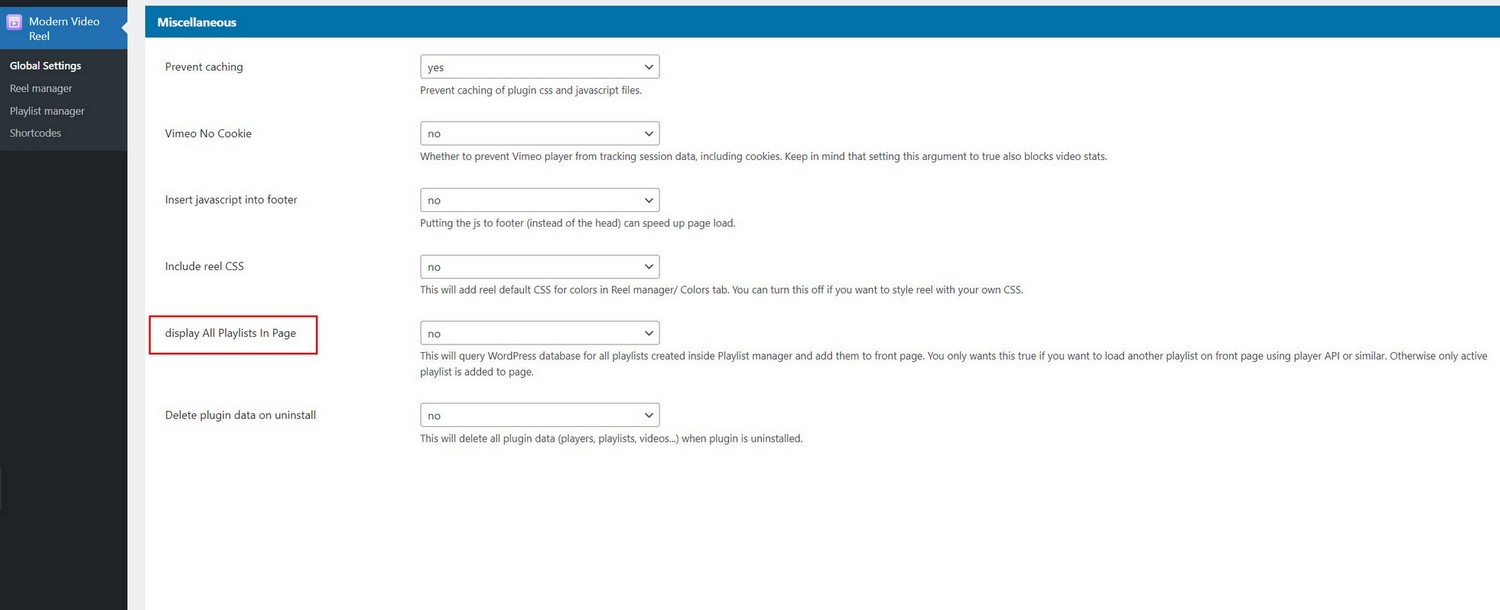
You can also use option "Display all playlists in page" in Global settings / Miscellaneous (which will by default put all playlists from Playlist manager in page, so you dont have to manually define which playlists to exist in page in playlist_id attribute):
mvp_reel_playerID.destroyPlaylist(); //Destroy current playlist (not neccessary to call if loadPlaylist is used because its called internally)
mvp_reel_playerID.loadMore(); //load more into the reel (if the load more settings are used and there are more items to load)
/* add / remove items */
var tracks = [
{
type: 'video',
path: 'media/vertical/05.mp4',
poster: 'media/vertical/poster/05.jpg',
title: 'Relaxation moments',
description: 'Vivamus non massa non est consequat pulvinar.',
noSound: true,
slug: 'relaxation-moments',
mediaId: 3
},
{
type: 'video',
path: 'media/vertical/06.mp4',
poster: 'media/vertical/poster/06.jpg',
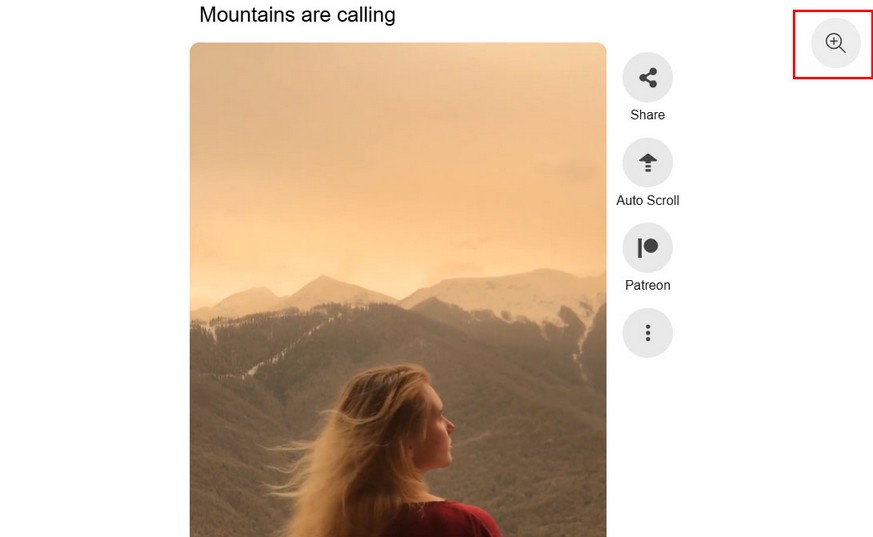
title: 'Mountains are calling',
description: 'Pellentesque habitant morbi tristique senectus et netus et malesuada fames ac turpis egestas.',
noSound: true,
slug: 'mountains-are-calling',
mediaId: 4
}
]
addItem(track, position)
mvp_reel_playerID.addItem(tracks[0],1) //add item by slug 'relaxation-moments', position 1
mvp_reel_playerID.addItem(tracks[1],'end');// add item by slug 'mountains-are-calling', position end
mvp_reel_playerID.addItem(tracks,'end'); // add multiple items, position end
removeItem(format, value)
mvp_reel_playerID.removeItem('slug', 'crazy-sunset'); //remove item by slug 'crazy-sunset'
mvp_reel_playerID.removeItem('slug', 'mountains-are-calling'); //remove item by slug 'mountains-are-calling'
mvp_reel_playerID.removeItem('media-id', 3); //remove item by data-media-id 3
mvp_reel_playerID.getSetupDone(); //get setup done (plugin inited, ready to use api)
mvp_reel_playerID.isPlaylistLoading(); //check if playlist is currently loading
mvp_reel_playerID.setAutoScroll();//toggle autoscroll
mvp_reel_playerID.toggleFullscreen();//toggle fullscreen
mvp_reel_playerID is constructed from mvp_reel_player + ID.
ID is generated automatically starting from 0 for every new reel you place in page. For example, if you add one reel in page, ID will be 0 (so it becomes mvp_reel_player0).
You can also manually add instance_id in shortcode (then the plugin will use this as ID), example (This reel will have ID 1):
How to use API methods in WordPress text editor:
Toggle playback of current active item:
<a onclick="togglePlayback();return false;" href="#">Toggle playback </a>
<script type="text/javascript">
    function togglePlayback(){
        mvp_reel_playerID.togglePlayback();
    };
</script>
Play next item:
<a onclick="nextMedia();return false;" href="#">Next Media </a>
<script type="text/javascript">
    function nextMedia(){
        mvp_reel_playerID.nextMedia();
    };
</script>
Load playlist by playlist ID. Note that you need to have Display all playlists in page option true in Global settings / Miscellaneous tab.
<a onclick="loadPlaylist('.mvp-playlist-PLAYLIST_ID');return false;" href="#">Load playlist </a>
<script type="text/javascript">
    function loadPlaylist(id){
        mvp_reel_playerID.loadPlaylist(id);
    };
</script>
Load more videos in the reel
<a onclick="loadMore();return false;" href="#">Load more </a>
<script type="text/javascript">
    function loadMore(){
        mvp_reel_playerID.loadMore();
    };
</script>
Domain change
How to batch rename all video urls (and other urls: thumbnails...) in specific playlist to make them usable on another domain?
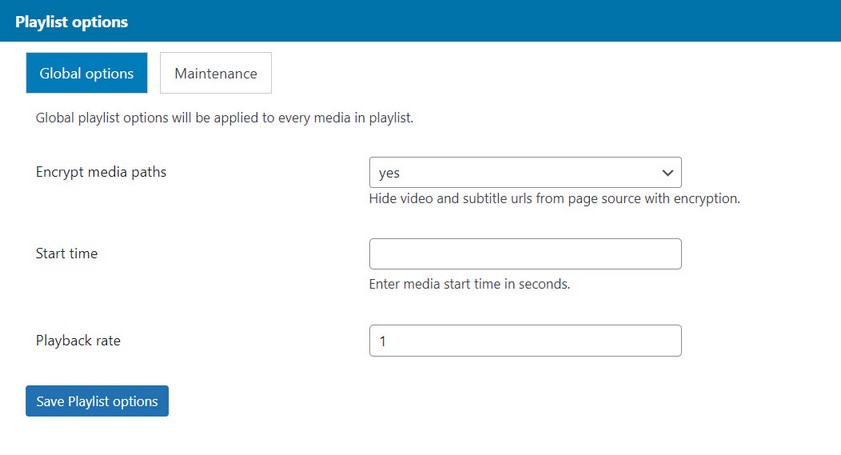
Go to Playlist manager / Edit playlist / Playlist options / Maintenance tab where you can rename all url in current playlist:

Modern Video Player compatibility
Reel is compatible with Modern Video Player playlists that you have already created in Playlist manager inside Modern Video Player WordPress plugin.
Make sure you have new Modern Video Player WordPress plugin version which is compatible with Reel!
Note that not all media type from Modern Video Player is supported in the Reel. There are some exceptions.
Full media support for Reel is explained in media section.
To load playlist from Modern Video Player inside the Reel, simply add following in shortcode:
playlist_id_mvp is the ID of the playlist from Modern Video Player. In this case Reel will load this playlist. Modern Video Player needs to be activated for this to work.
User addon
User AddOn for Reel is available on the following link
User AddOn for Modern Video Reel WordPress plugin enables registered WordPress users to interact (comment, like and favorite) items inside the Reel.
Admin can choose user roles which can access these features.
Comments, likes and favorites can be enabled per Reel so admin can choose which Reels have these features.
Users will be able to see and manage their own likes and favorites inside WordPress plugin menu. Users can also create playlists from liked and favorited videos and use default shortcodes (for example most liked videos, most liked weekly, monthly, yearly etc.. )
Activate User AddOn
First make sure addOn is activated together with main Video Reel plugin.
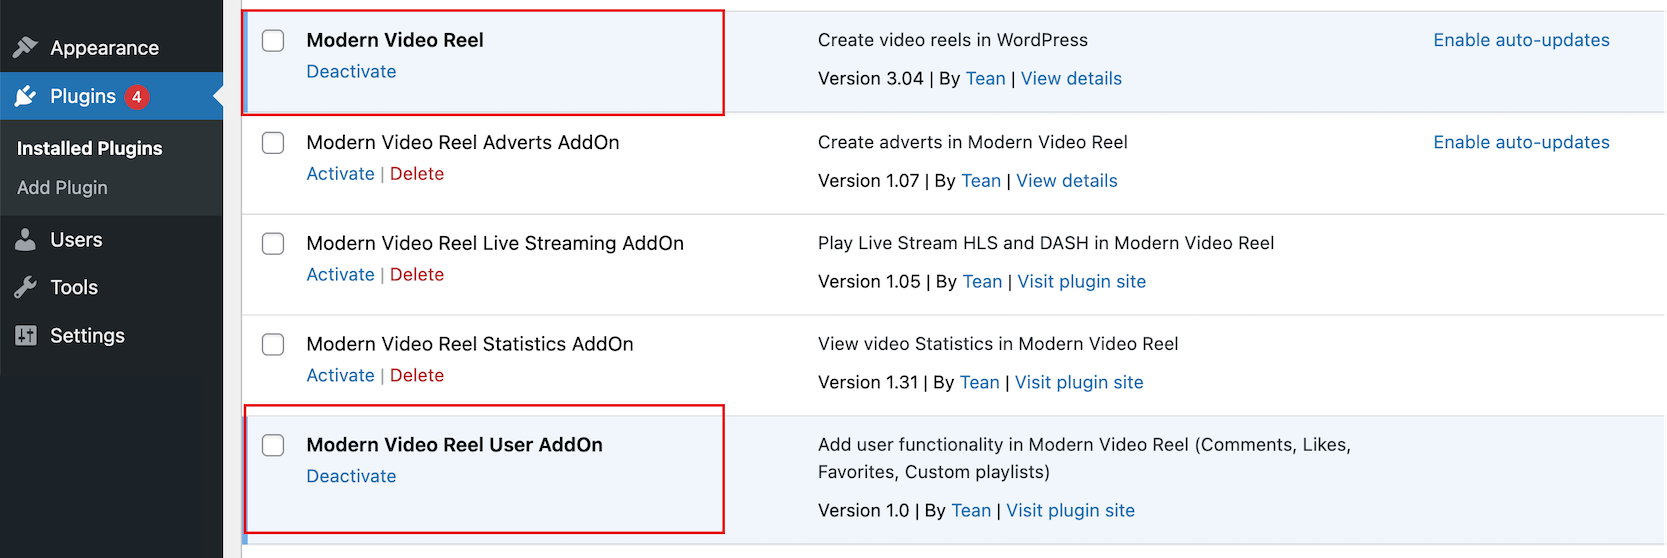
Also, make sure you have the latest compatible version of main Video Reel plugin.
Register plugin inside Reel manager / Edit Reel / User Addon tab
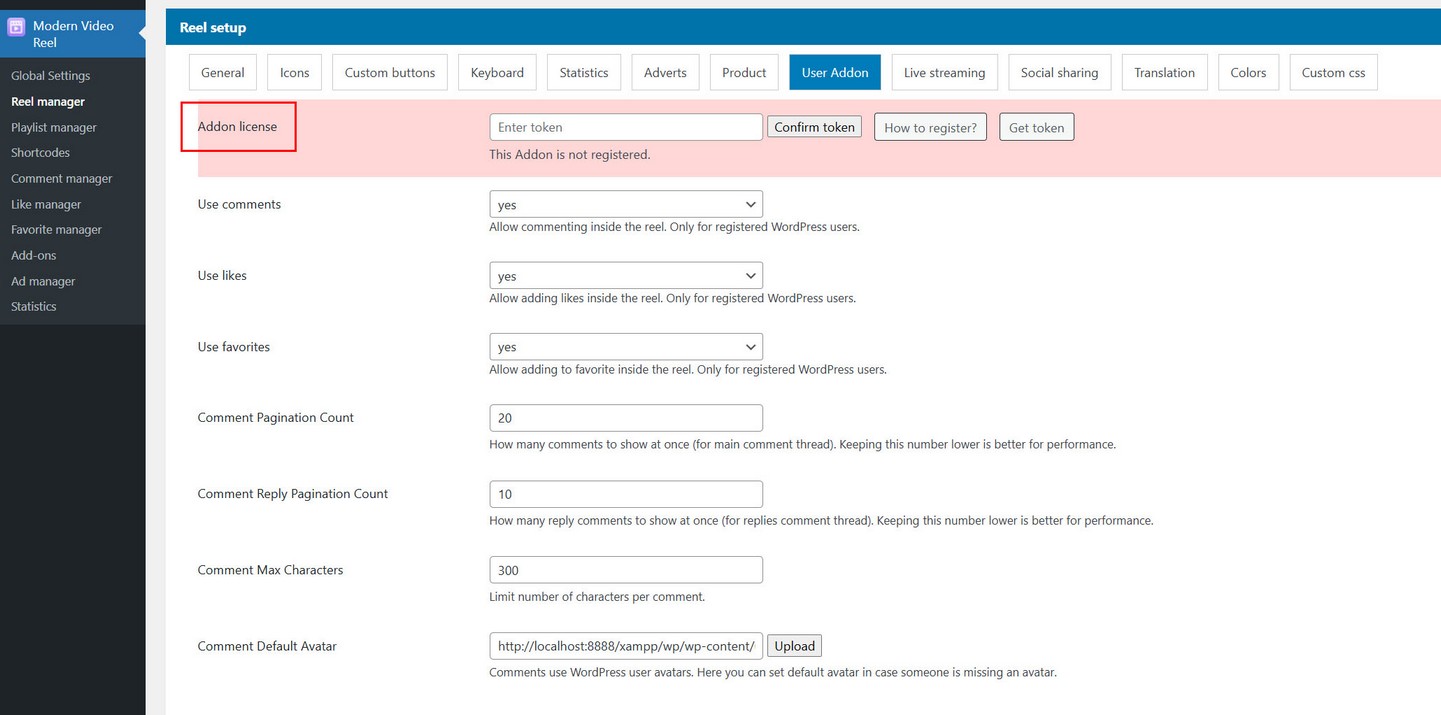
Registration is done the same way as registering main plugin.
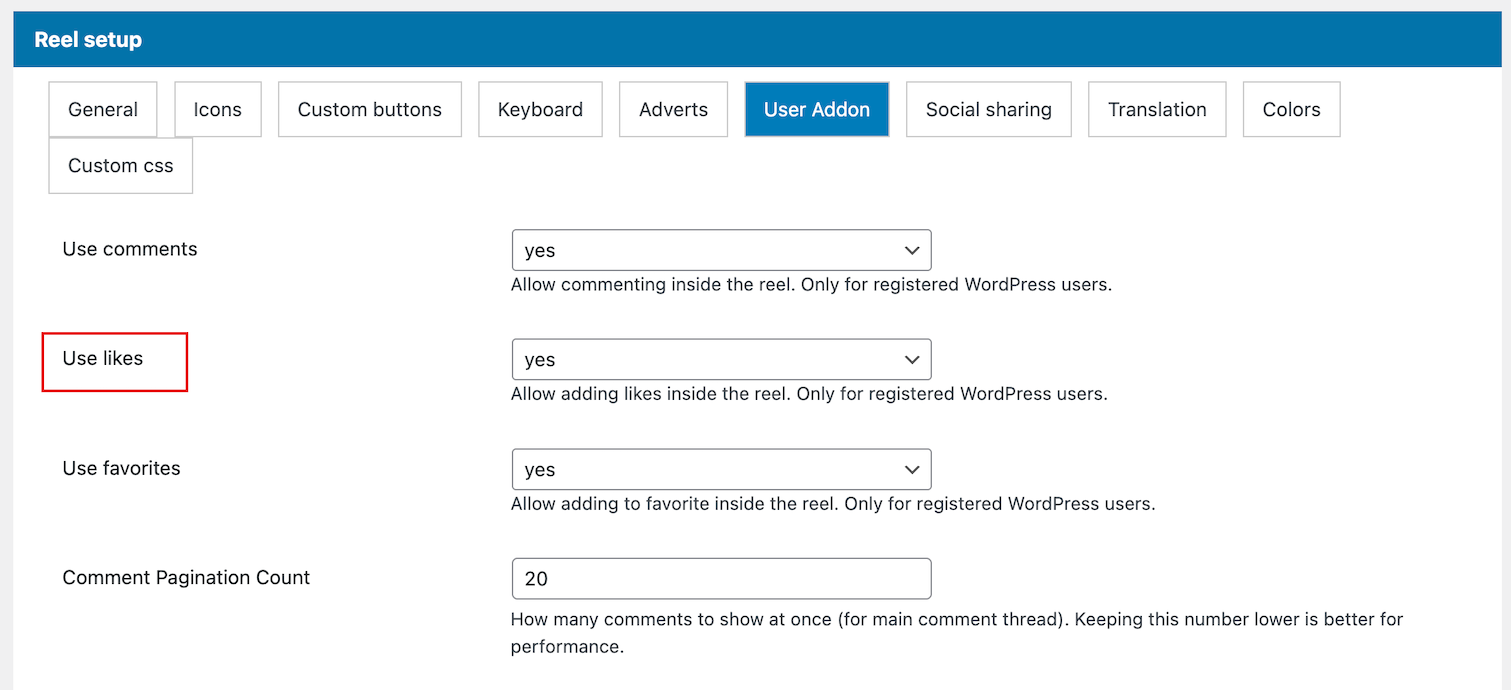
Using Likes
Likes can be enabled per Reel, meaning some Reels can use Likes, while other not.
Enable Likes inside Reel manager / Edit Reel / User Addon tab
Like icon inside the Reel appears in vertical icon list:
![]()
Clicking Like icon each registered WordPress user can add its own vote.
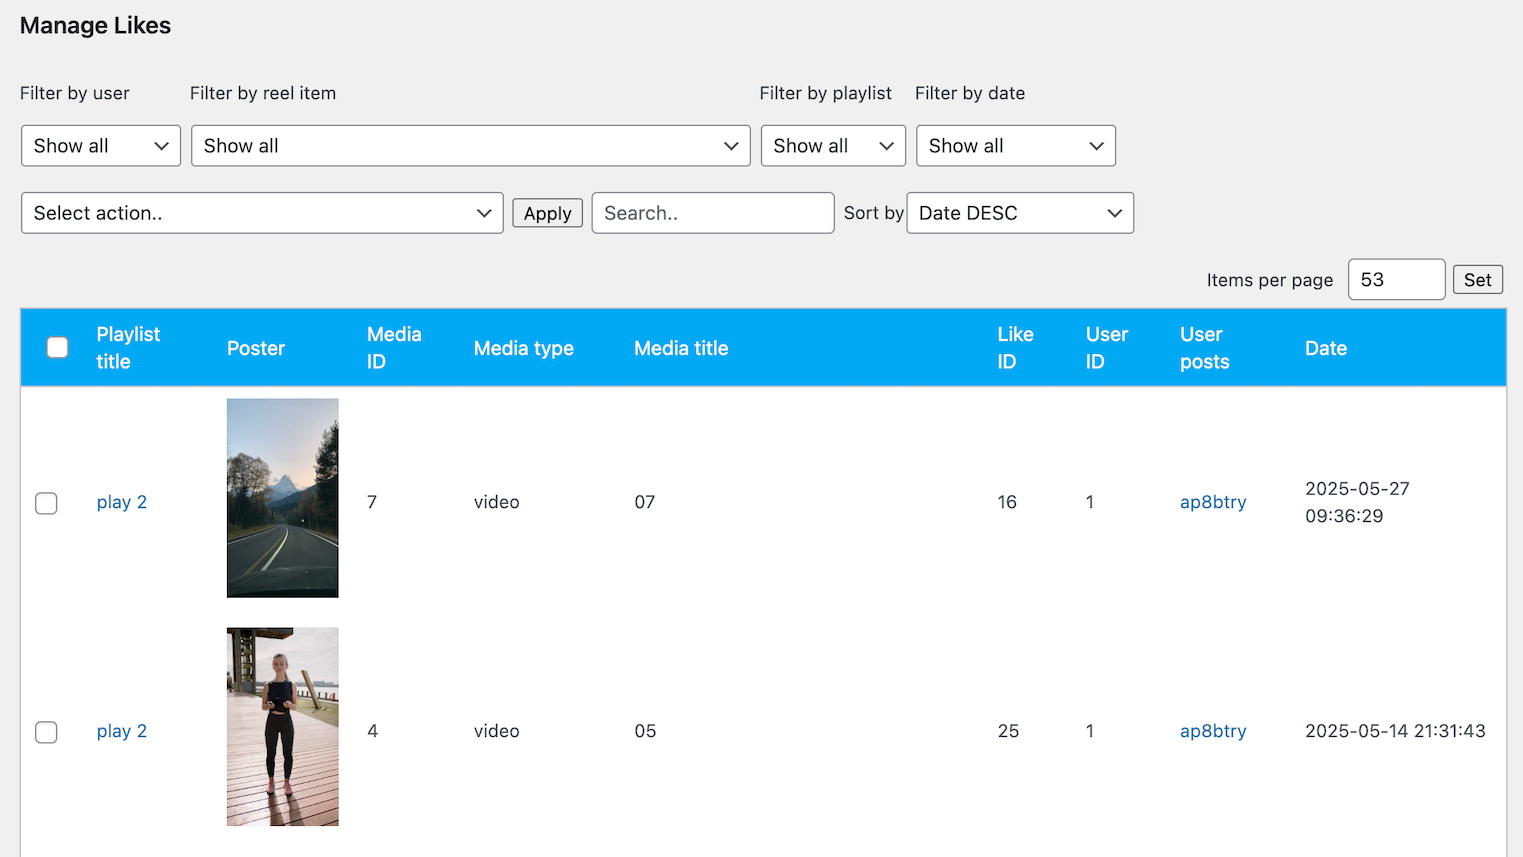
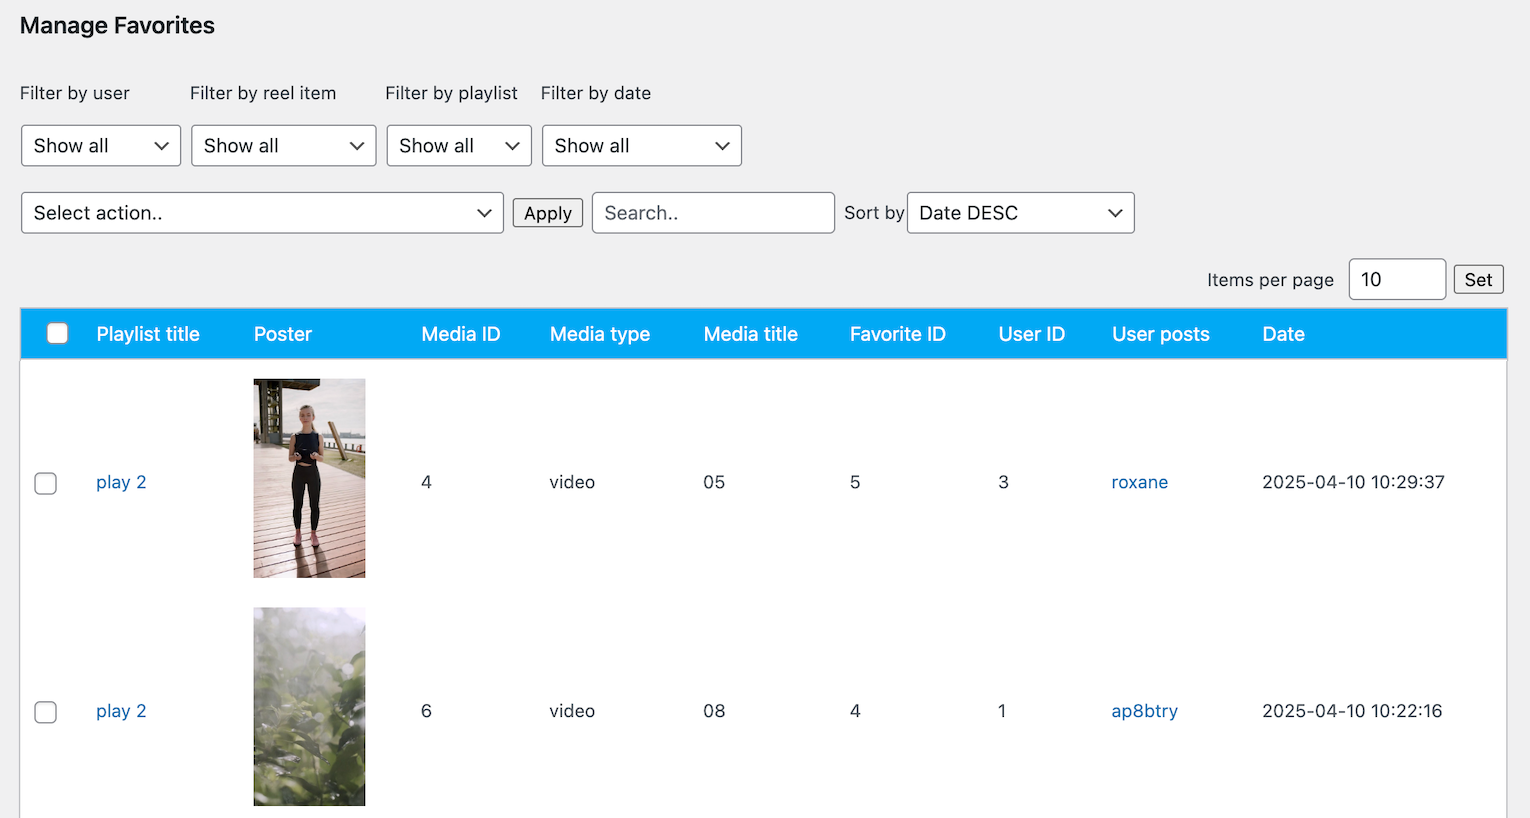
Likes manager
Both Admin and WordPress users have access to its own menu in the plugin where they can see and manage likes. Admin can see all likes, while each WordPress user can see their own likes.
Like shortcodes
Inside Likes manager there are multiple default shortcodes provided that can be used to view Reel.
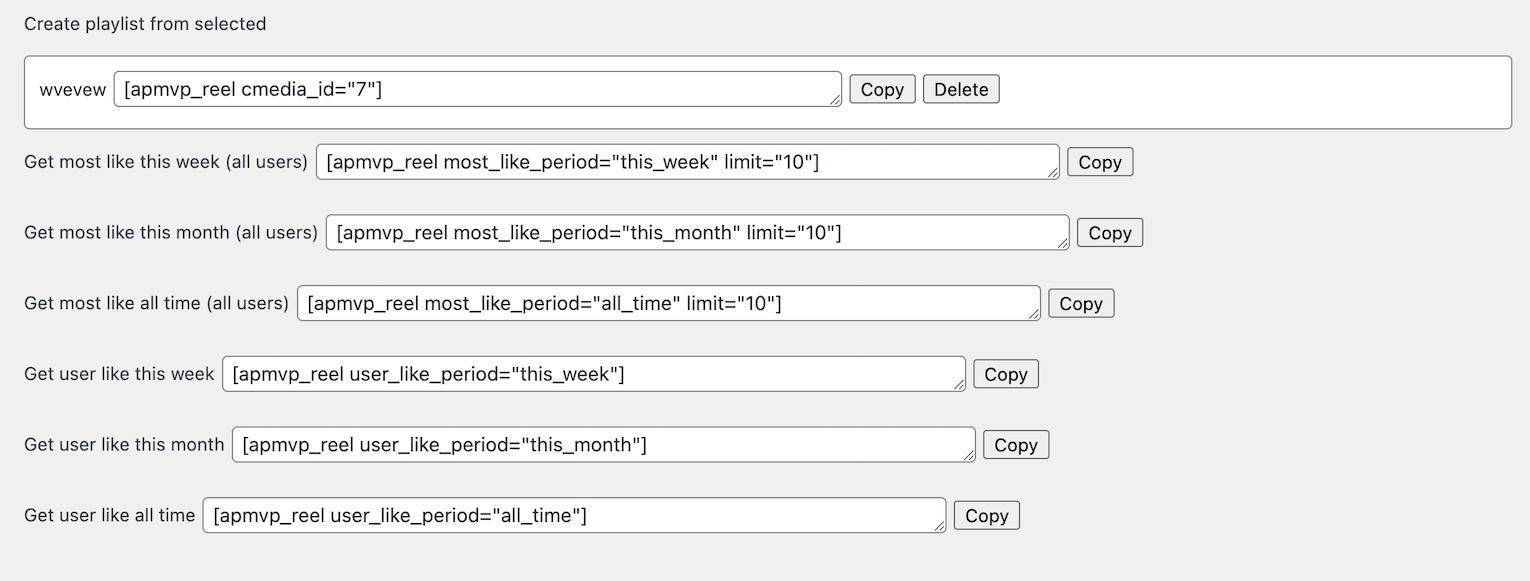
User can also create their own shortcodes from selected likes and save them in this section.
Using Favorites
Favorites can be enabled per Reel, meaning some Reels can use Favorites, while other not.
Enable Favorites inside Reel manager / Edit Reel / User Addon tab

Favorite icon inside the Reel appears in vertical icon list:
![]()
Clicking Favorite icon each registered WordPress user can add Reel item to his favorites list.
Favorite manager
Both Admin and WordPress users have access to its own menu in the plugin where they can see and manage favorites. Admin can see all favorites, while each WordPress user can see their own favorites.
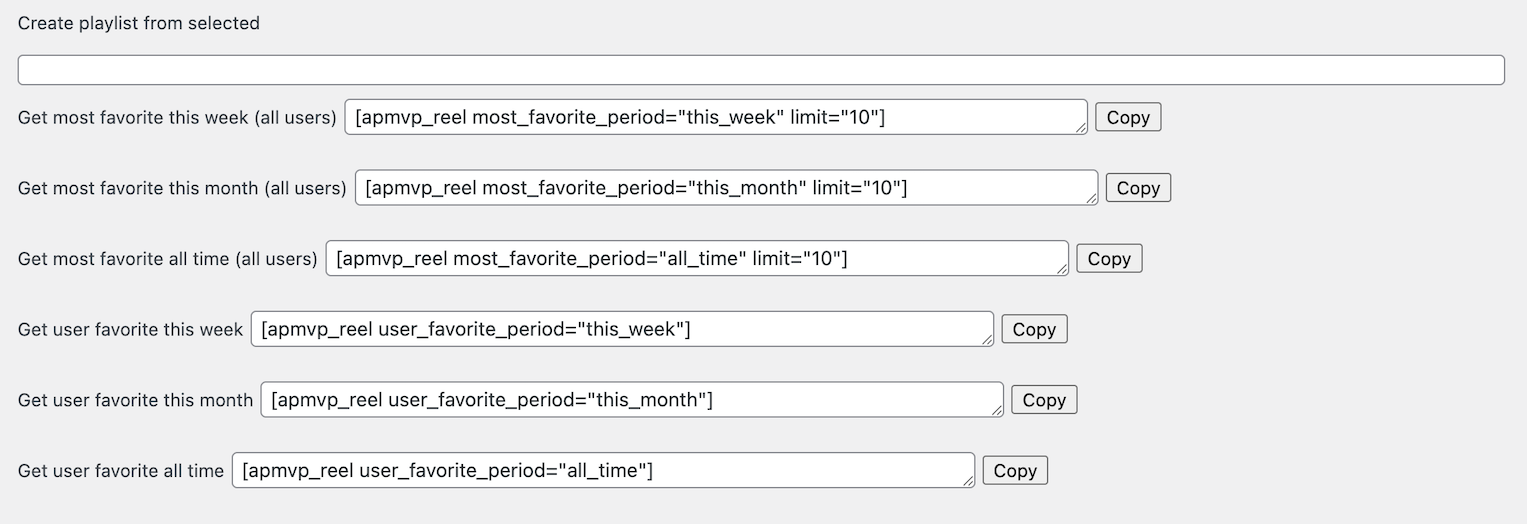
Favorite shortcodes
Inside Favorite manager there are multiple default shortcodes provided that can be used to view Reel.
User can also create their own shortcodes from selected favorites and save them in this section.
Restrict content
Reel items can restricted from view from certain user roles.
This can be done in 2 ways:
Inside Playlist manager / Playlist options you can restrict whole reel from viewing.
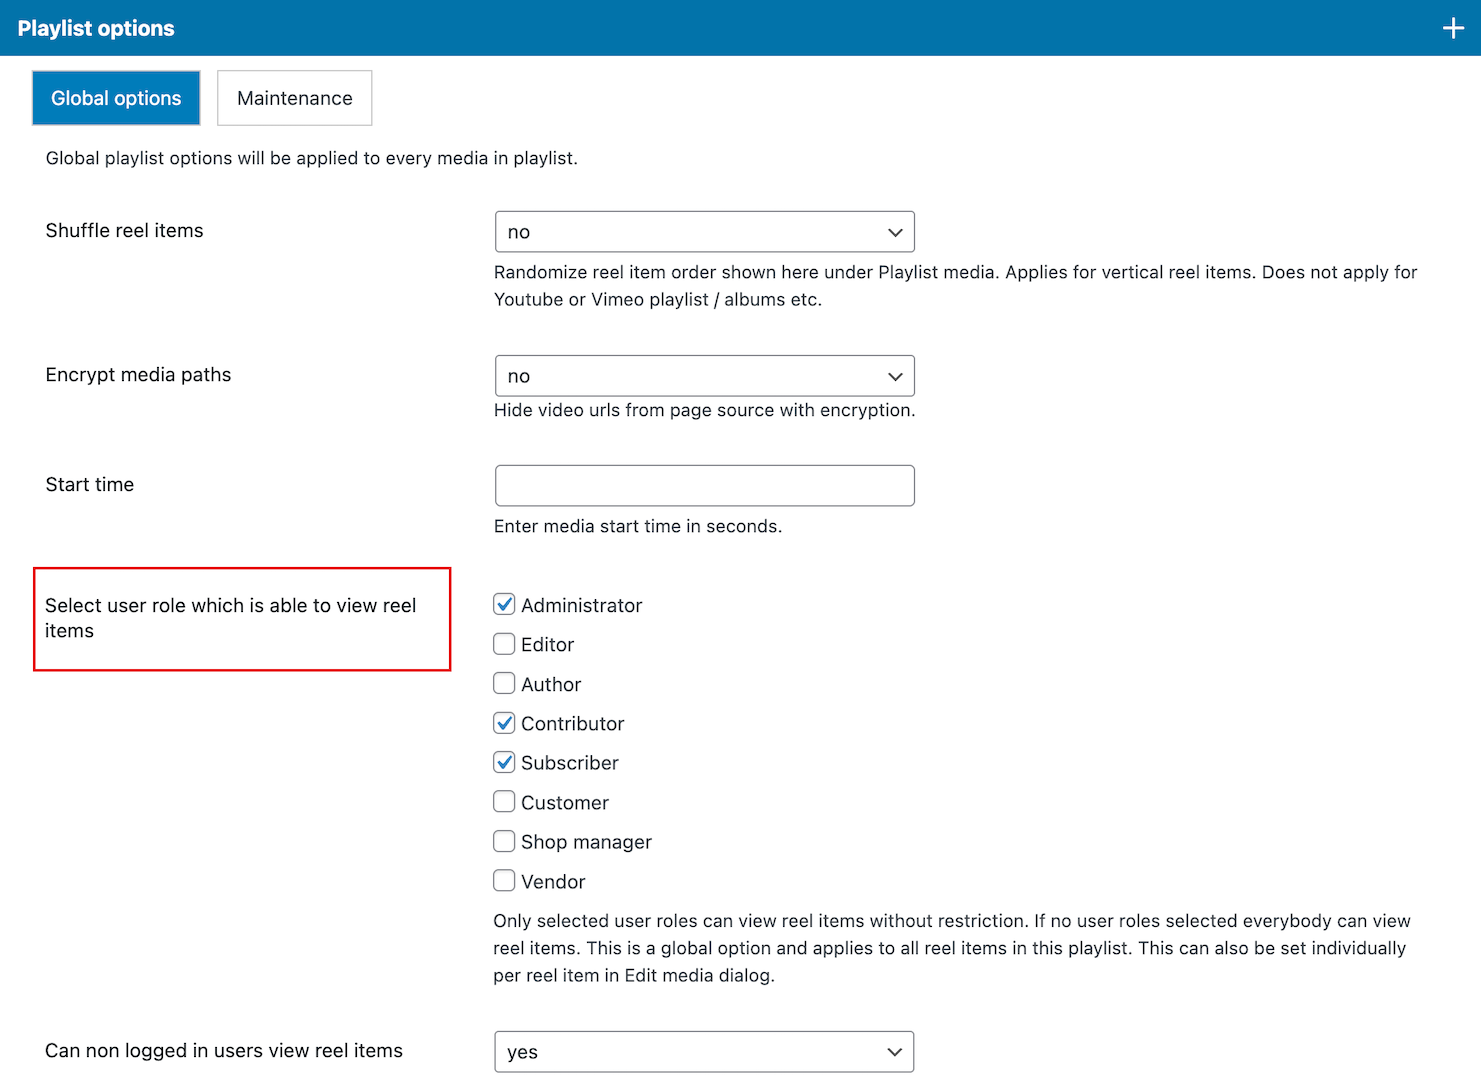
Inside Playlist manager / Add media dialog you can restrict specific item in reel from viewing.

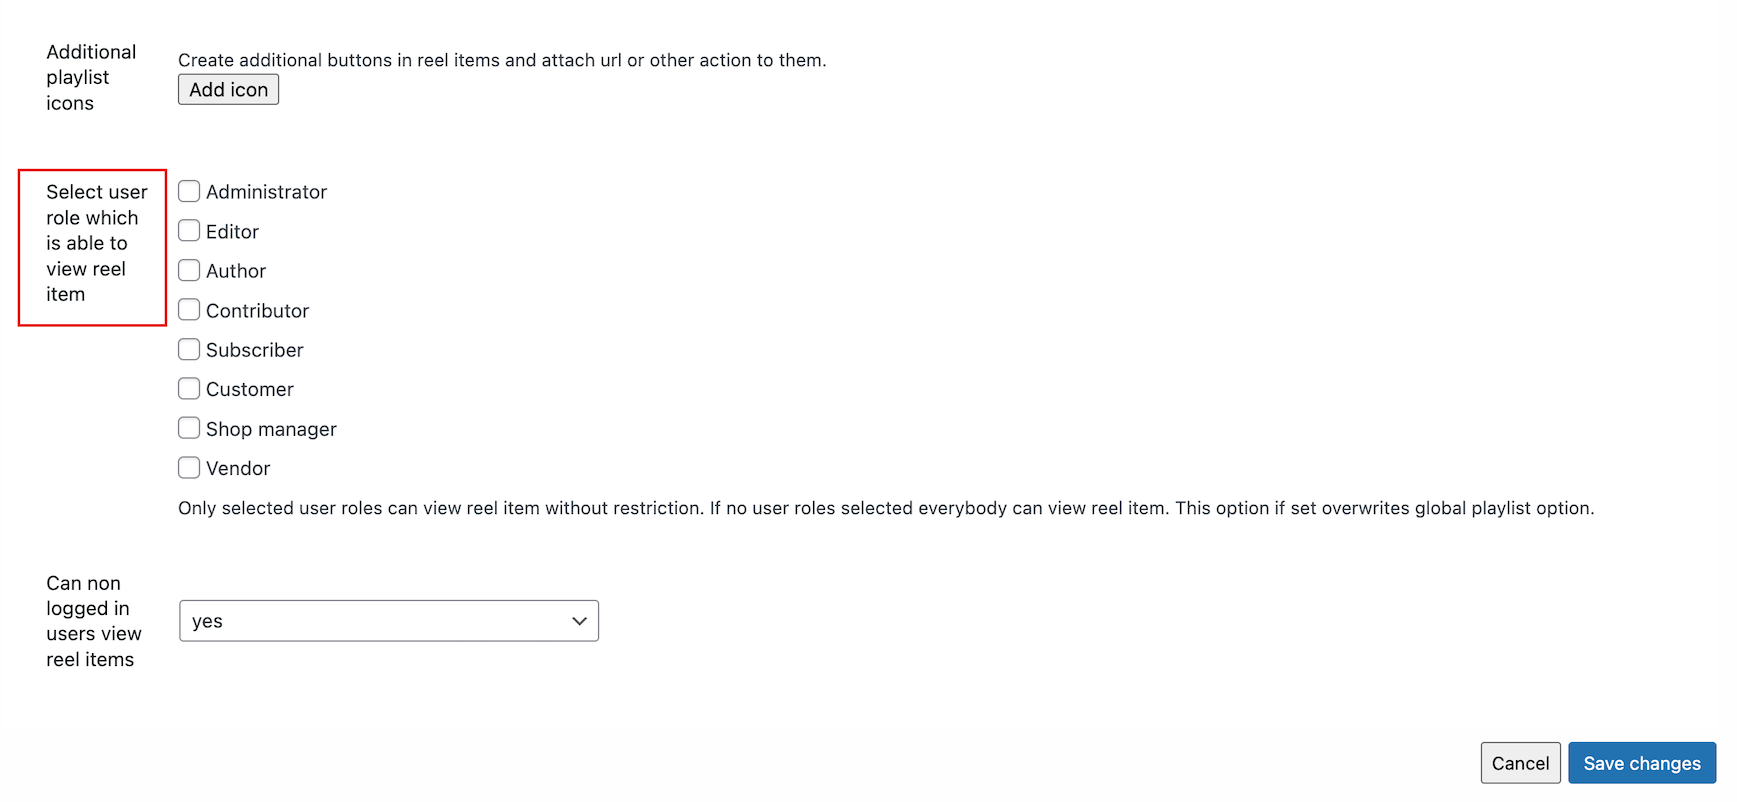
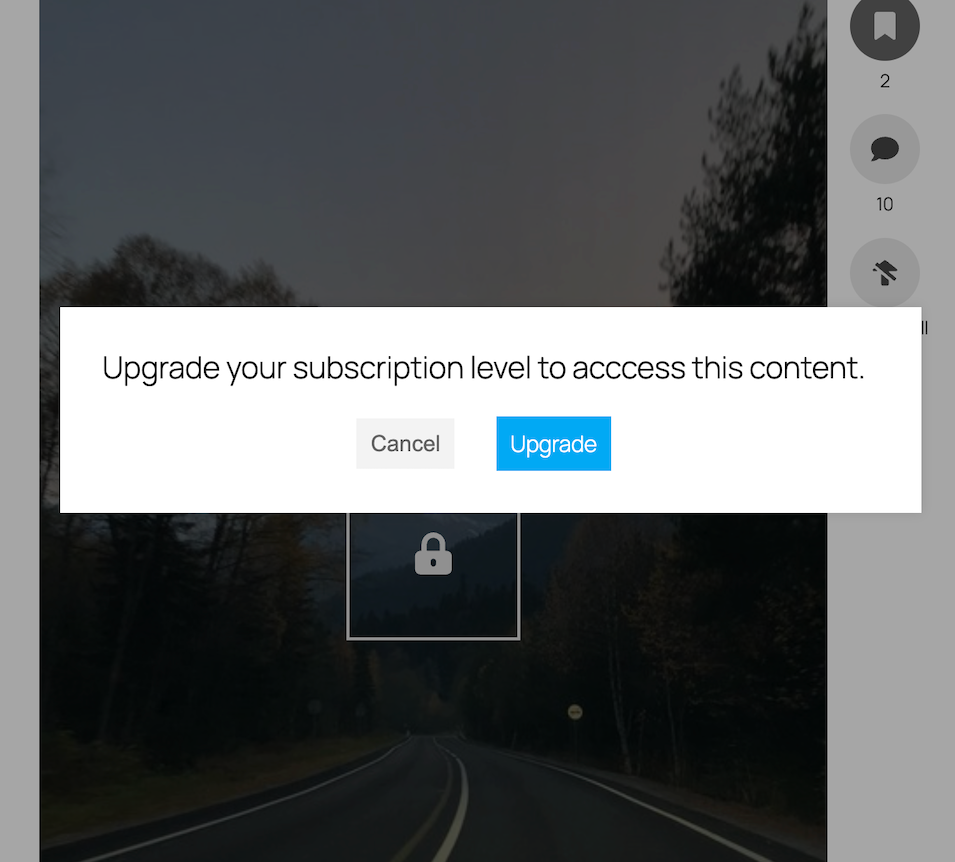
This will show a lock icon over the Reel item when user tries to view content.
![]()
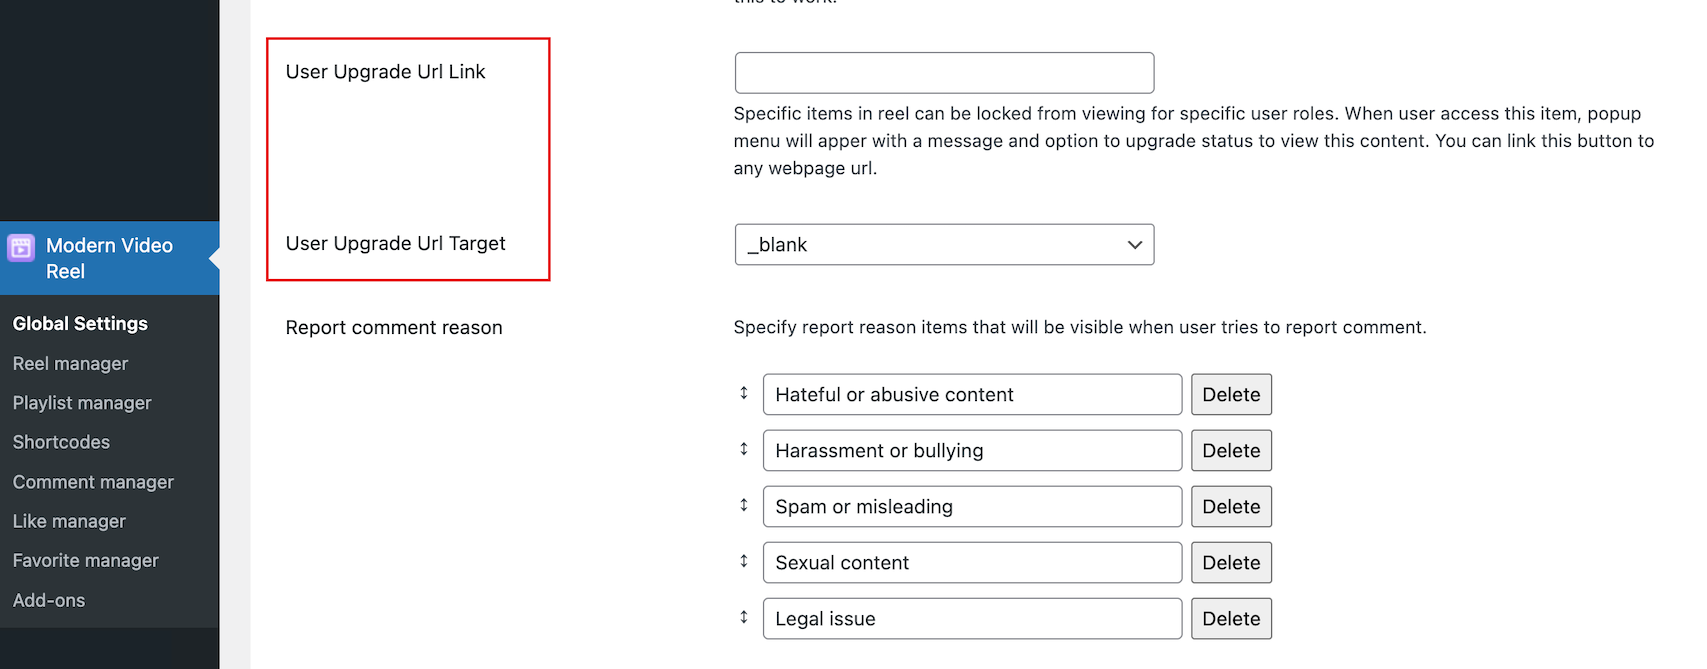
Further more, popup menu will open asking users to upgrade and option to redirect to any url.
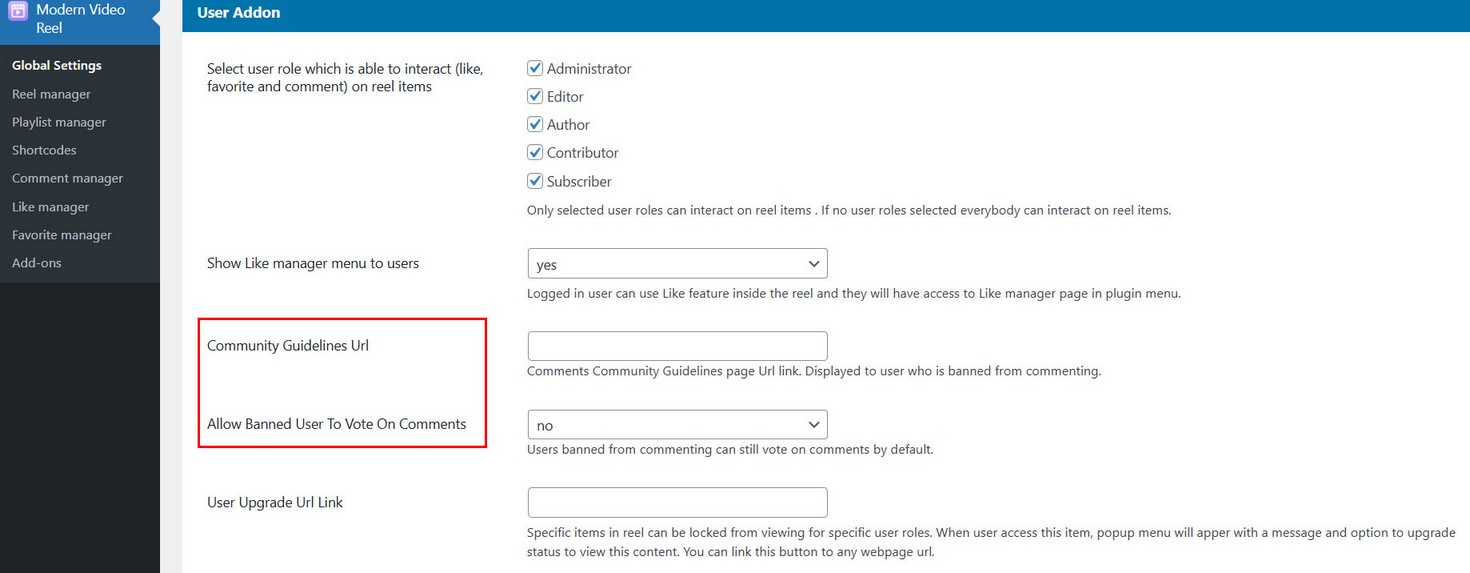
This options can be set in Global settings / User Addon tab
Notes
This does not include adverts. If you use Advert Addon for this plugin, adverts will still be shown to users even if content is restricted.
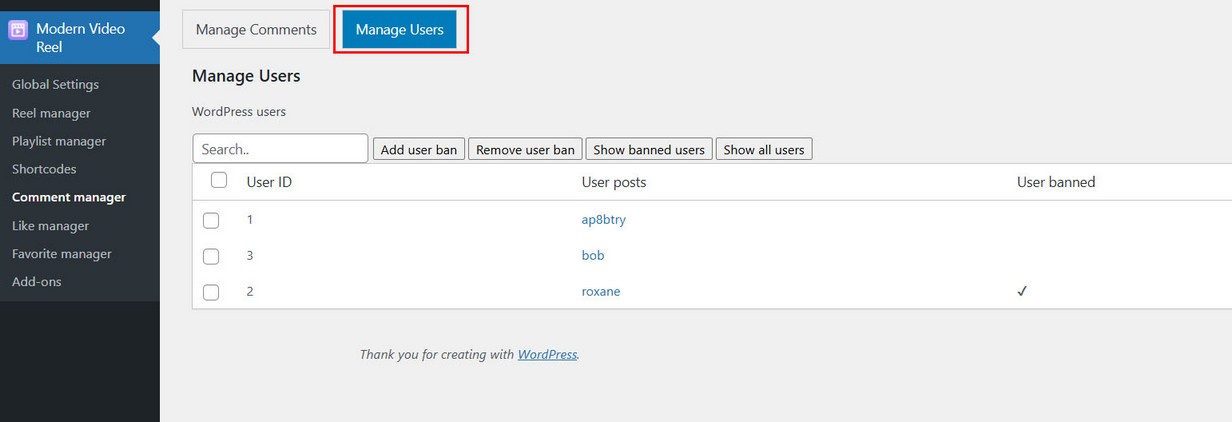
User ban
Users can be banned by admin from commenting.
Access Wordpress Users in Plugin menu / Comment manager. and manage their status.
If the user is banned, when browsing Reel and trying to make a comment or reply, he will receieve the following dialog.
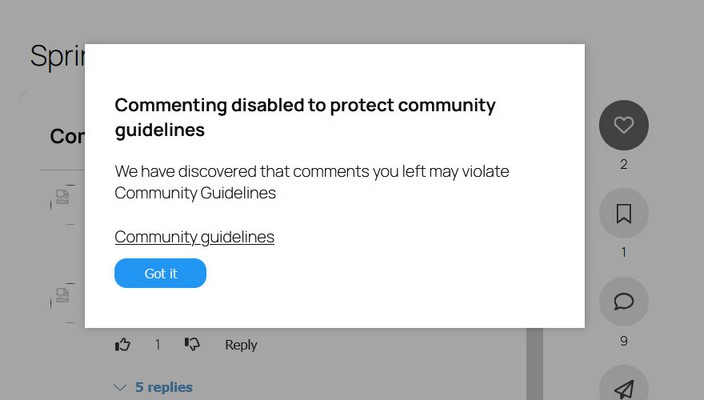
Settings available for User ban in Global settings / User Addon tab.
Adjust translation in Reel manager / Edit Reel settings / Translation tab.
![]()
WooCommerce Product addon
WooCommerce Product AddOn for Reel is available on the following link
Using WooCommerce Product AddOn for Modern Video Reel WordPress plugin You can attach WooCommerce products to Reel items or build Reel from WooCommerce product images and videos.
WooCommerce Products can display directly in the Reel and users can add products to cart using Ajax, without navigating away from the Page.
Activate Product AddOn
First make sure addOn is activated together with main Video Reel plugin.
Also, make sure you have the latest compatible version of main Video Reel plugin.
Register plugin inside Reel manager / Edit Reel / Product tab

Registration is done the same way as registering main plugin.
Using Product Addon
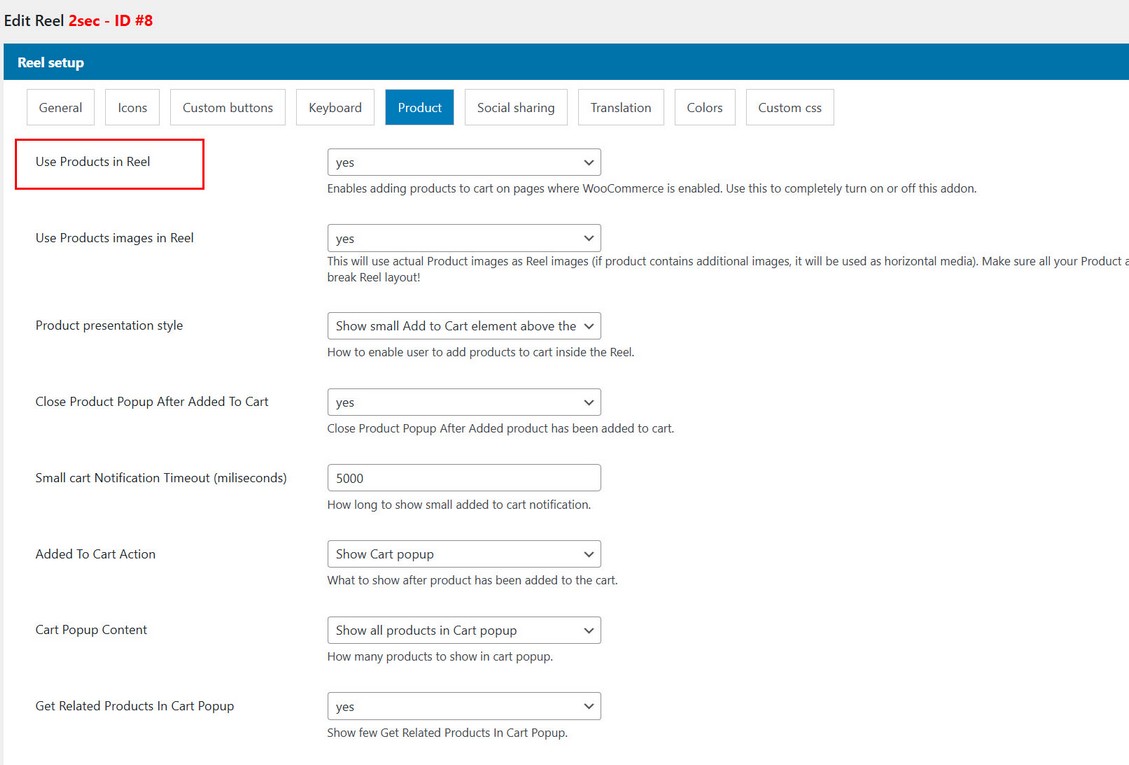
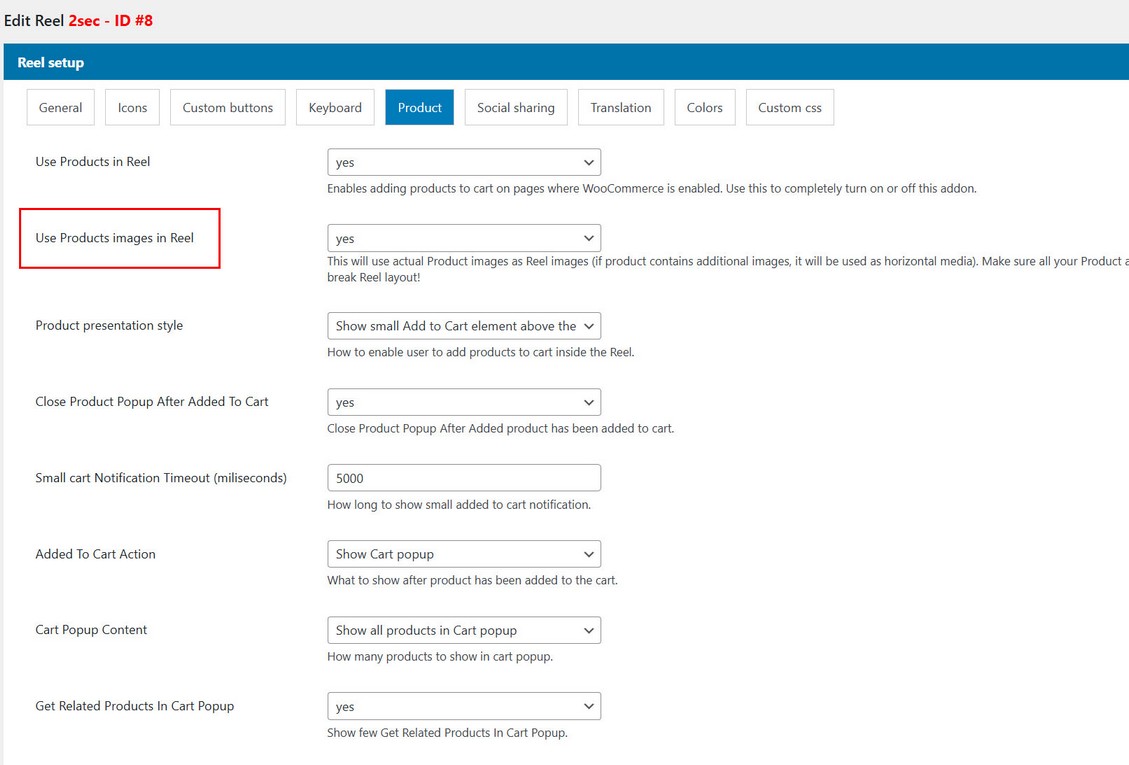
Activate Products in Reel
First, if you want to use Product in some Reel, activate them in Reel manager / Edit Reel / Product tab
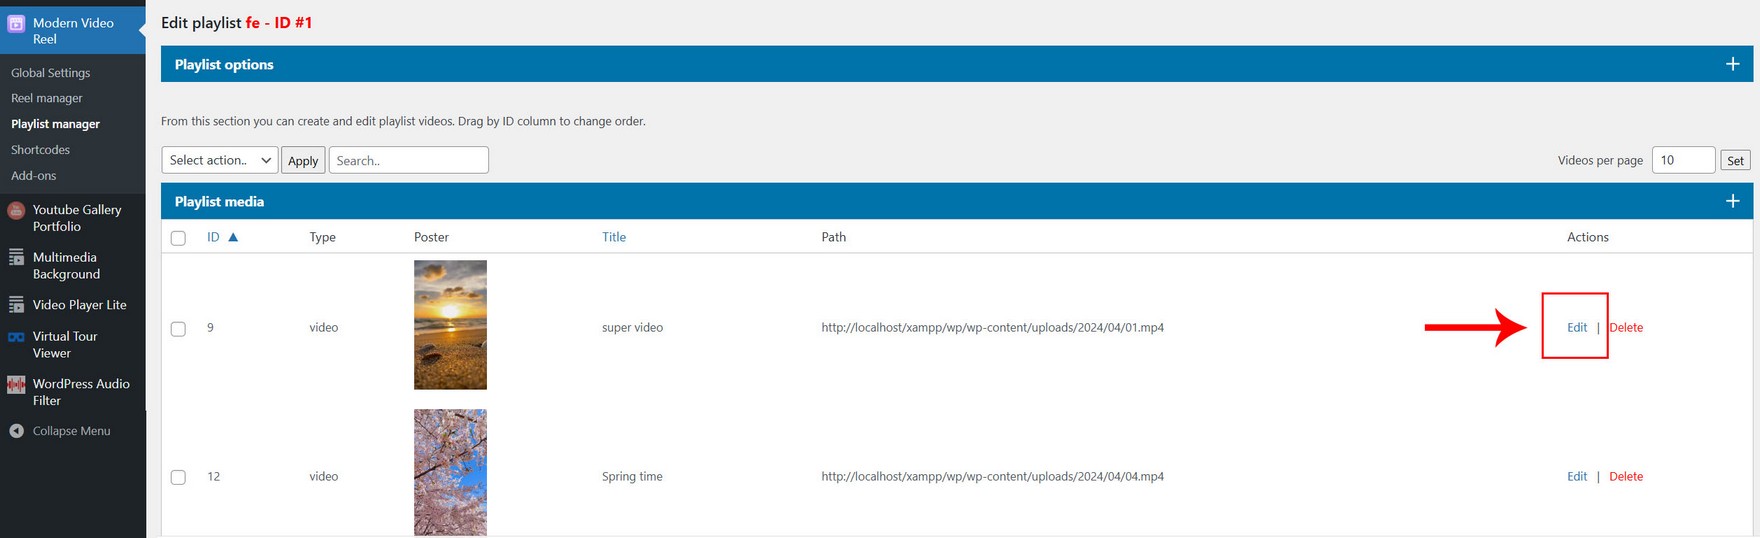
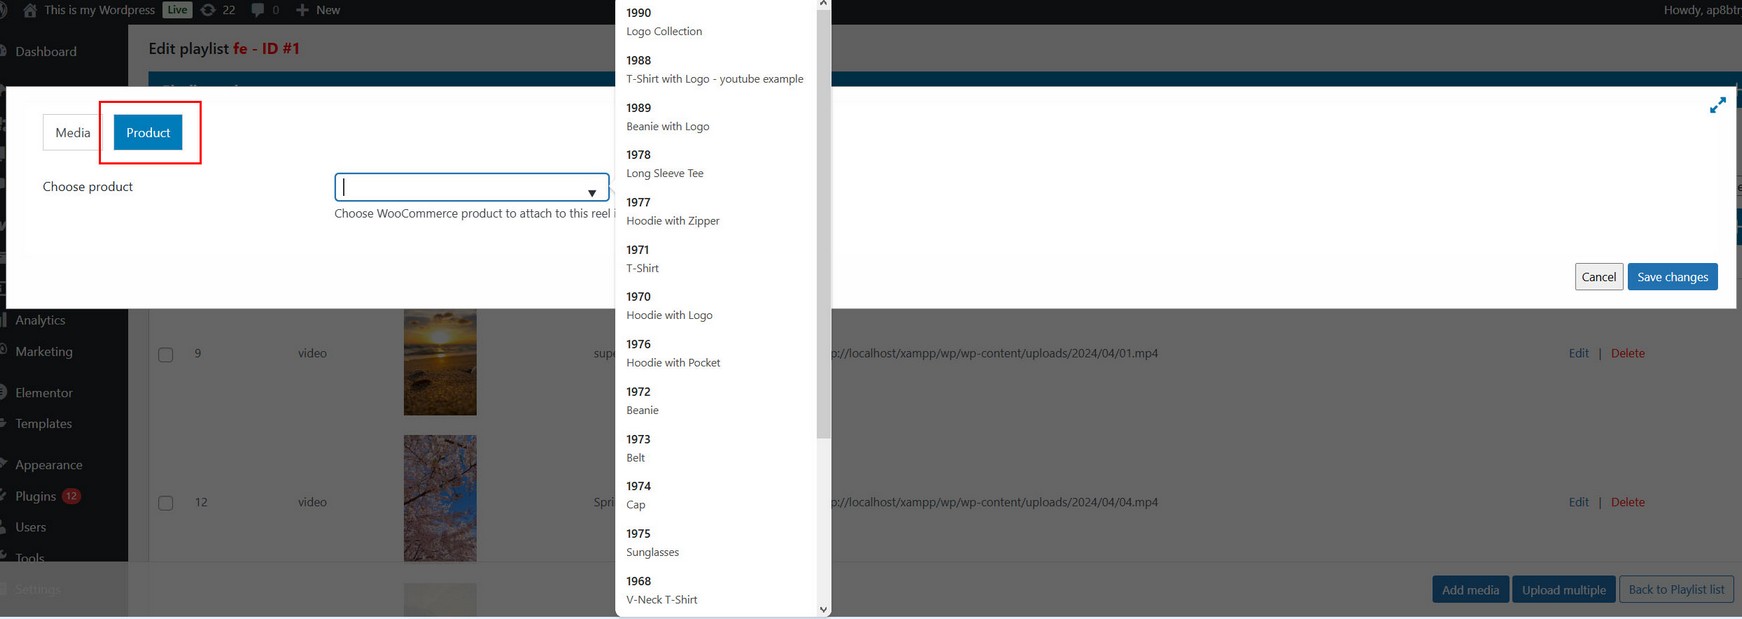
To attach product to specific Reel item, go to Playlist manager / Edit Playlist/ Add media dialog.
Product Addon options
Product Addon options are available inside Reel manager / Edit Reel
Translation:
![]()
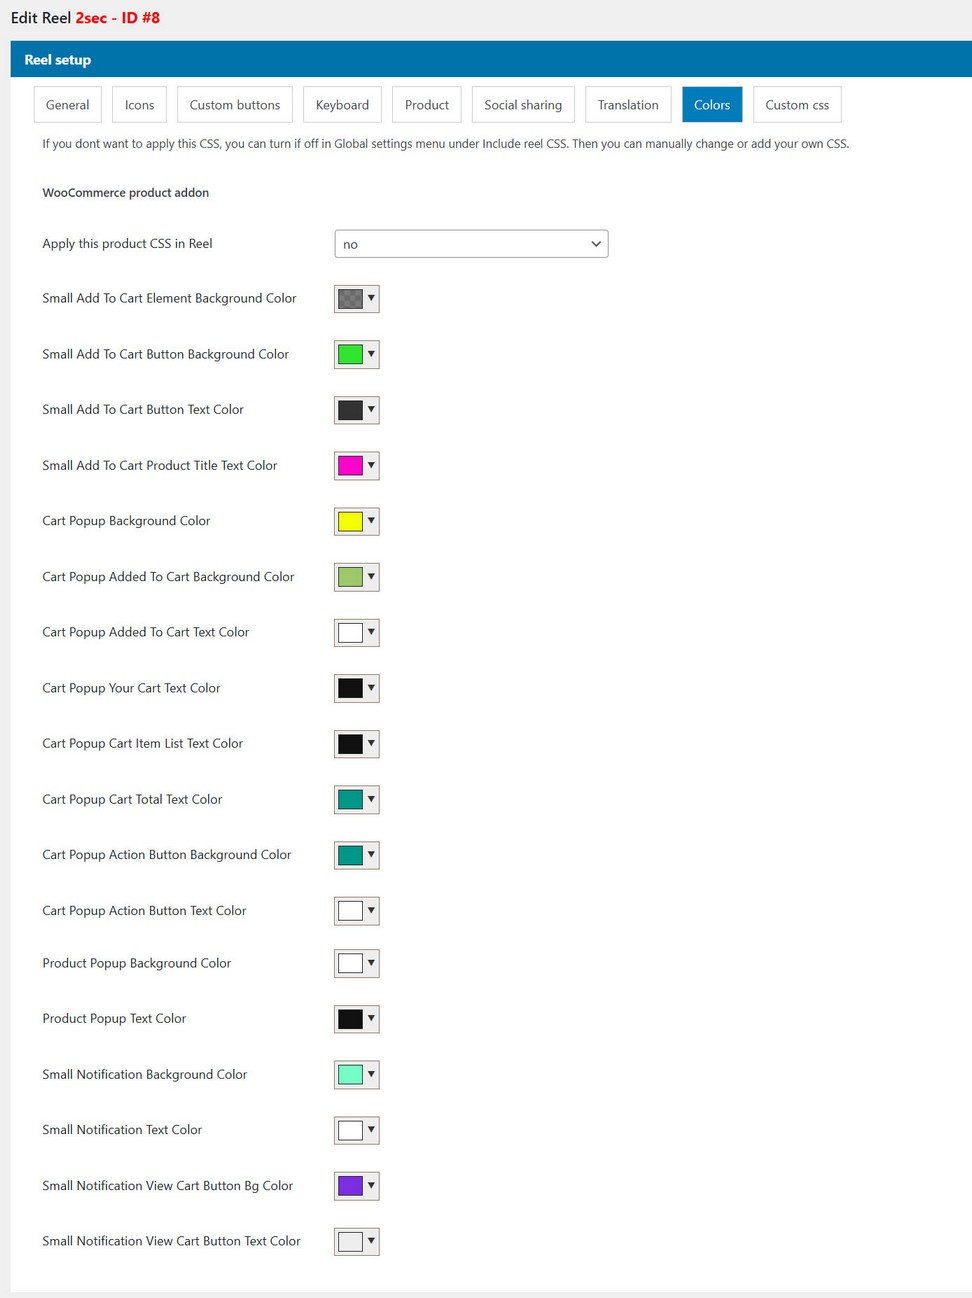
Colors:
Adding video to Product
Videos can be attached to products (and additional product images). To add videos to product from Product edit page, go to Reel video tab:

From there all product images and additional product images will be listed. You can attach video to every product image and a caption. Note that first product image is main image, while other can be variation images or additional product images.
Build Reel from WooCommerce product images and videos
If you want to show these videos together with product images in Reel, you can activate this option in Reel manager / Edit Reel / Product tab:
Main product image will be shown in Reel on start, while additional product images will be shown as Horizontal reel items.
Note that your videos should be the same size (or aspect ratio) as product images! Otherwise, having different size images and videos per Reel item may mess up the Reel layout.
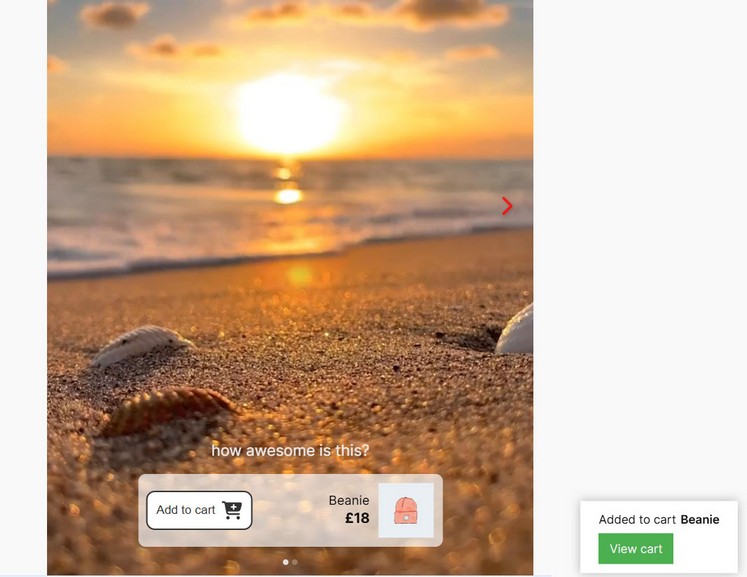
Add Product to cart
Add Product to cart in Reel
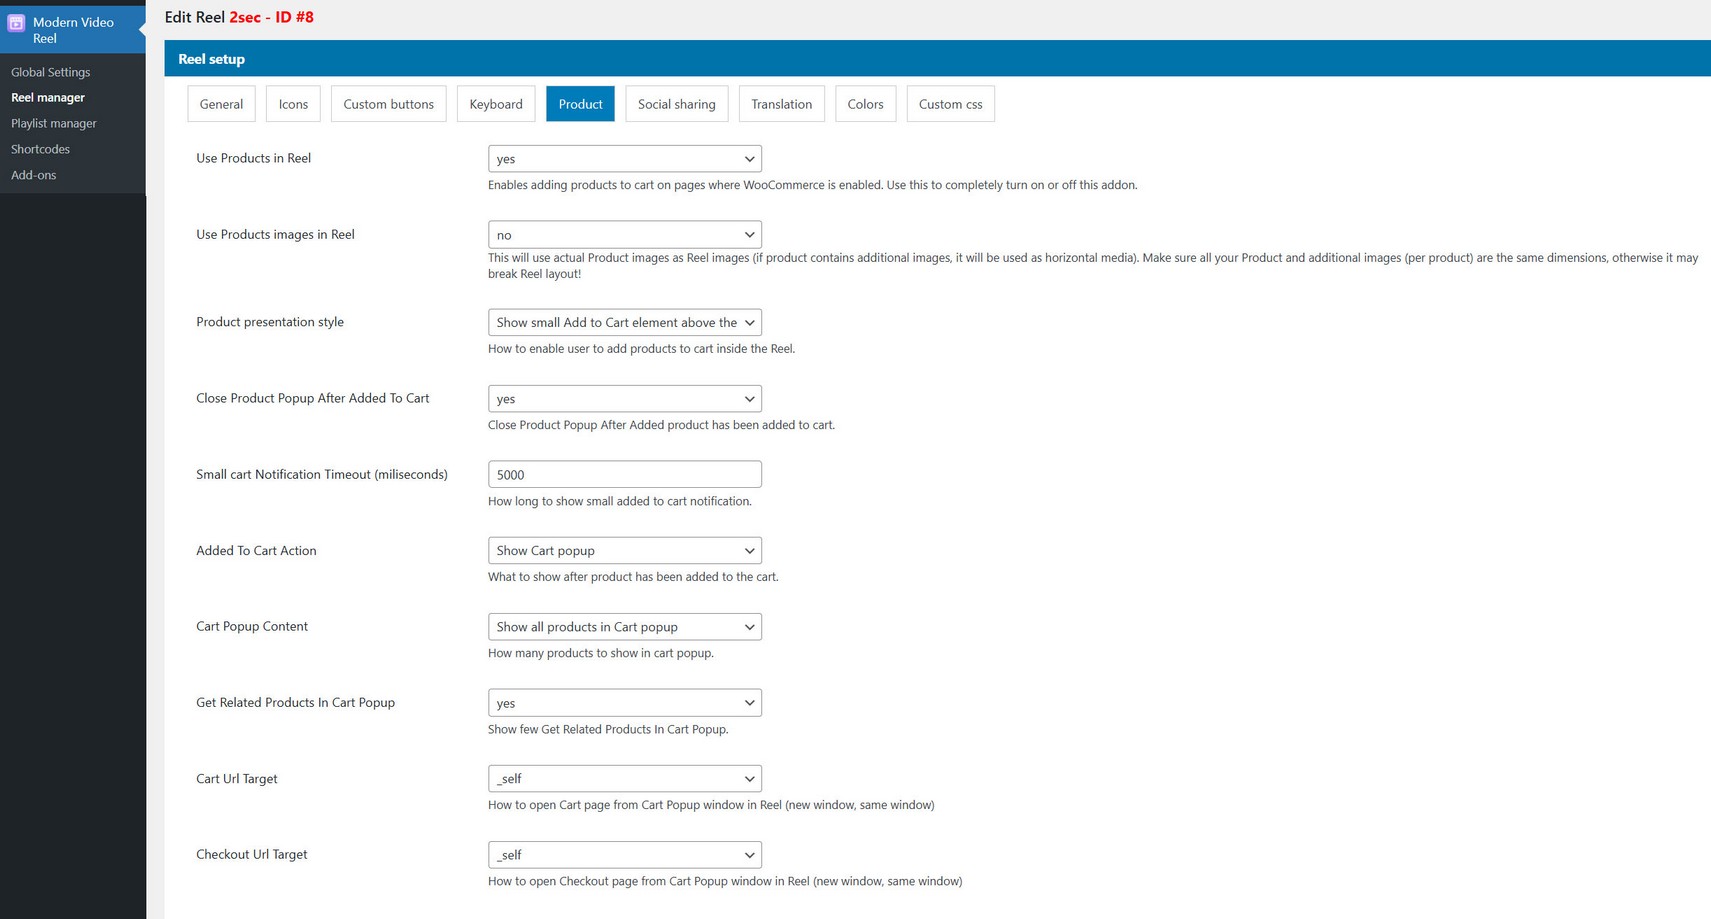
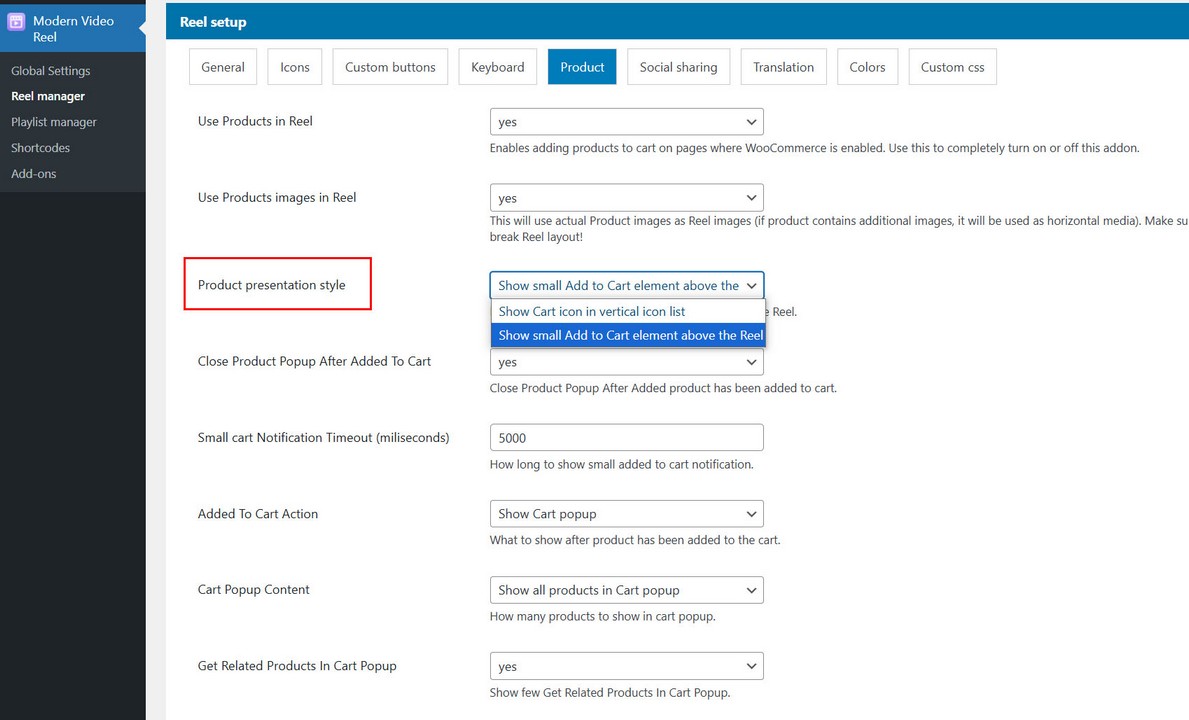
Choose available options inside Reel manager / Edit Reel / Product tab:
Cart icon in vetical list:
![]()
Small Cart element above Reel:

Added to Cart action
Choose action which will happen after product is added to cart inside Reel manager / Edit Reel / Product tab:
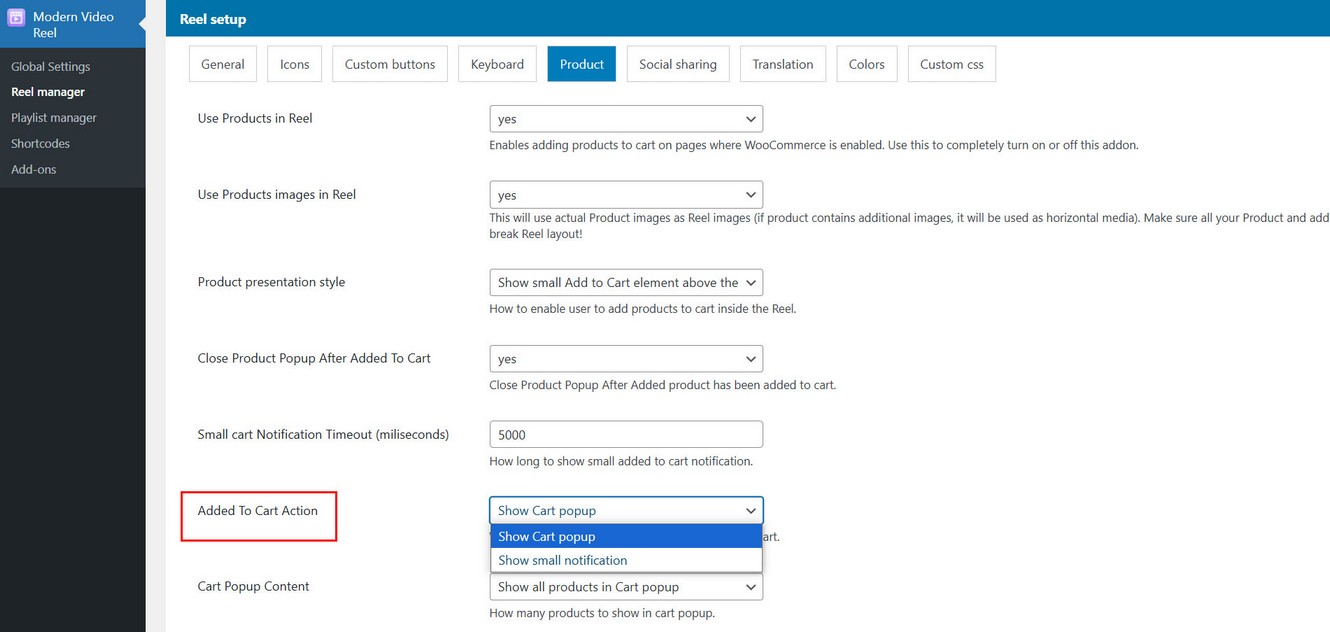
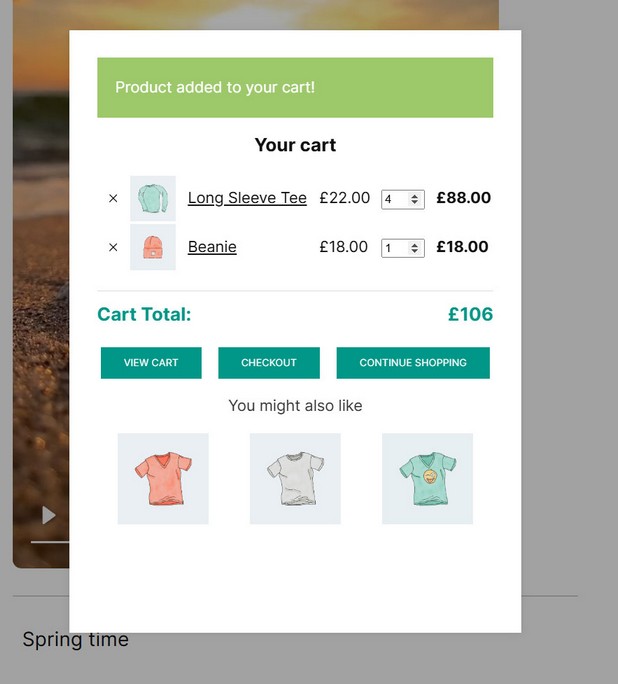
Cart popup will display context of Cart above the Reel:
Small notification will display at the bottom:
Adverts addon
Adverts AddOn for Reel is available on the following link
Using Advert AddOn for Modern Video Reel WordPress plugin, you can display all kinds of video, audio, image, HTML adverts and Vast inside the Reel. Adverts can be played before, during and after reel item playback, on pause, in repeated intervals etc..
Normal vs Vast adverts
Adverts split into 2 distinct categories: Normal adverts and Vast adverts.
Normal adverts can be HTML video, audio, image, Youtube and Vimeo single videos. Adverts can also be any type of HTML or url link. Adverts can be shown before, during or after main Reel items finishes playing. Adverts can be shown on pause, or in repeated intervals. These type of adverts can be used with any media type inside the Reel.
Vast adverts use Google Ima loader and support following types of vast adverts https://developers.google.com/interactive-media-ads/docs/sdks/html5/client-side/tags . Vast adverts can only be used with HTML video and audio inside the Reel.
Global vs individual adverts
Global adverts can be attached to whole Reel and will affect each item in the Reel (each reel item will use the same adverts). Global adverts can be defined in Plugin menu / Ad manager section.
Individual adverts only affect Reel item to which they are attached (Reel item is one video or image in whole Reel). Individual adverts can be defined item in Playlist manager / Edit Playlist/ Add media dialog.

Notes:
If Individual advert is set for some Reel item, it will take precedence over Global advert (if global adverts are attached to the Reel).
For example, following shortcode has global ads attached (ad_id):
[apmvp_reel player_id="PLAYER_ID" playlist_id="PLAYLIST_ID" ad_id="AD_ID"]
Global adverts (ad_id) will not be counted for Reel items inside items in playlist_id that have individual ads defined!
Using Adverts AddOn
First make sure addOn is activated together with main Video Reel plugin.
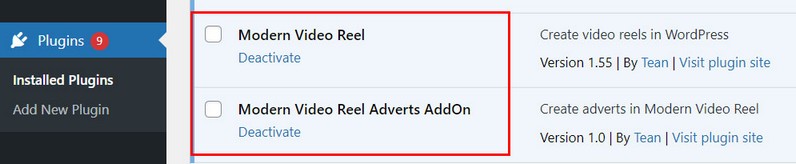
Also, make sure you have the latest compatible version of main Video Reel plugin.
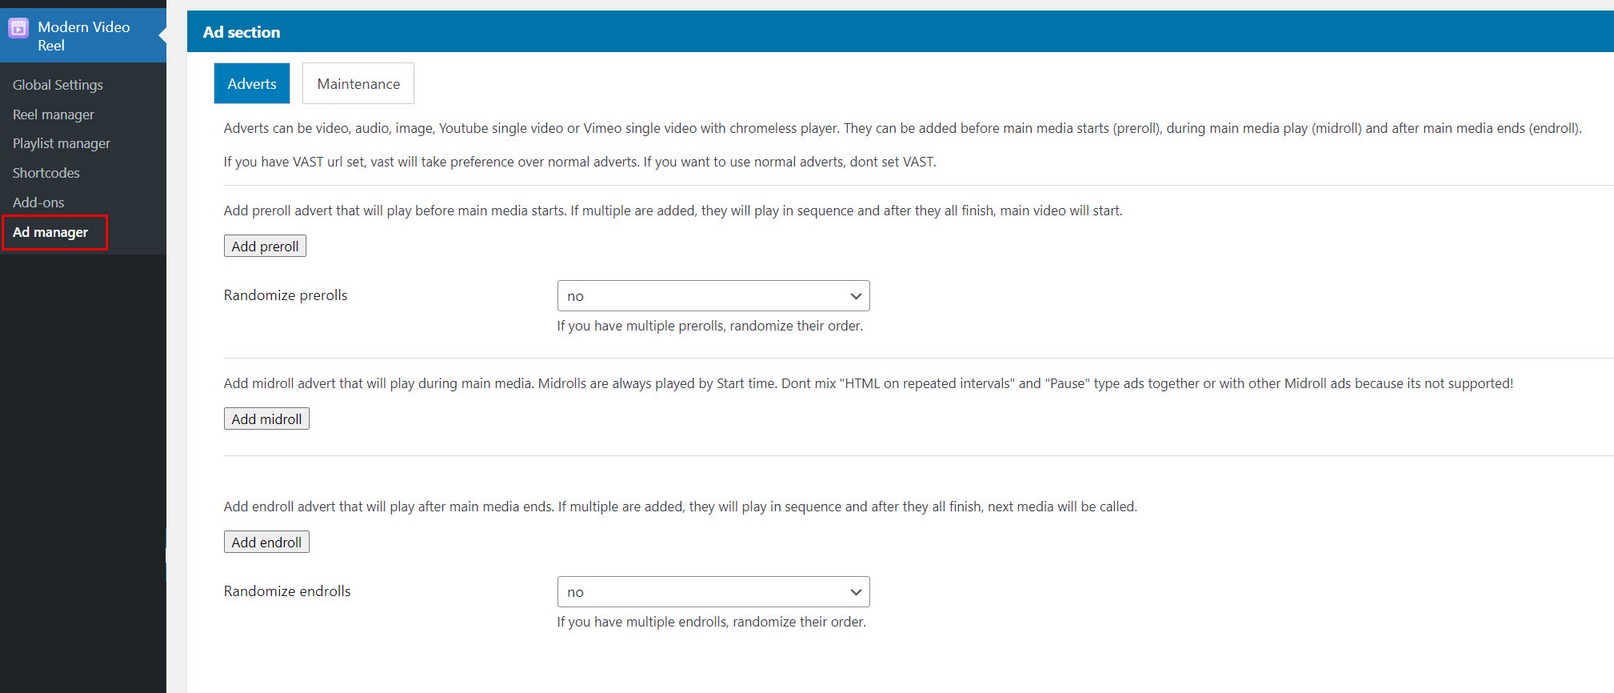
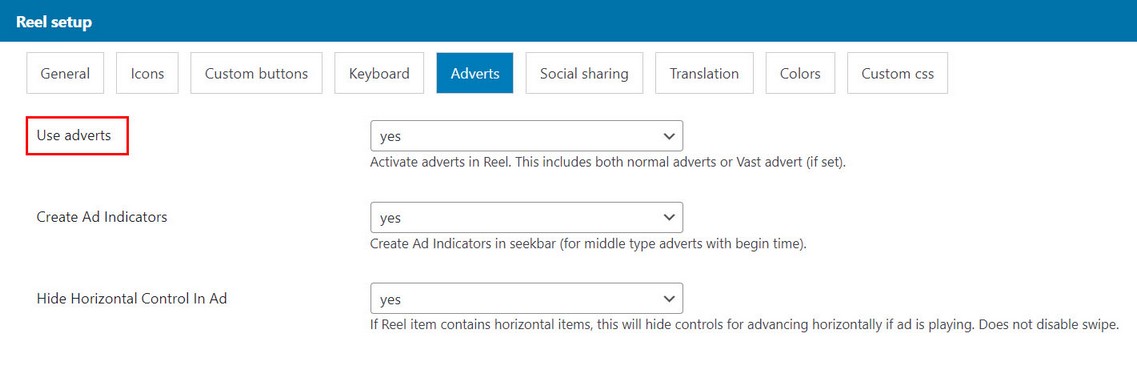
Activate adverts in Reel Manager / Edit Reel / Adverts tab (if not activated they will not show in the Reel)
Register plugin inside Reel manager / Edit Reel / Adverts tab

Registration is done the same way as registering main plugin.
Notes:
Adverts can be added only on main (vertical) Reel items. Adverts cannot be placed on inner horizontal media.
Adverts can be added to Reel type video, audio, Youtube or Vimeo. They cannot work with Reel type image or html.
When adverts play, Reel it not disabled by design (like a video player would be) and user can still scroll (navigate) normally through the reel and advance to next or previous Reel item using buttons or scroll / swipe.
Advert skip button is optional. It can be used so the user can skip the advert immediatelly or after X seconds.
Advert items (video, audio, Youtube...) have custom controls (play button, volume button, seekbar...) Its not possible to have video advert with default browser controls.
Advert compatibility
Some type of mid adverts cannot work together!
1. You cannot mix Mid adverts, Pause adverts and Repeat adverts together in one Reel item (Reel item being one video or image in Reel). They all belong to mid-type adverts that happen while main Reel item plays. Use either type of them in one Reel item, but not mixed!
2. Using Normal adverts and Vast adverts in single Reel item is not supported. Use either type of them but not together in one Reel item!
Pre adverts
Adverts before main Reel items (pre adverts)
One or more adverts can be placed before main Reel item and they will all play in sequence (if multiple) before main Reel item plays.
To add preroll inside the adverts tab, choose preroll and select type.
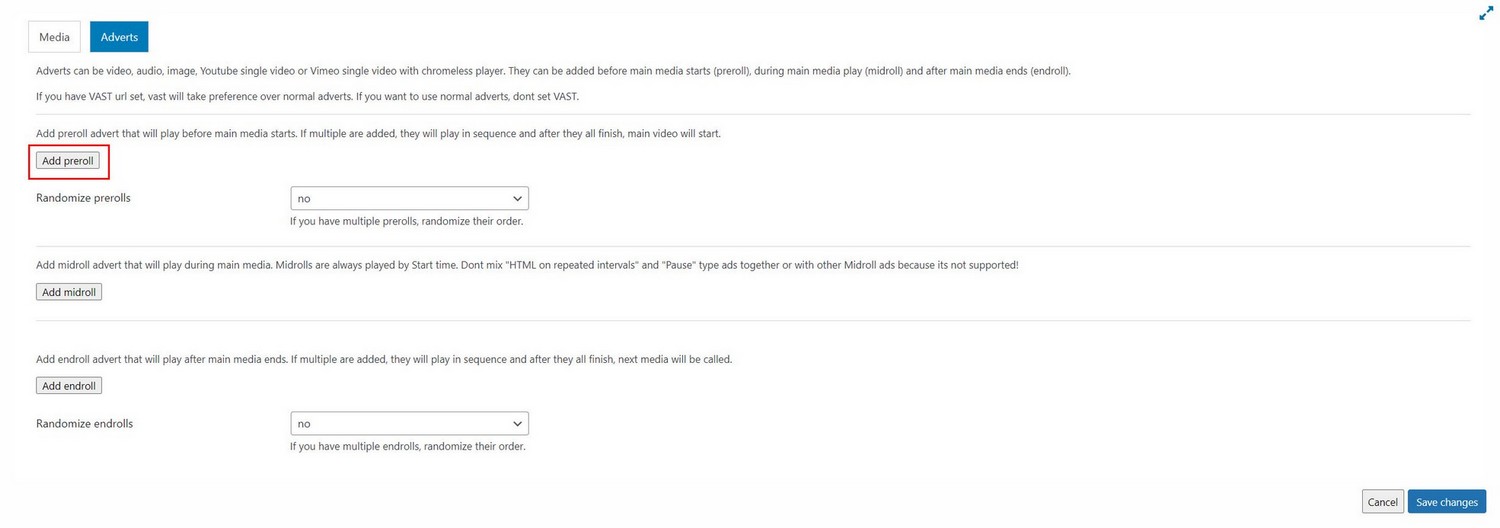
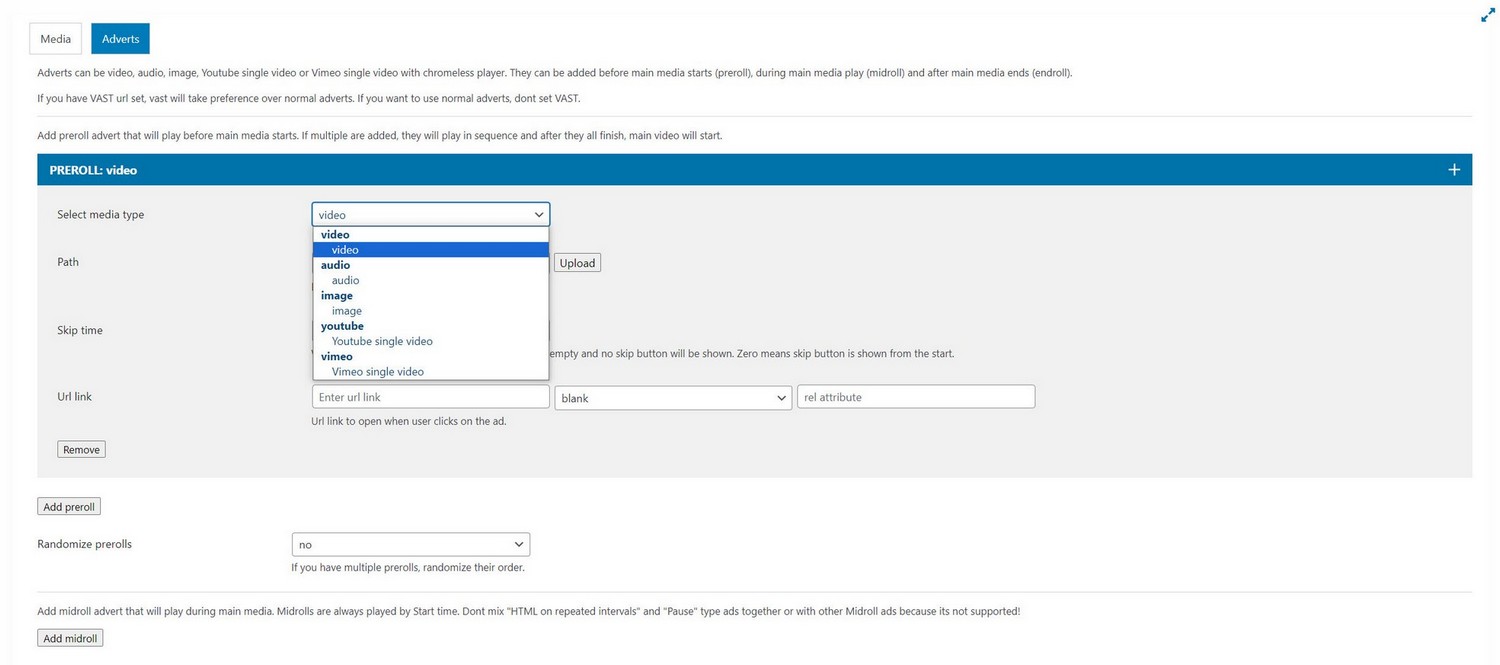
Preroll supports video, audio, image (with duration defined), Youtube single and Vimeo single video.
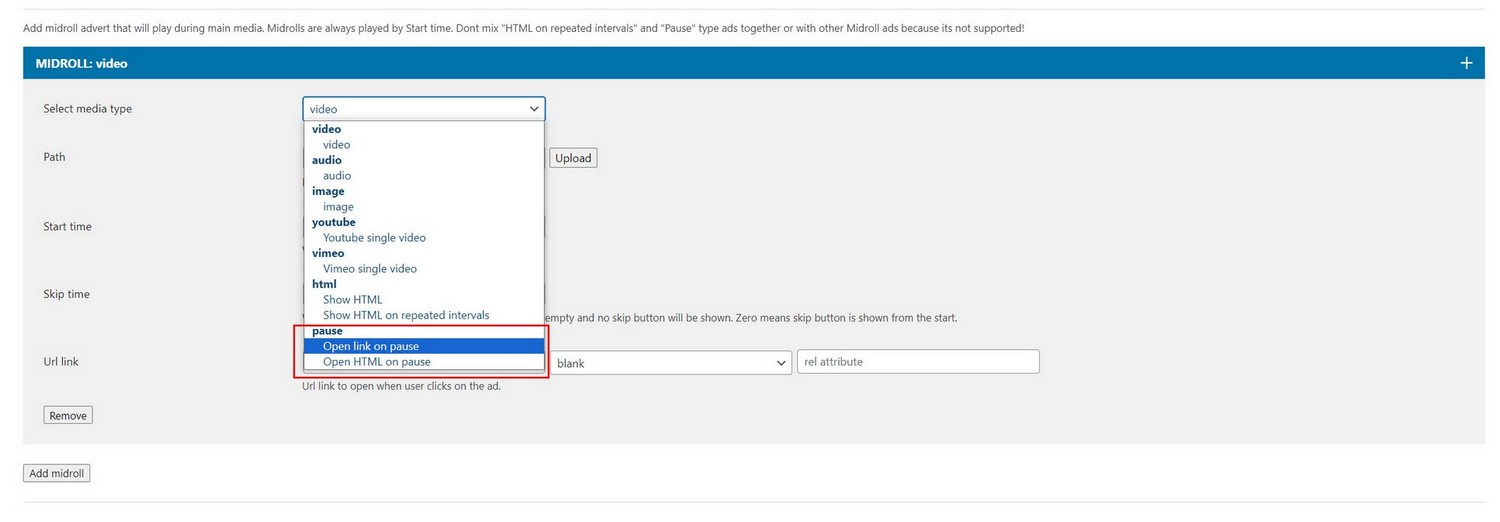
Mid adverts
Adverts during main Reel items (mid adverts)
One or more adverts can be placed to play during main Reel item.
To add midroll inside the adverts tab, choose midroll and select type.
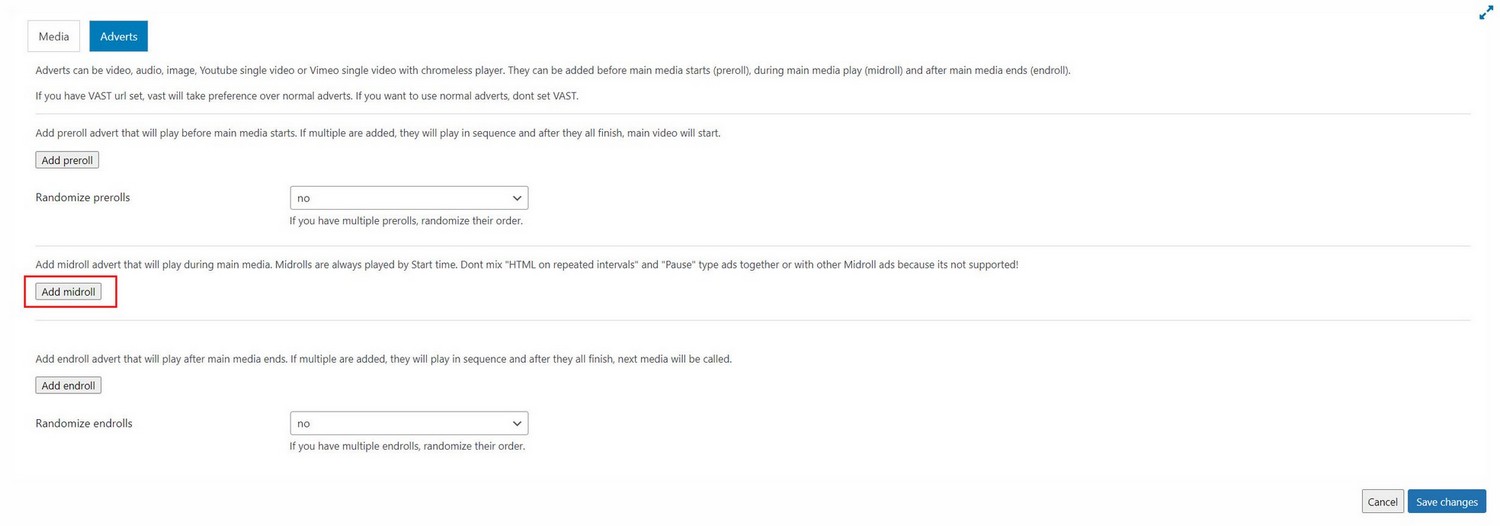
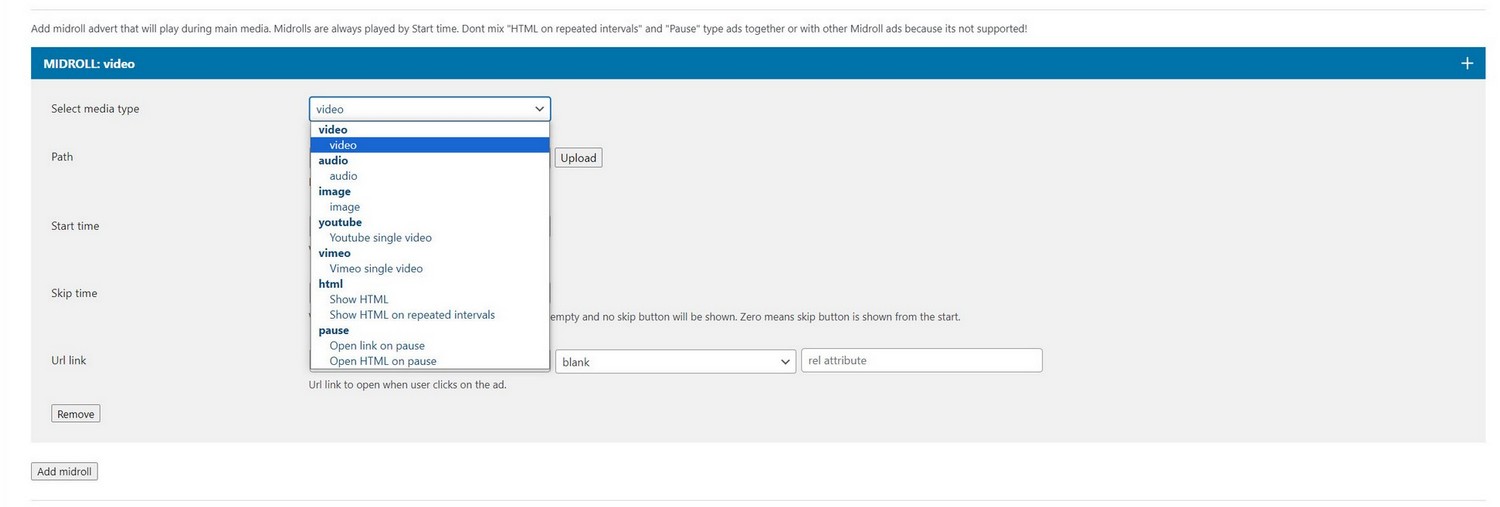
Midroll supports video, audio, image (with duration defined), Youtube single and Vimeo single video.
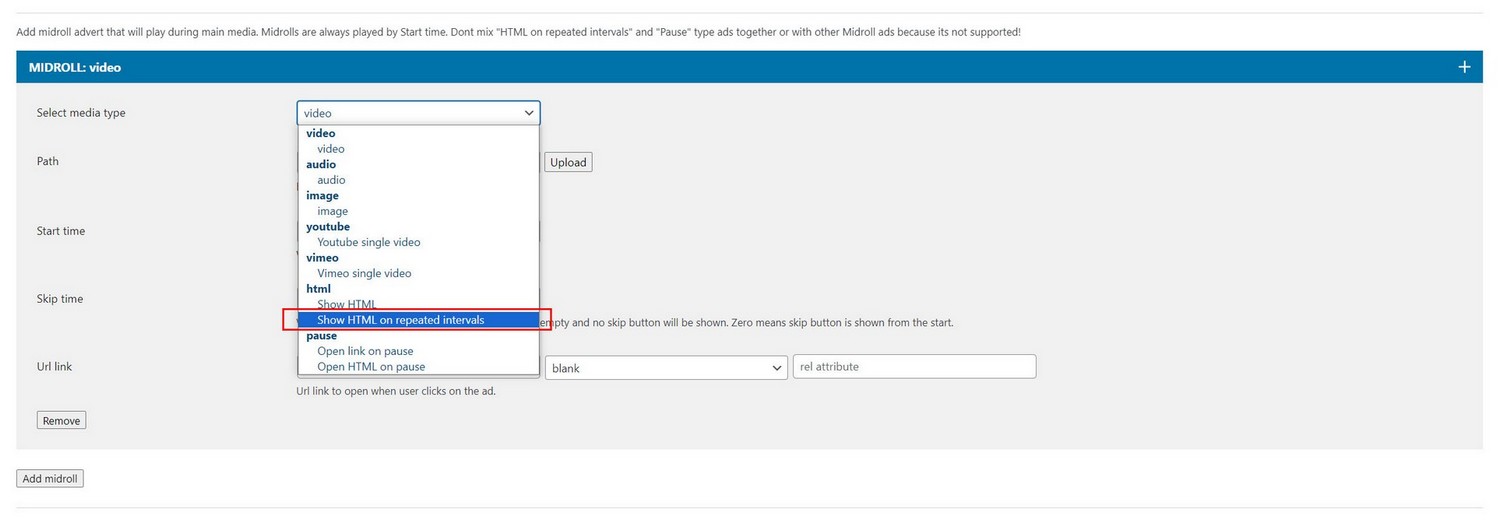
Midroll also supports placing your own custom HTML as advert (with specific time duration), showing HTML in repeated intervals (repeat the same HTML every 10 seconds for example) and Pause adverts (open link or show HTML when main Reel item is paused).
Its important to note that you cannot mix all these above mentioned midroll types together! So you need to chose one or more midroll type, but not mix them.
For example:
Usage 1, you can have defined several (video, audio, image, Youtube single and Vimeo single video) type of midroll, each with different start time.
Usage 2, you can have defined several HTML (show custom HTML at specific start time) type of midroll, each with different start time.
Usage 3, you can have defined several HTML in repeated intervals (repeat HTML every 10 seconds) type of midroll.
Usage 4, you can have defined several Pause adverts (open link or show HTML when main Reel item is paused) type of midroll.
End adverts
Adverts that play after main Reel items (end adverts)
One or more adverts can be placed to play after main Reel item finishes playing. If multiple are added they will play in sequence.
Note that Auto scroll reel need to be turned on for end advert to be triggered!
To add endroll inside the adverts tab, choose endroll and select type.
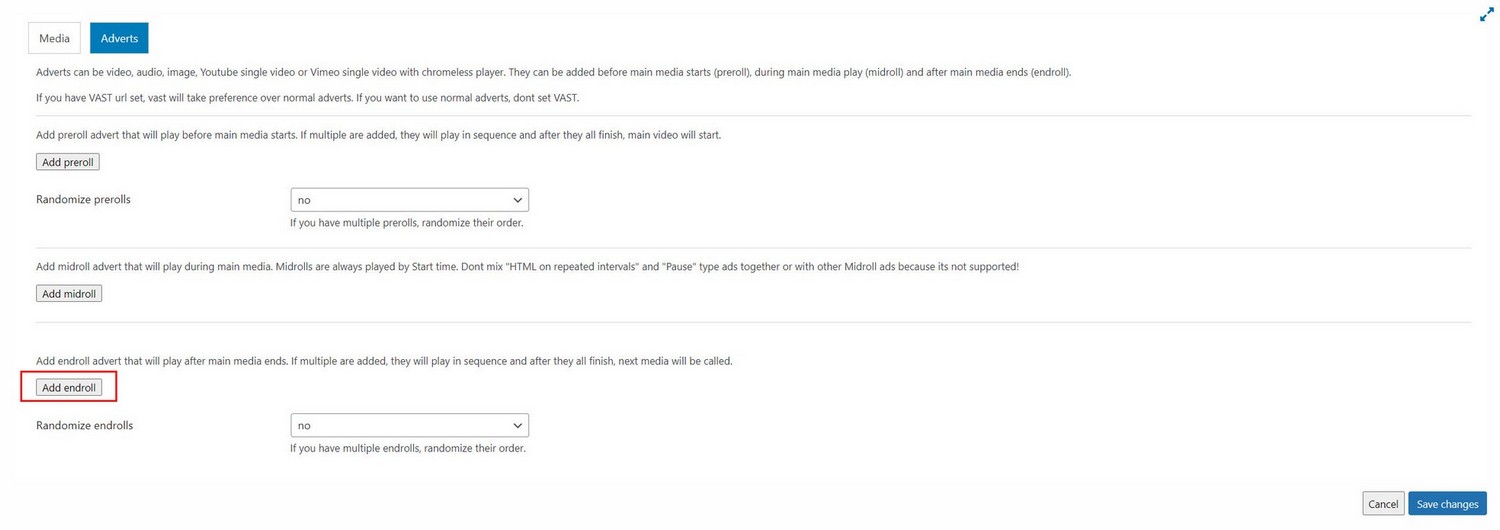
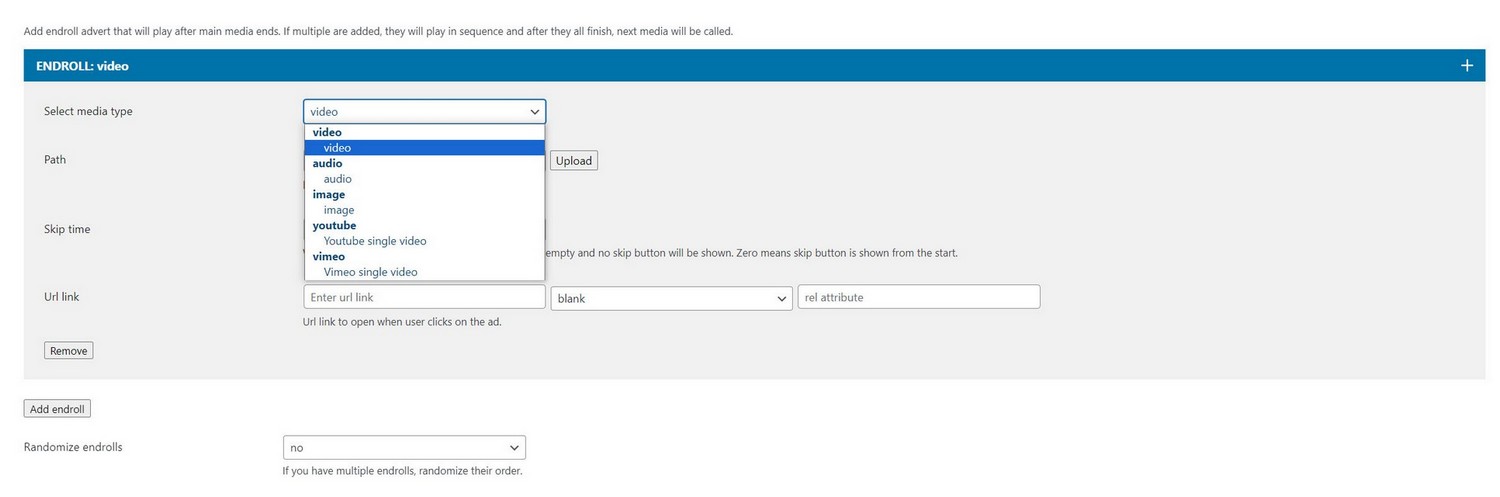
Endroll supports video, audio, image (with duration defined), Youtube single and Vimeo single video.
Pause adverts
Adverts that play when main Reel items is paused
You can open a url link or show custom HTML when Reel video is paused. One or more adverts can be defined to show when main Reel item is paused. If multiple are added each one will show on new pause.
To add Pause advert inside the adverts tab, choose midroll and select type.
HTML adverts
Adding custom HTML in advert
Custom HTML can be show in advert (your own element in page can be shown in Reel as advert)
To add Custom HTML advert inside the adverts tab, choose midroll and select Show HTML.
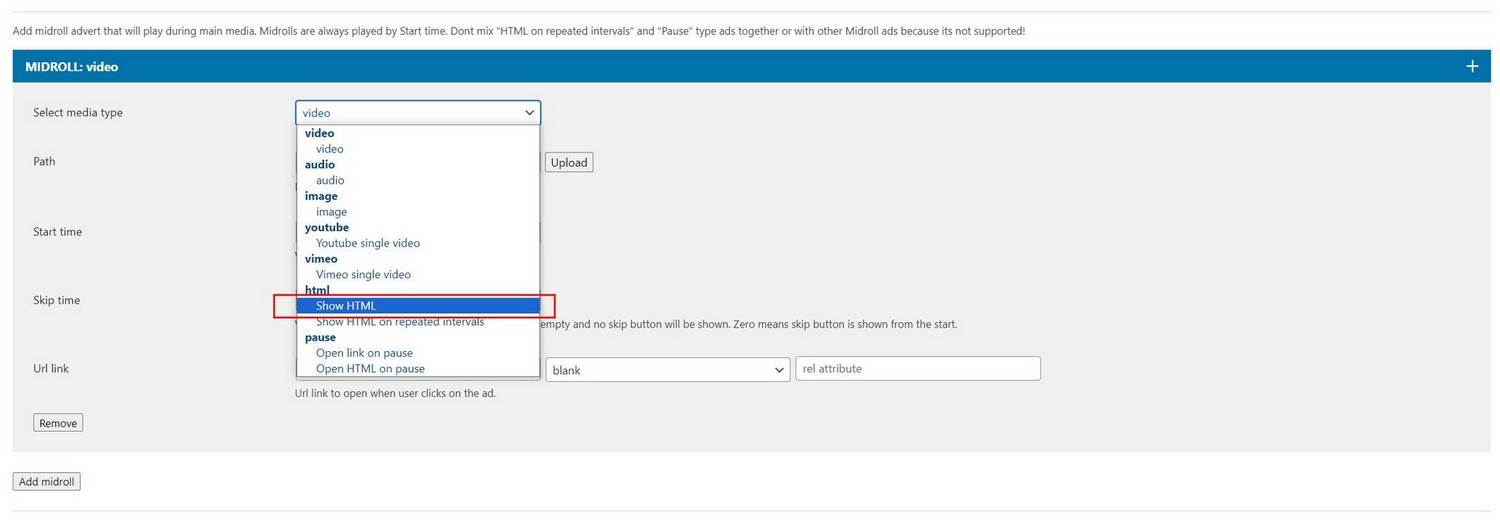
Inside the path field you enter ID attribute of your element (for example #my-div).
Note that you need to have element with ID attribute defined in path present somewhere in page body.
Remember to add your own CSS for this element (#my-div)
HTML Repeat adverts
Show custom HTML that repeat every X seconds while main Reel items is playing
Same as HTML adverts except they repeat every x seconds.
One or more adverts can be defined to play when main Reel item is playing. If multiple are added each one will play in sequence.
To add Repeat advert inside the adverts tab, choose midroll and select Show HTML on repeated intervals.
Reel item as advert
Making whole Reel item an advert (reel item is advert)
In your Reel, you can make individual vertical Reel item behave as advert (meaning whole Reel item is advert and contains nothing more). As your scroll down the Reel, you have one video for example, then next Reel item is scrolled to, this item is an advert.

How to create Reel item as advert?
Inside Playlist manager / Edit Playlist / Add media dialog, under Media tag, choose Make Reel item as advert (this option wil be available for media type video, audio, image, Youtube single video, Vimeo single video):
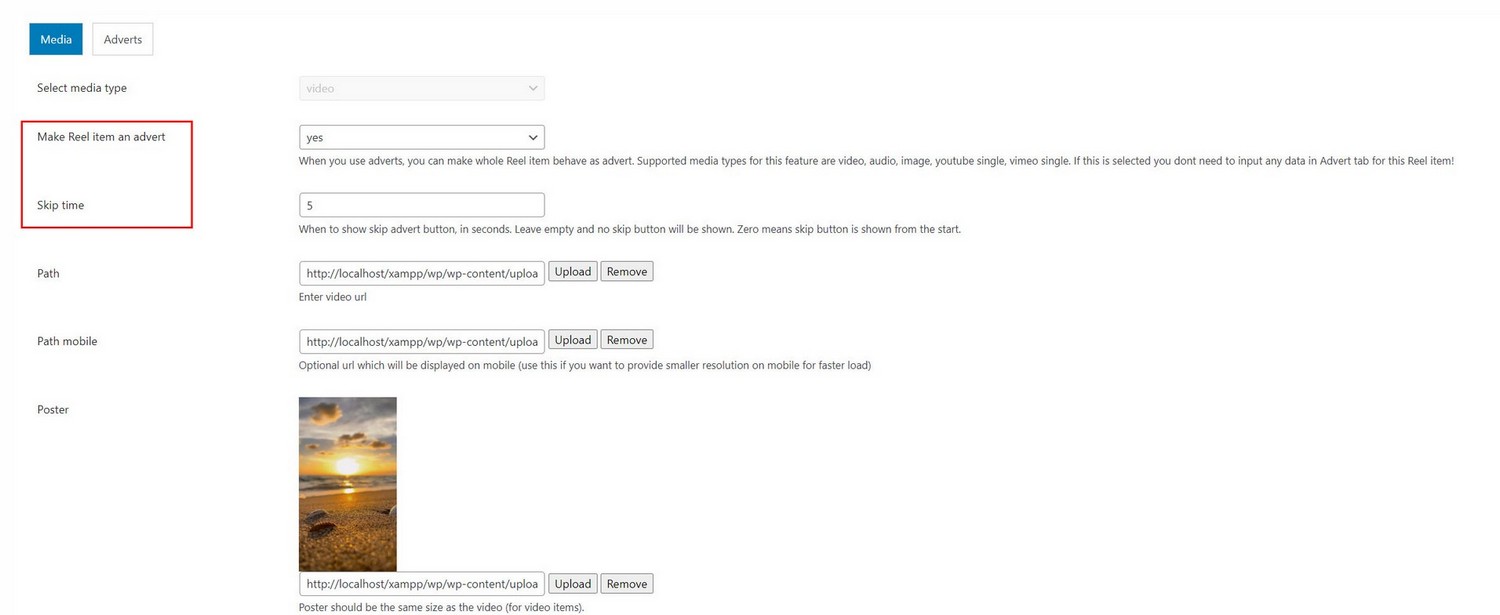
When this is active, anything what is set inside the Adverts tab will be ignored!
Mixing adverts
Most normal adverts can be mixed together in single Reel item.
You can set (for example) preroll, midroll and endroll advert in single Reel item.
Note that you cannot mix different types of midroll adverts together!
Vast adverts
Using Vast adverts
Notes / Rules
You can either use Vast adverts or normal adverts (all other adverts described in this Addon) per single Reel item (single Reel item is one video or image in Reel). For example, Its not possible to mix Vast advert with mid advert in single Reel item.
Although we suggest using either Vast adverts or normal adverts per whole Reel.
Vast adverts only work with HTML video (mp4) or audio (mp3, wav...) in Reel. This means Vast cannot be used with Youtube or Vimeo for example.
Supported Vast advert examples are listed here: https://developers.google.com/interactive-media-ads/docs/sdks/html5/client-side/tags
Make sure you run plugin on server (local or online) when you use Vast adverts! It will not work offline!
Each Reel item can have single Vast advert!
If Vast advert is defined, it will take precedence over normal adverts!
Adding Vast adverts
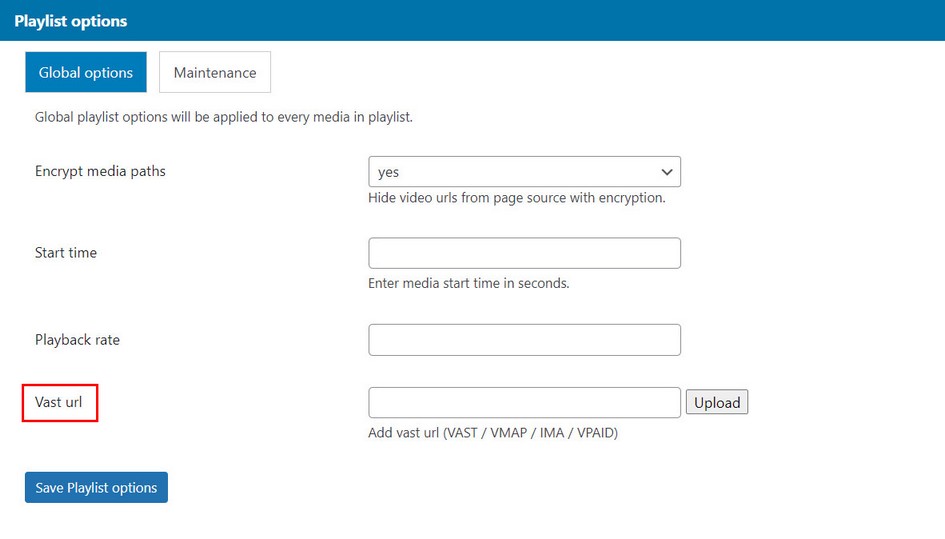
1. Vast advert can be added in Playlist manager / Edit Playlist / Global options tab. Vast added in such way will be used for every item in Reel.
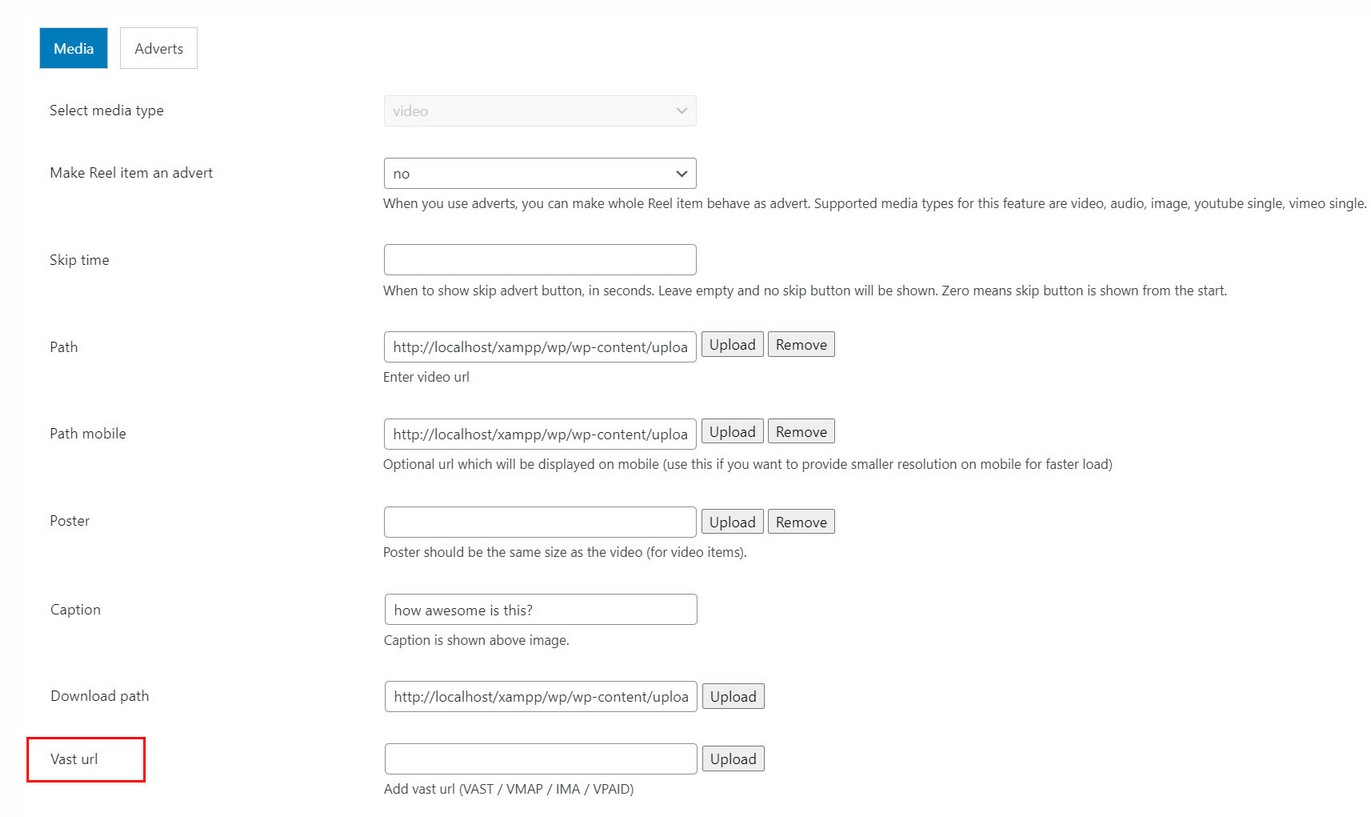
2. Vast advert can be added in Playlist manager / Edit Playlist / Add media dialog. Vast added in such way will be used only for this Reel item.
Adverts API
Following functions are available to control adverts externally.
player.removeAd();//remove advert. This will skip advert which is currently playing. You can use this if advert does not have a skip button (for example) and requires user action to continue playing videos in the reel after advert.
How to use API methods in WordPress text editor:
<a onclick="closeAdvert();return false;" href="#">Close Advert </a>
<script type="text/javascript">
    function closeAdvert(){
        mvp_reel_playerID.removeAd();
    };
</script>
mvp_reel_playerID is constructed from mvp_reel_player + ID.
ID is generated automatically starting from 0 for every new reel you place in page. For example, if you add one reel in page, ID will be 0 (so it becomes mvp_reel_player0).
You can also manually add instance_id in shortcode (then the plugin will use this as ID), example (This reel will have ID 1):
Amazon S3
Amazon AddOn
Amazon AddOn is available on the following link
Using Amazon AddOn for Modern Video Reel, it allows playback of video and audio files stored in Amazon S3 storage with presigned url. Playback is enabled for both private and public buckets. You can use Amazon S3 with Amazon CloudFront to host videos in a secure way.
Features
- Play video and audio files from S3 storage
- Support for private nad public buckets
- Play single or multiple videos
- Load whole bucket of videos in single playlist
- Use Amazon S3 with CloudFront support.
- Automatically load video video poster from S3 storage (optional)
- Can be mixed with other media types in the playlist
Using Amazon AddOn
First make sure addOn is activated together with main Video Reel plugin.

Also, make sure you have the latest compatible version of main Video Reel plugin.
Register plugin inside Reel manager / Edit Reel / Amazon tab
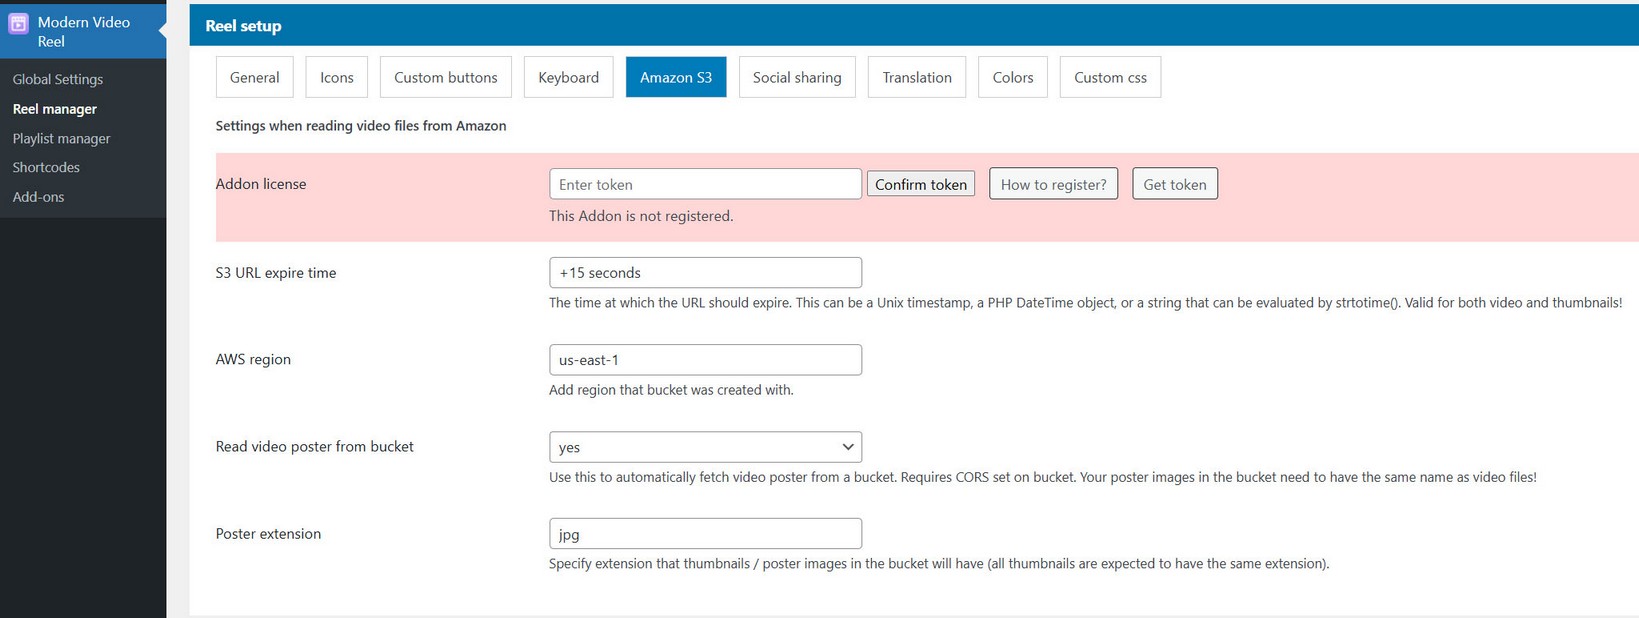
Registration is done the same way as registering main plugin.
Note: if you just want to place your files in public bucket on Amazon S3, you dont need this setup! Then just link to files as usual and use media type video (or audio).
Settings
Supported are public and private buckets. Supported are single video/audio urls and reading a whole bucket with video/audio files inside.
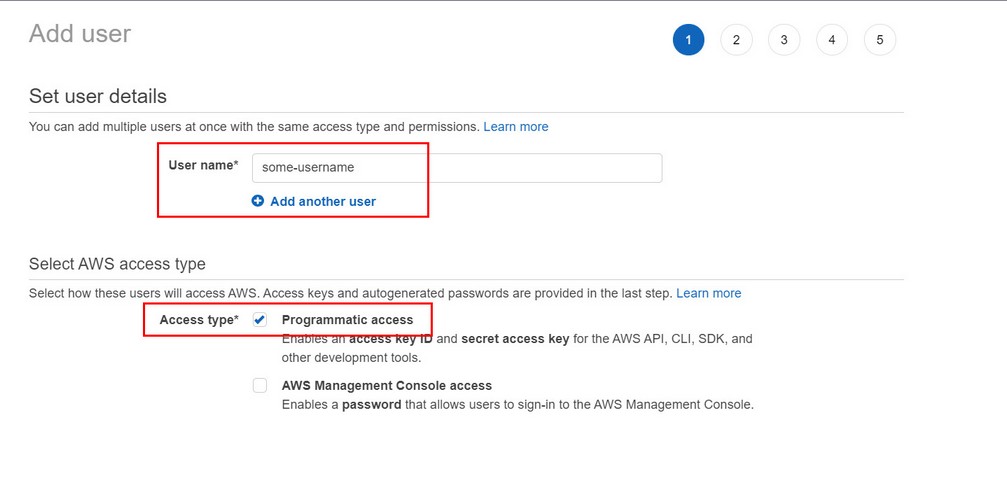
Credentials setup
1. Create IAM user with credentails on the following link:
https://console.aws.amazon.com/iam/home#/home2. Add username and enable Programmatic access:
3. Enable AmazonS3ReadOnlyAccess policy for user:

4. After user is created copy his credentials (key and secret) and enter then in Global settings / Credentials:


CORS setup
Add CORS policy to bucket (this is required if you want to use image poster / thumbnails in player which are also located in the bucket):
To add CORS policy, go to permissions tab in the bucket, scroll to CORS section and enter the following:
[
    {
        "AllowedHeaders": [
            "*"
        ],
        "AllowedMethods": [
            "GET",
            "HEAD"
        ],
        "AllowedOrigins": [
            "*"
        ],
        "ExposeHeaders": [],
        "MaxAgeSeconds": 3000
    }
]

Video setup
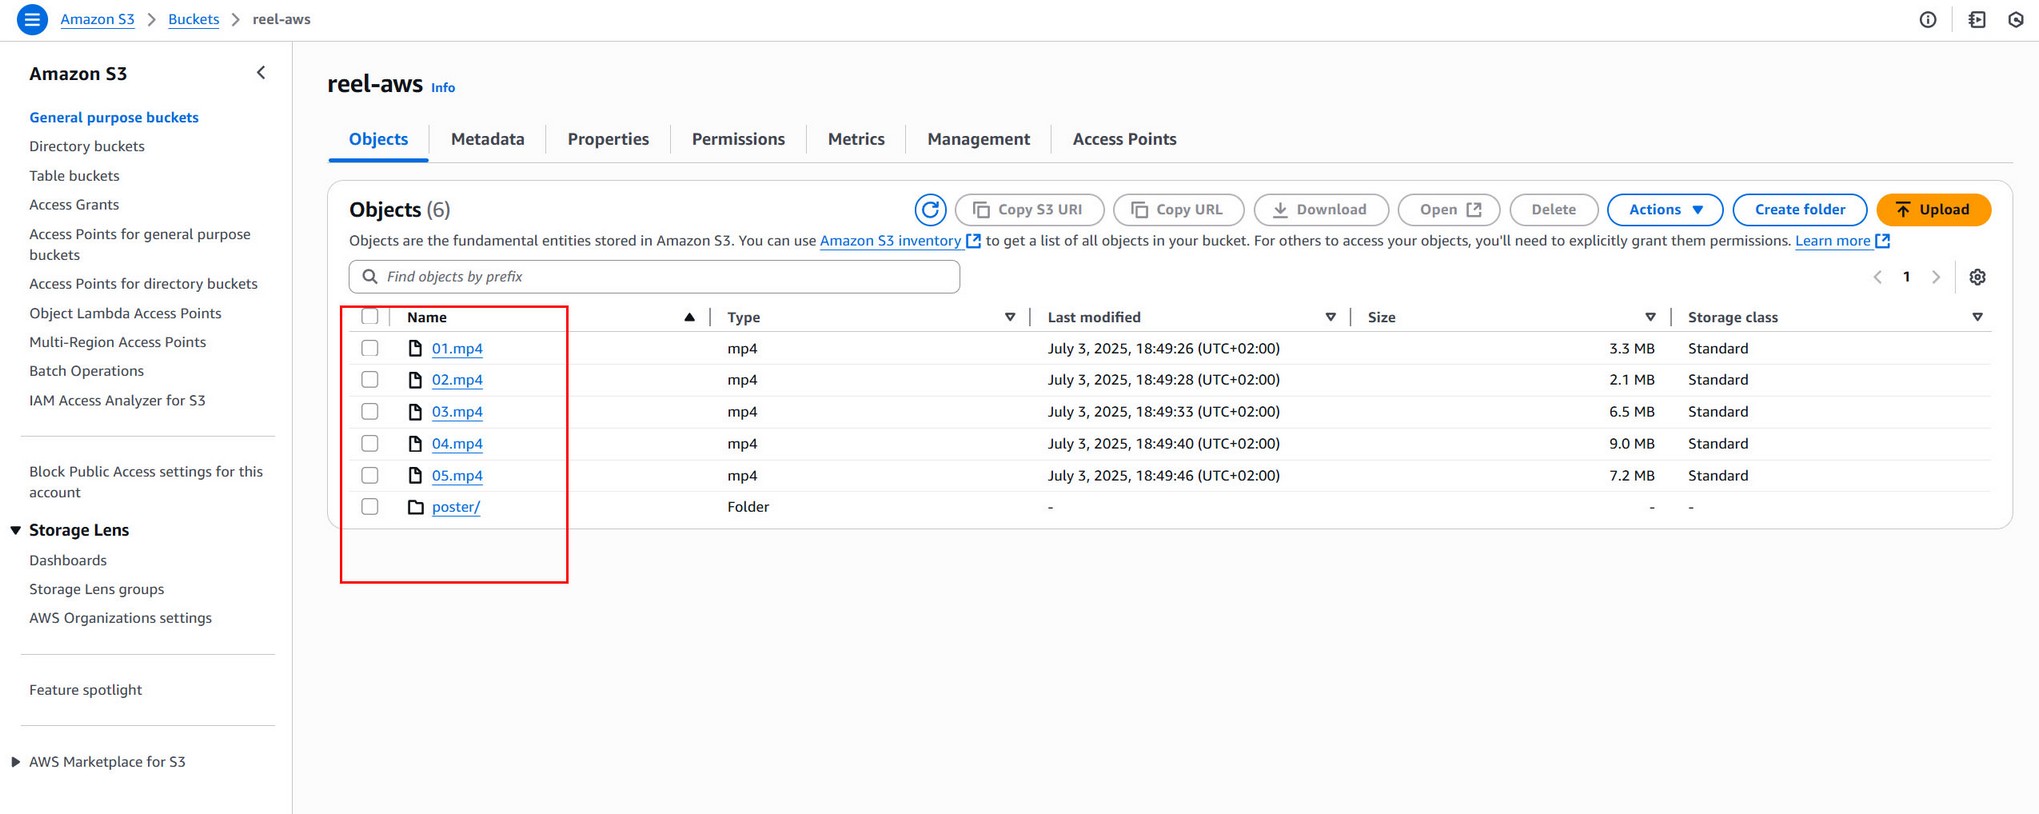
Supported are single video urls and reading a whole bucket with video files inside (the same is true for audio).
1. Read whole bucket with video files:
Create bucket, and choose AWS region closest to you.

Enter highlighted region in plugin settings:

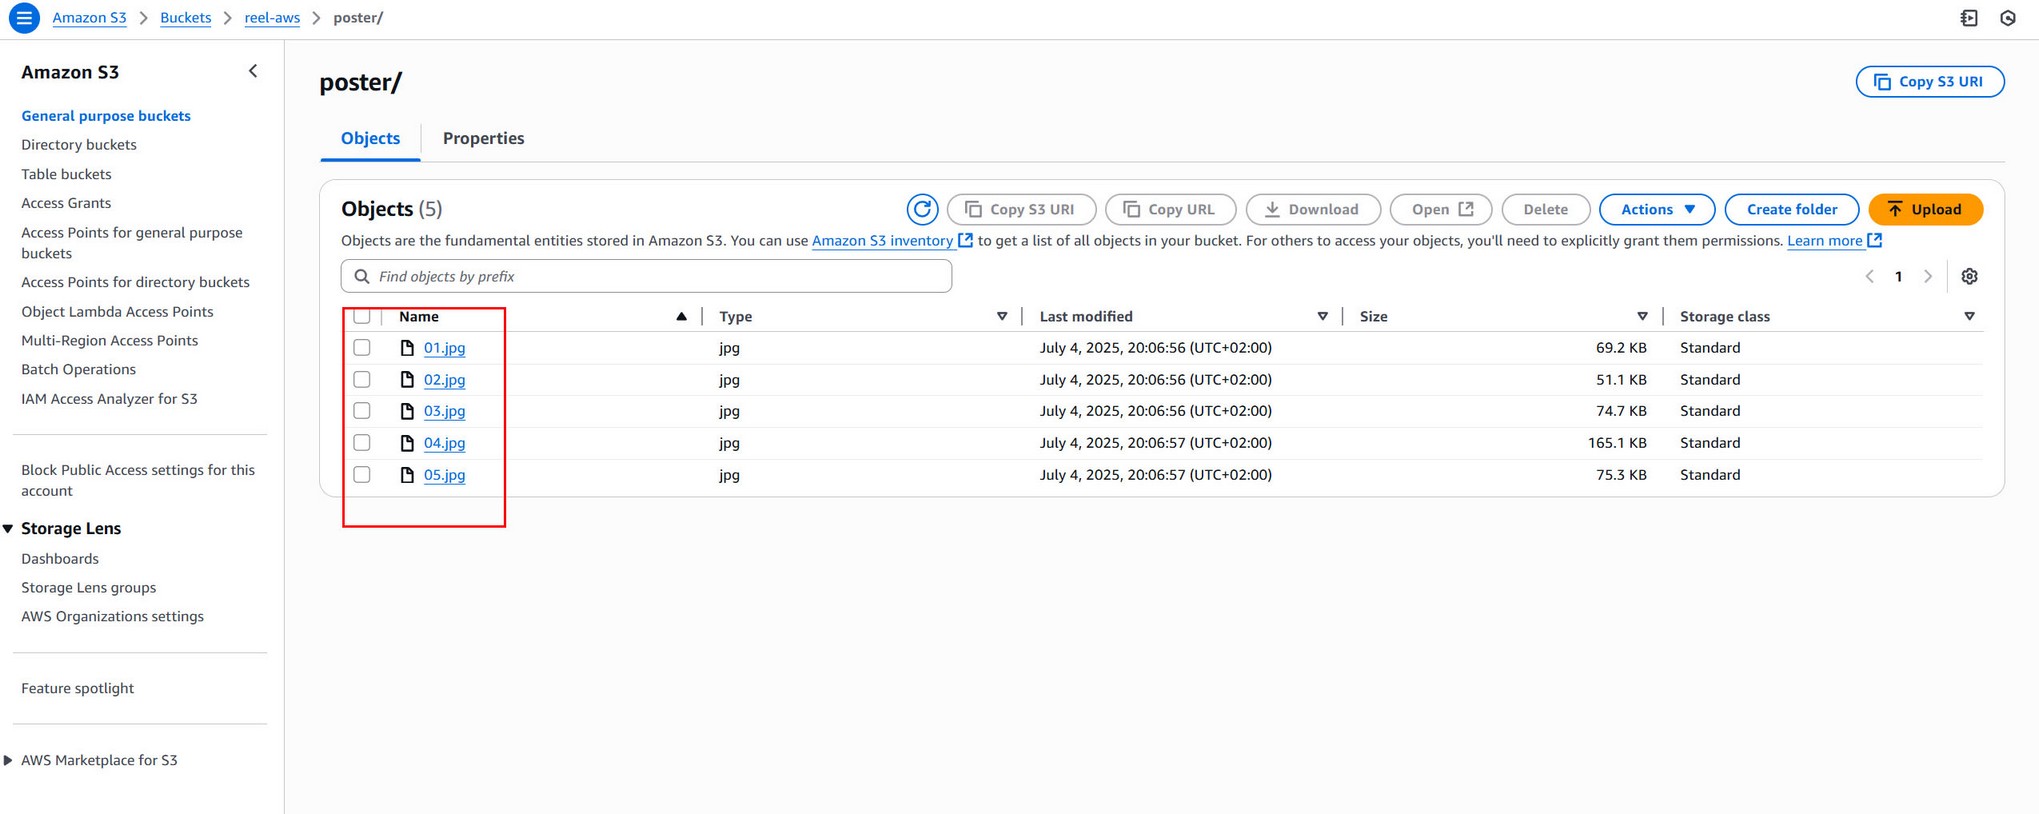
Upload video files inside bucket. If you want to host image poster on S3 as well create folder named "poster" inside this bucket and place your image files for poster inside that folder. The same is true for thumbnails (in this case create folder named "thumb") Images for poster and thumbnails need to have the same name as video files!. Example this bucket has video files and poster / thumbnails named the same!
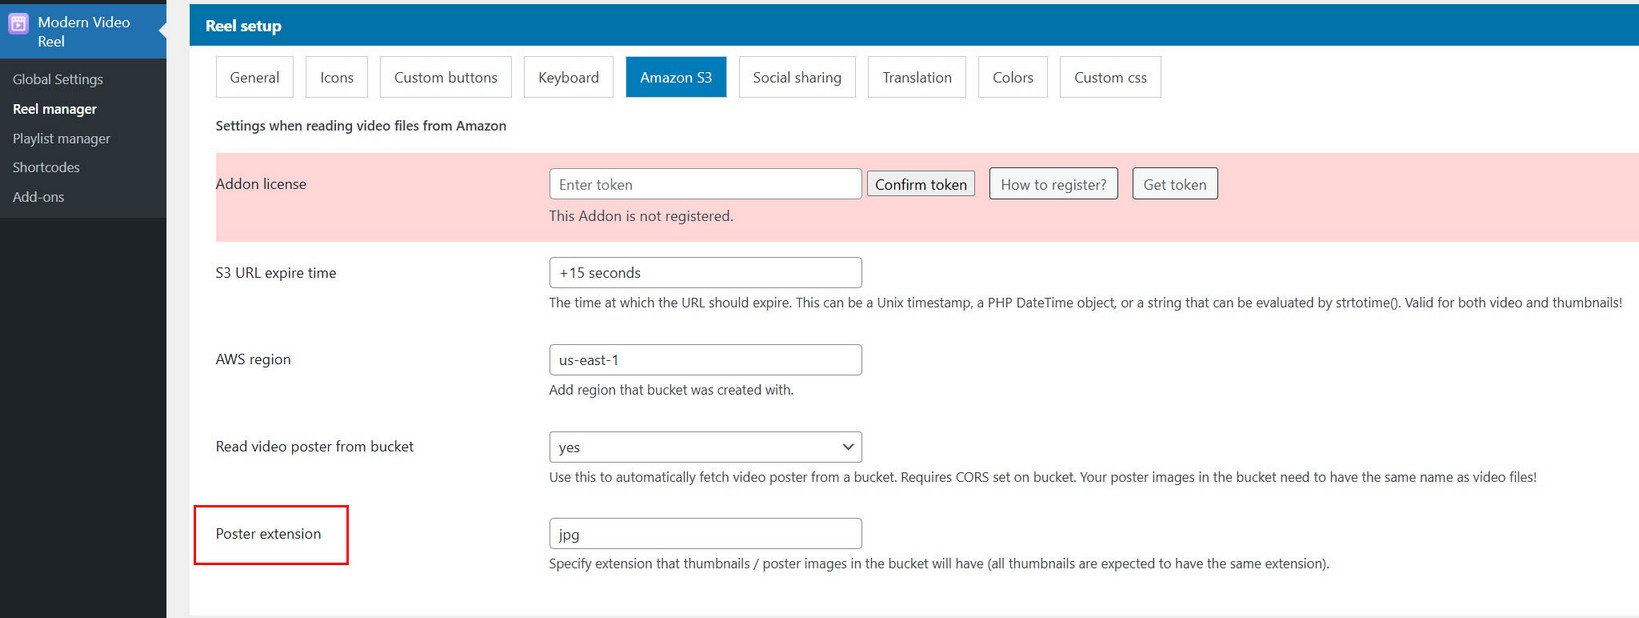
Poster images in example above use .jpg extension. You can set this option in settings:
Bucket privacy
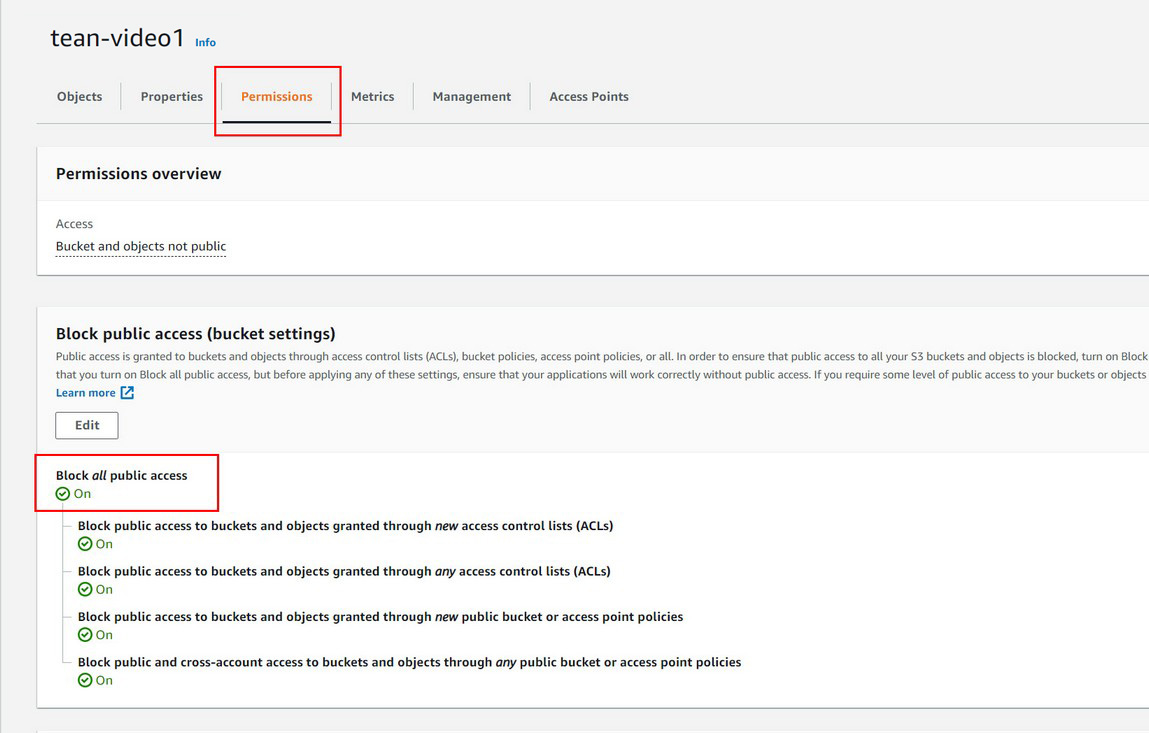
Bucket can be public or private. If you want a bucket to be private go to Permissions tab inside a bucket and check Block all public access
Amazon S3 with Cloundfront
Note this only works with Amazon Addon for this plugin!
How to integrate Amazon S3 buckets using Cloudfront?
First follow all steps in the Amazon S3 section. Once you have completed that you can continue with this section.
Sign in to the AWS Management Console and open the CloudFront console at https://console.aws.amazon.com/cloudfront/v3/home
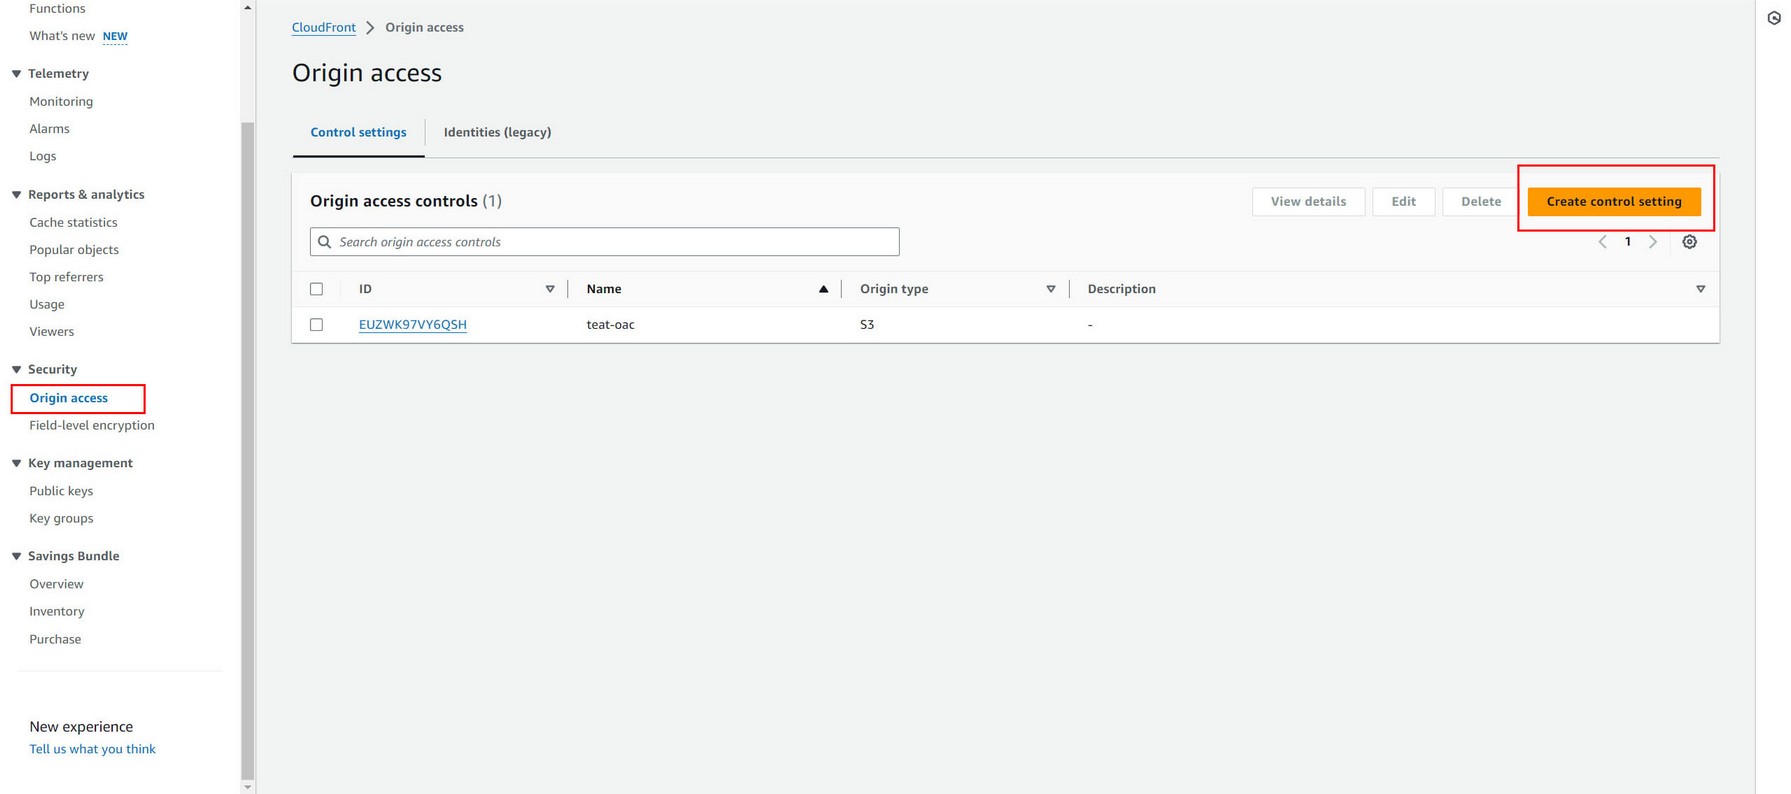
Create Origin access identity (OAI)

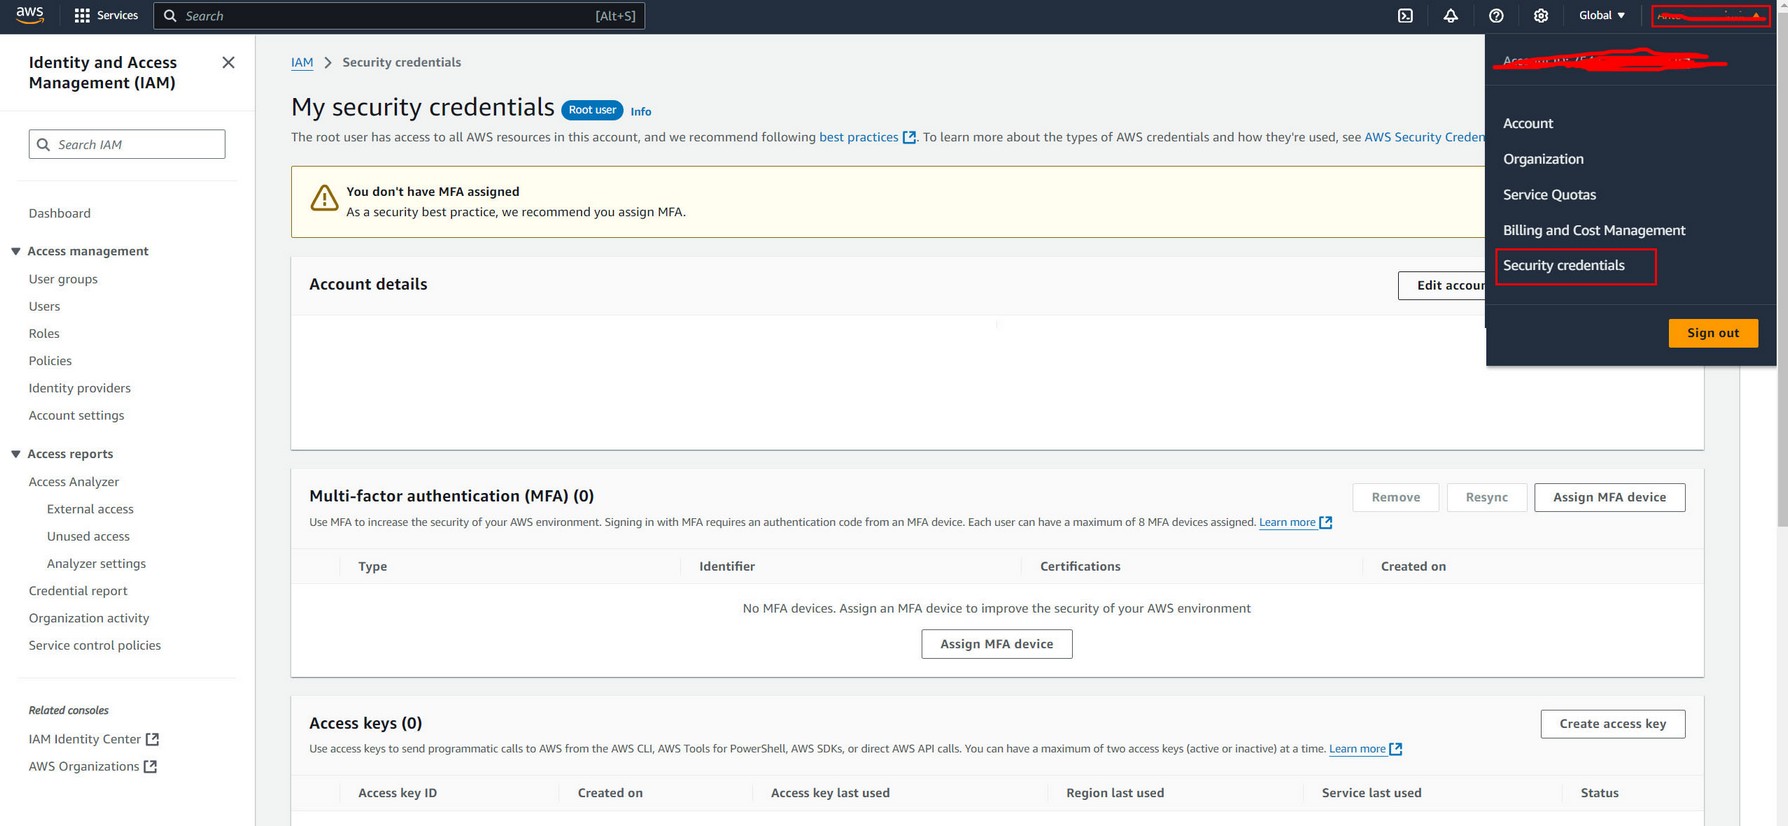
Create New key pair. Go to My account -> My security credentials:
Create Cloudfront key pair
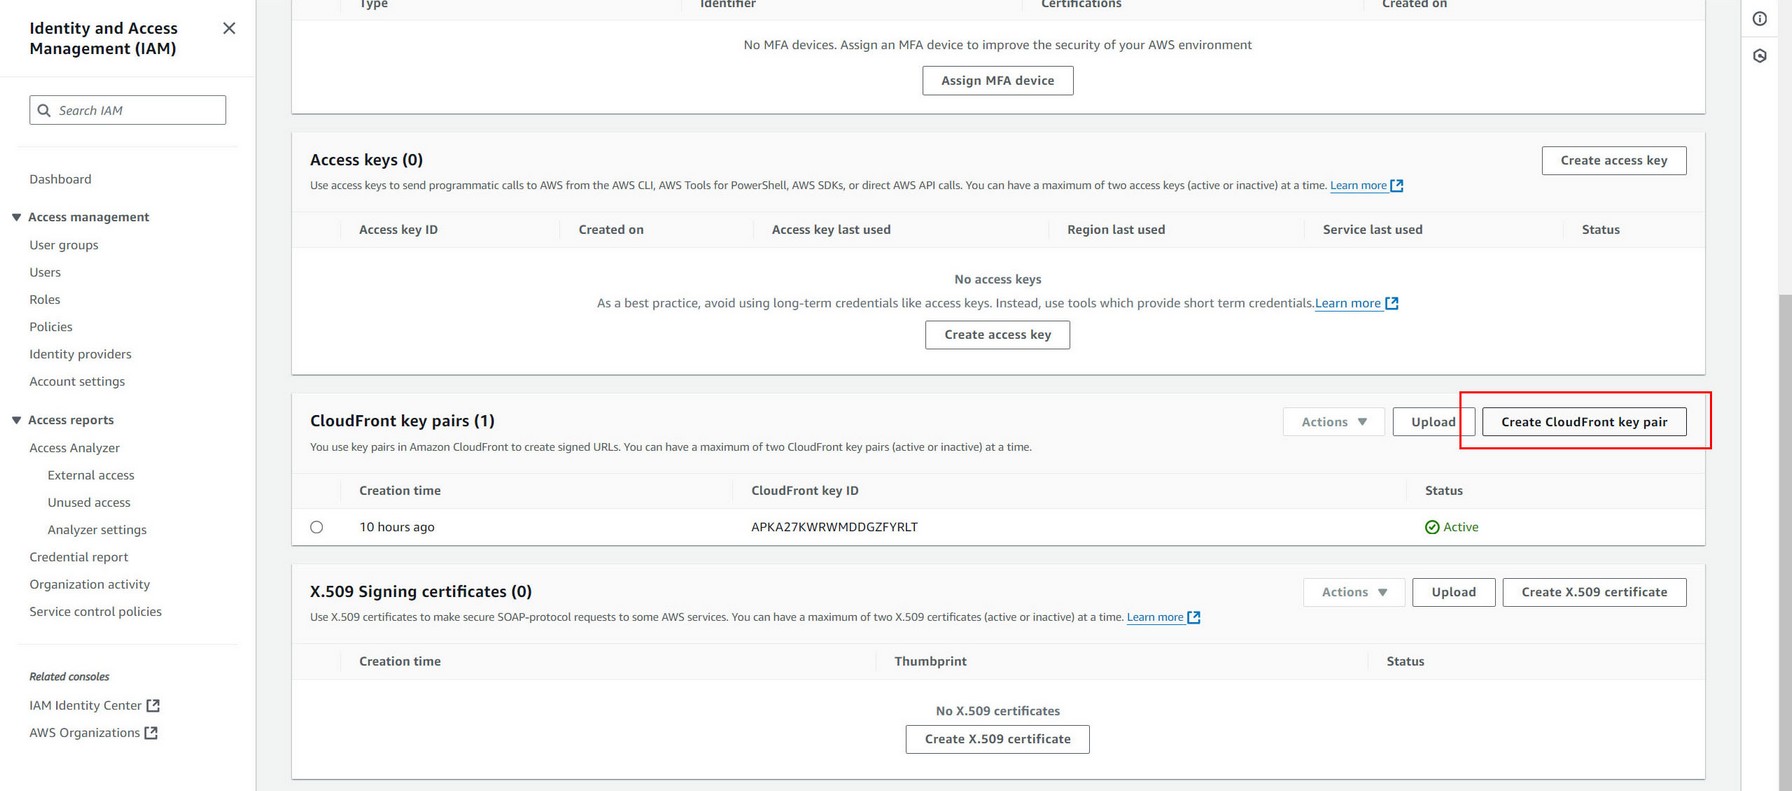
Create New key pair. And download both public and private key immediately after creation.

Rename private key to "private-key.pem" and move this file in WordPress uploads / mvp-reel-file-dir directory.
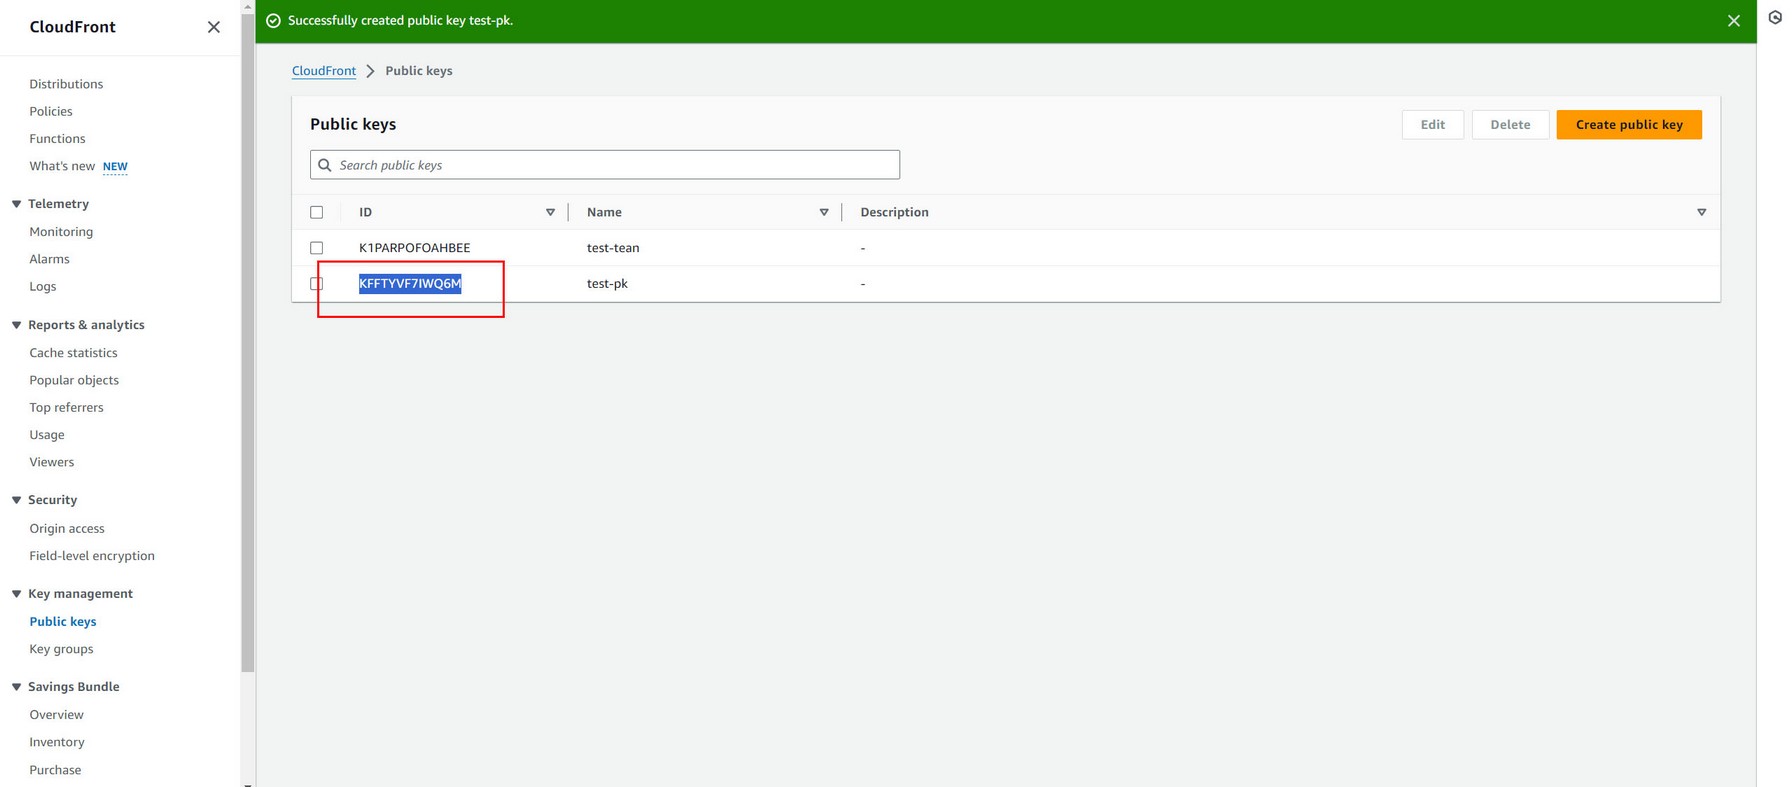
Create Public key under Key management.
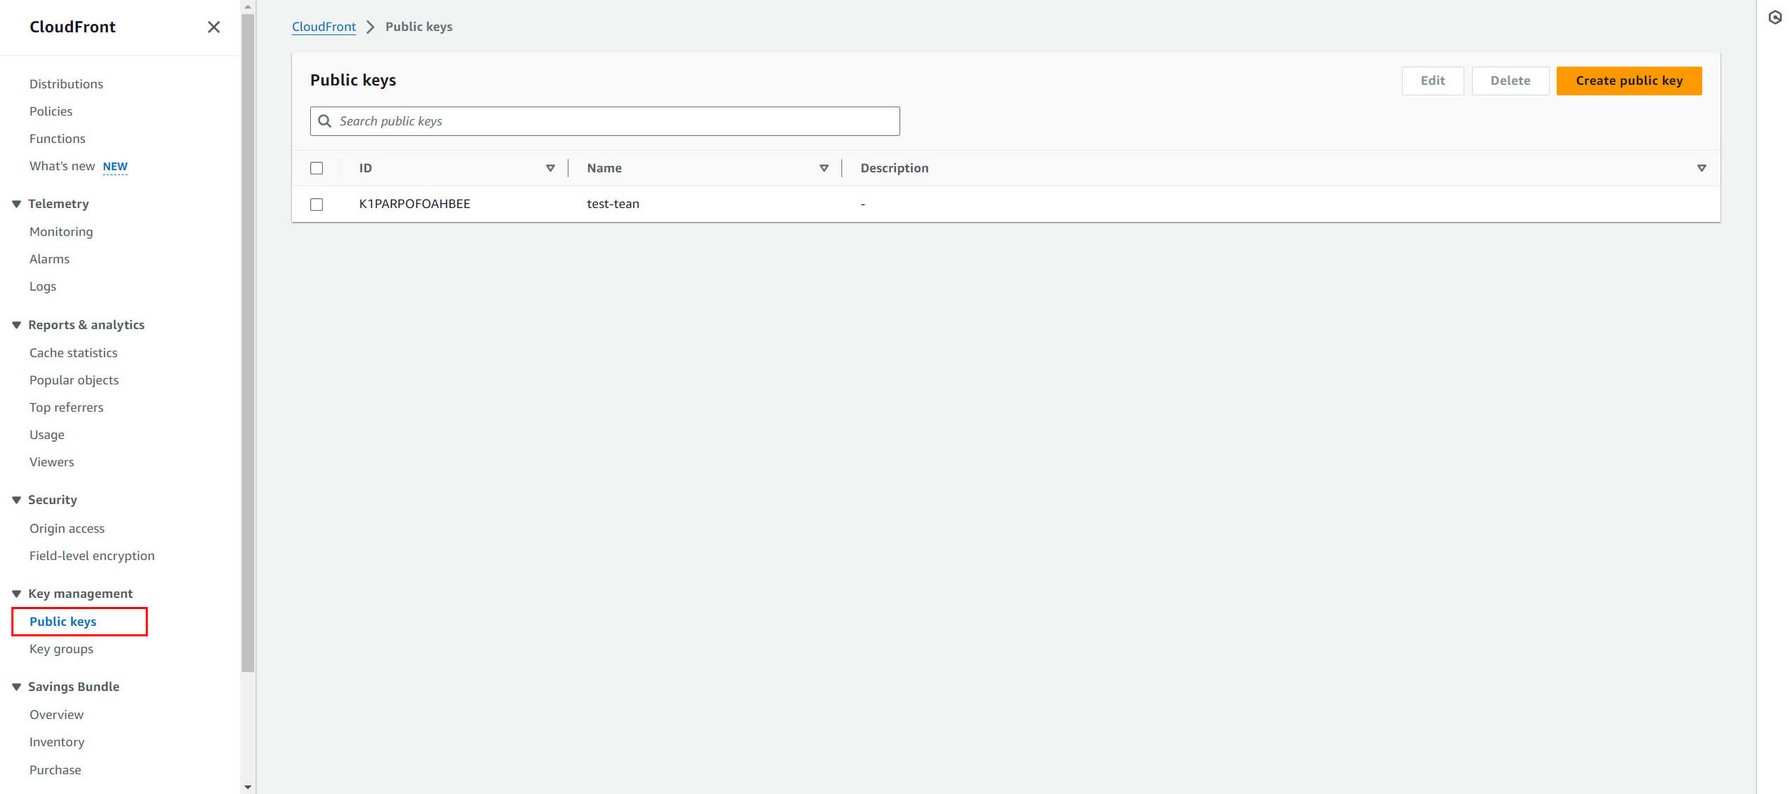
Give it some name, then open public key (you downloaded from the previous step) in any text editor and copy its content inside Key field. (Paste this public key value in pem format...). Make sure its a public key you copy not a private key!

Create Key group under Key management.

Choose public key you created in previous step to add to this key group.

Now create distribution
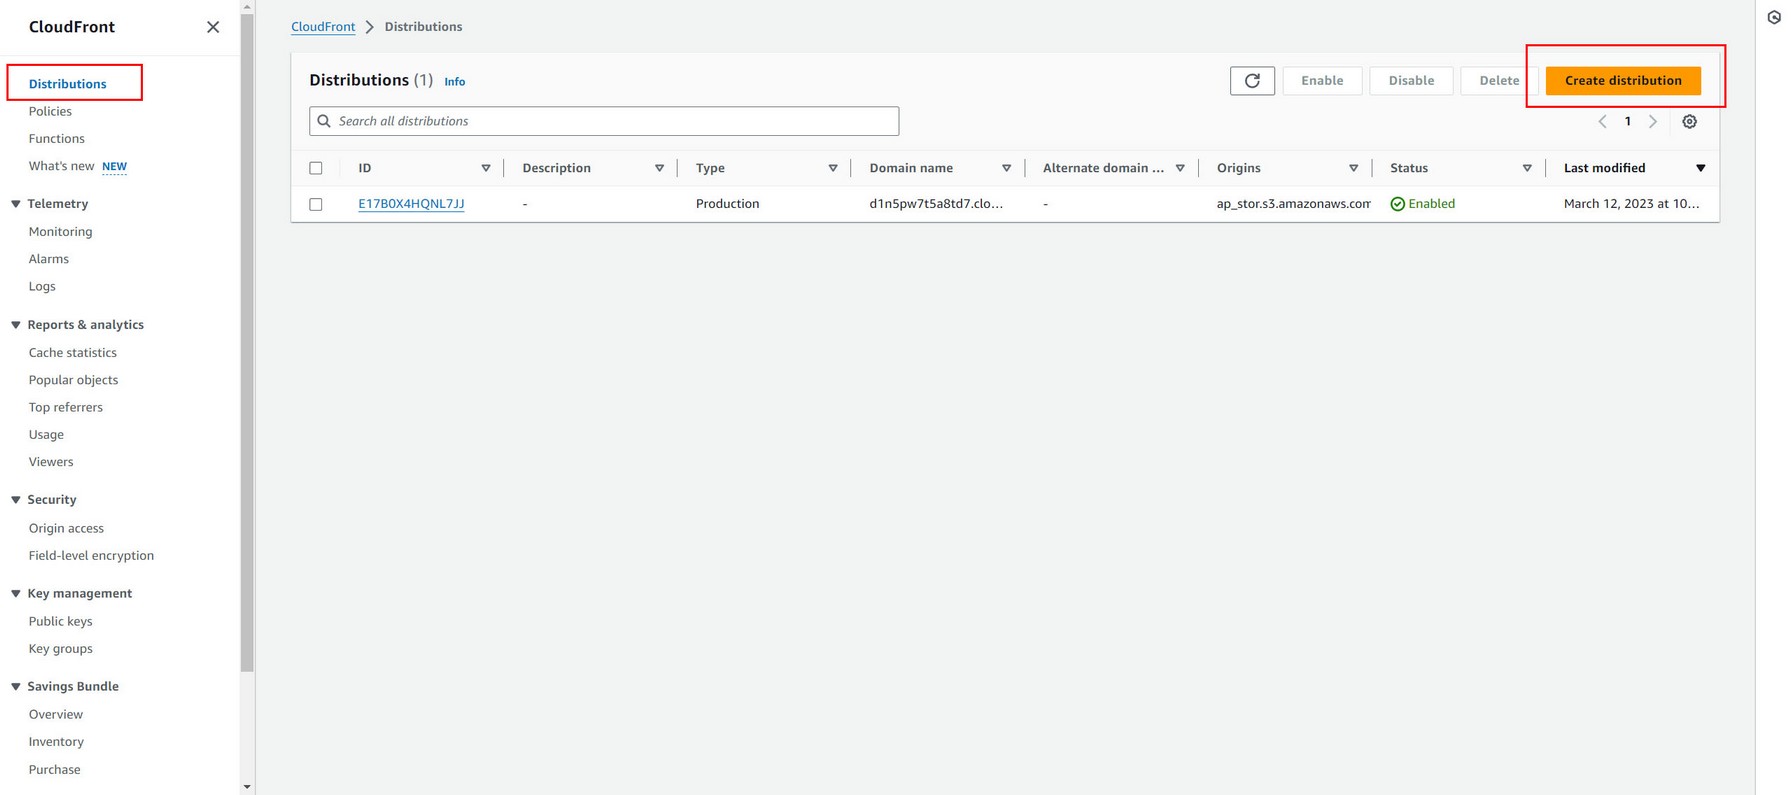
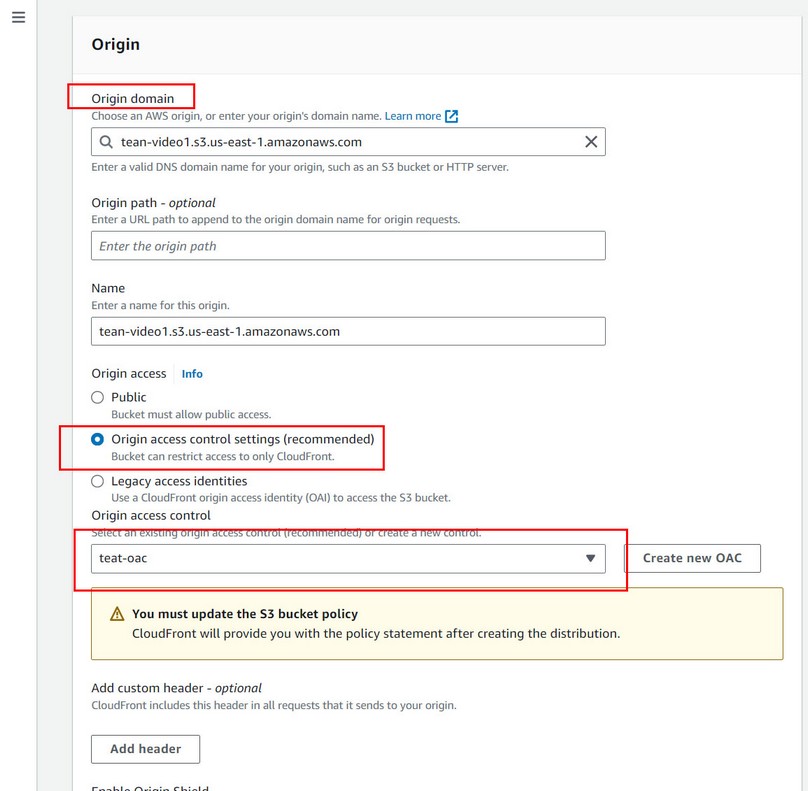
Under Origin domain choose the Amazon S3 bucket you want to connect with this distribution.
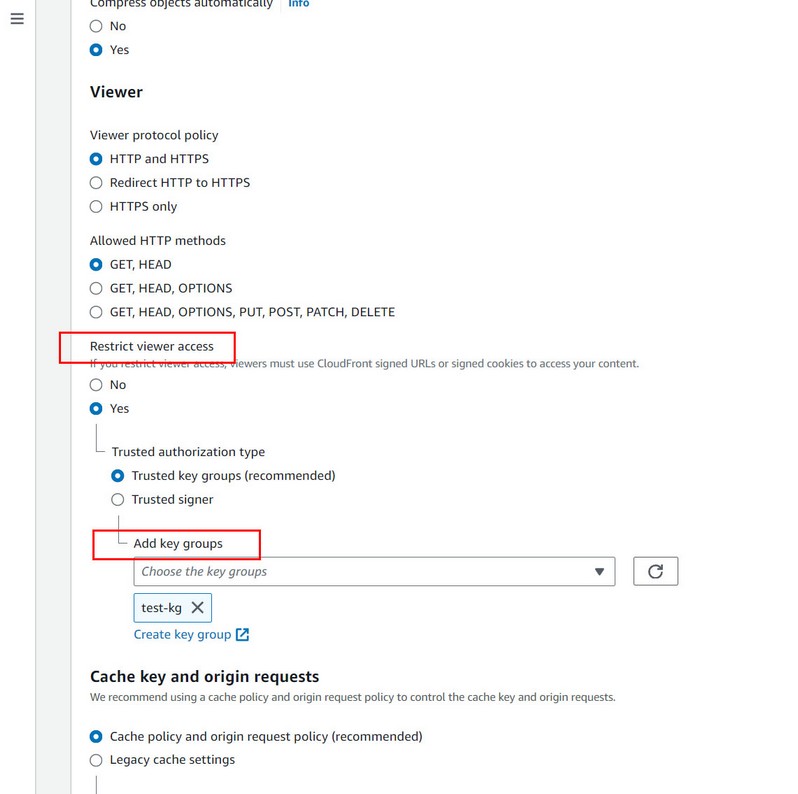
Under Restrict viewer access select Yes, and choose Trusted key groups, and select Key group you have created in previous steps in dropdown menu.
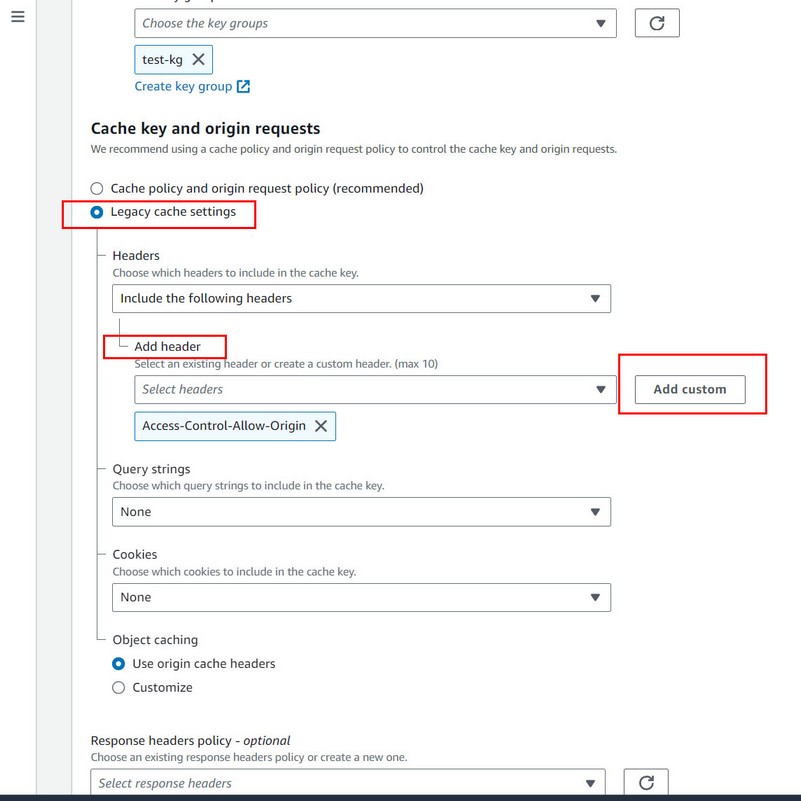
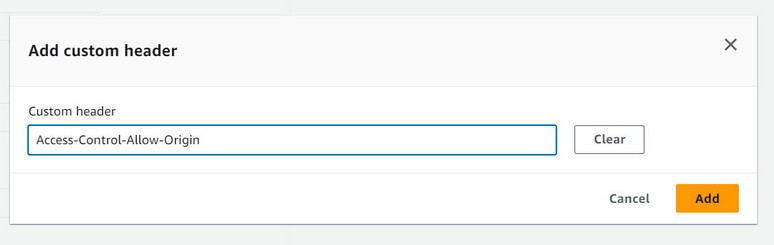
Under Cache key and origin requests select Legacy cache settings, choose Include the following headers, click Add custom button, and paste this as custom header inside: Access-Control-Allow-Origin
Access-Control-Allow-Origin
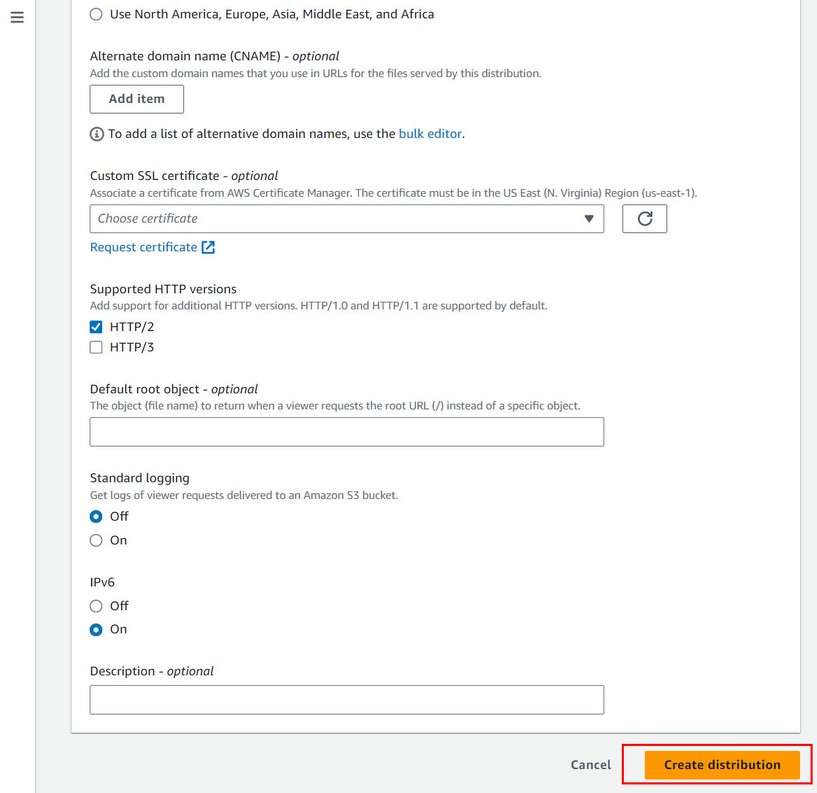
Now end creating distribution.
Copy distribution domain name and Public key pair ID into credentials, and set Use Cloudfront option:

Copy distribution domain name as Cloudfront domain url and Public key pair ID into credentials, and set Use Cloudfront option:

https://xxxxxxxxxxxxx.cloudfront.net/

xxxxxxxxxxxxx = your distribution domain

Note the full url with HTTPS, just replace your xxxxxxxxxxxxx distribution domain name!
If you need to update bucket policy you can use this example:
https://docs.aws.amazon.com/AmazonCloudFront/latest/DeveloperGuide/private-content-restricting-access-to-s3.html
{
    "Version": "2012-10-17",
    "Statement": {
        "Sid": "AllowCloudFrontServicePrincipalReadOnly",
        "Effect": "Allow",
        "Principal": {
            "Service": "cloudfront.amazonaws.com"
        },
        "Action": "s3:GetObject",
        "Resource": "arn:aws:s3:::<S3 bucket name>/*",
        "Condition": {
            "StringEquals": {
                "AWS:SourceArn": "arn:aws:cloudfront::111122223333:distribution/<CloudFront distribution ID>"
            }
        }
    }
}
Amazon adding videos
Supported are single videos and reading whole bucket of videos. The same is true for audio.
Adding single videos
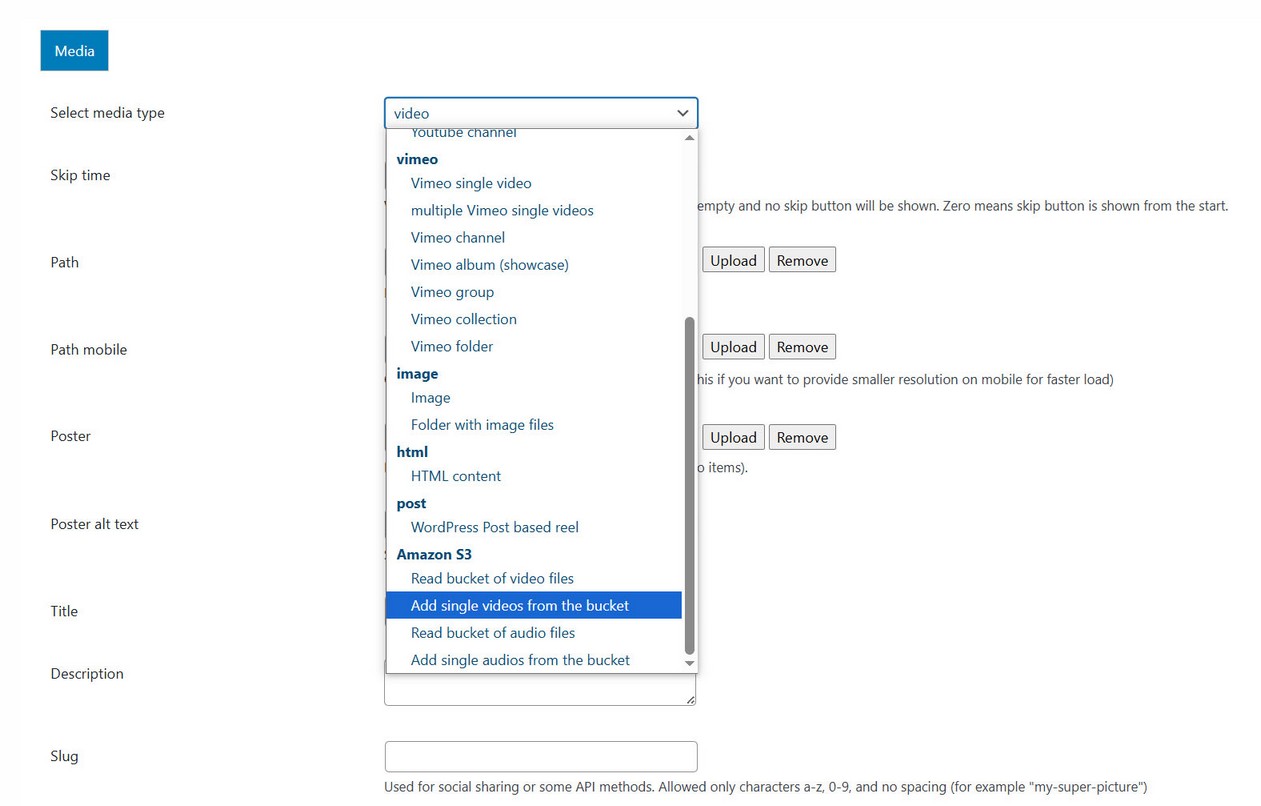
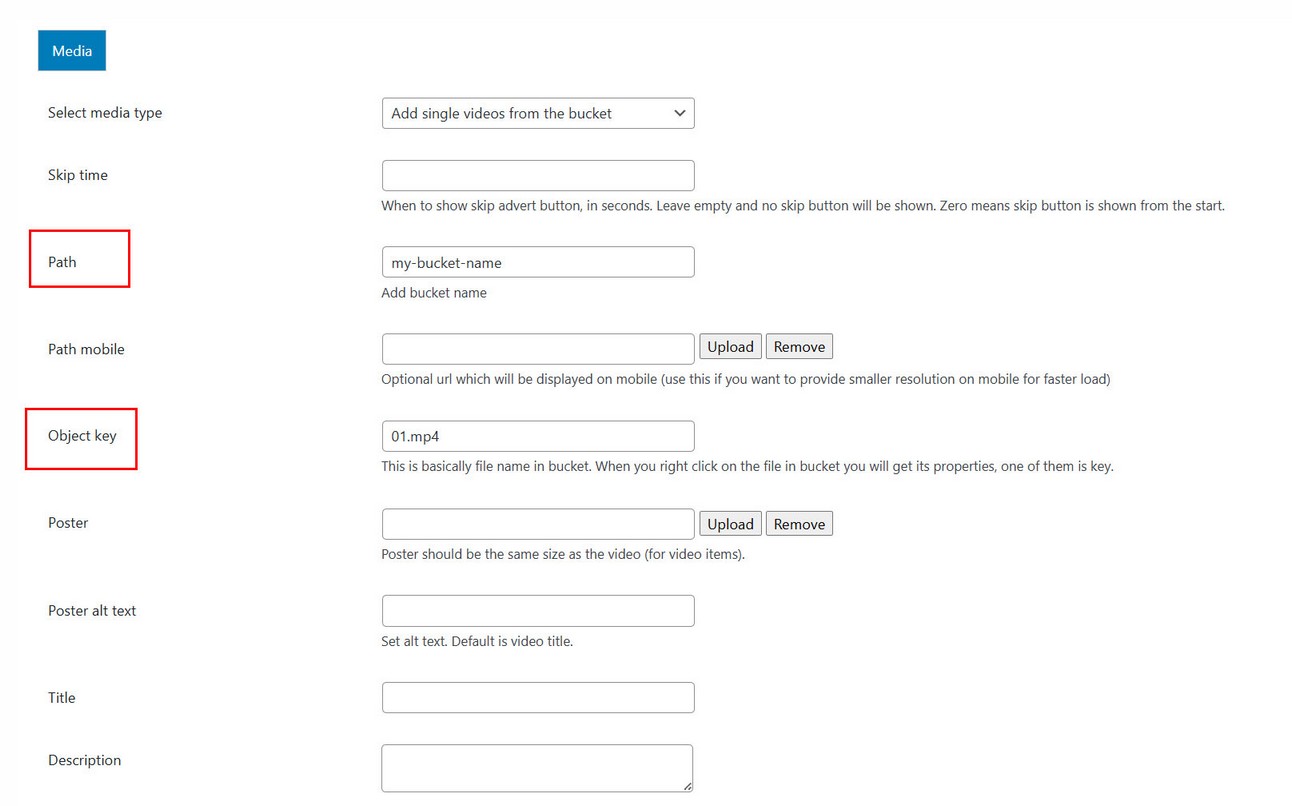
In Playlist manager / Edit Playlist / Add media dialog choose Add single videos from the bucket and enter bucket name and filename (key):
Adding whole bucket of videos
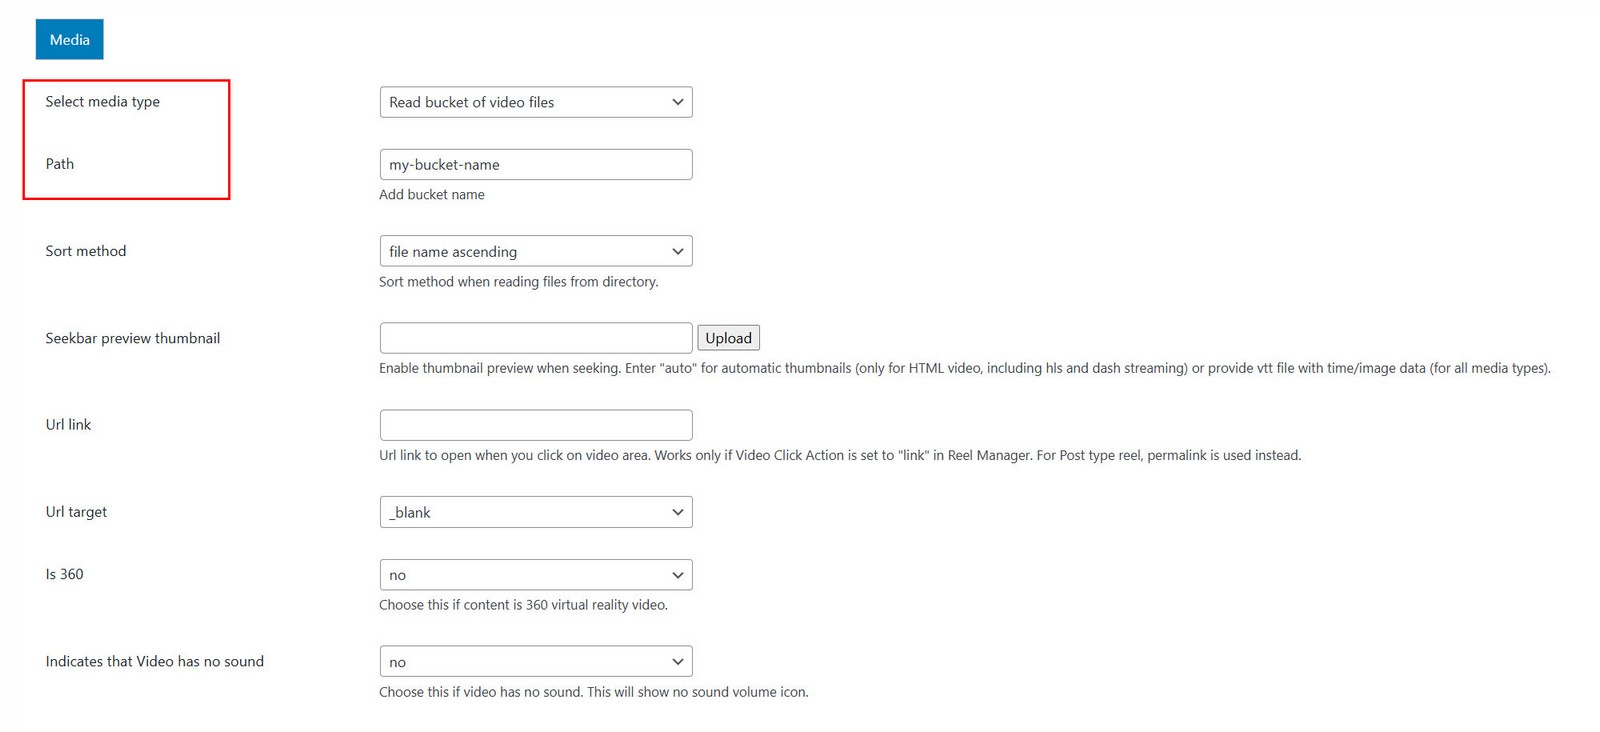
In Playlist manager / Edit Playlist / Add media dialog choose Read bucket of video files and enter bucket name:
Video bucket structure
Here is example how the bucket structure needs to look
video - bucket name
    -- video1.mp4
    -- video2.mp4
    -- video3.mp4

    poster folder (optional)
        -- video1.jpg
        -- video2.jpg
        -- video3.jpg
We have bucket (called "video" in our example, this can be called anyhow). Inside "video" folder are videos, poster, folder. "poster" folders are optional. Inside "poster" directory poster files are located.
Note: Equivalent video and poster file names need to be the same!
Audio bucket structure
audio - bucket name
    -- audio1.mp3
    -- audio2.mp3
    -- audio3.mp3

    poster folder (optional)
        -- audio1.jpg
        -- audio2.jpg
        -- audio3.jpg
Statistics addon
Video Statistics AddOn is available on the following link
Using Statistics addOn for Modern Video Reel For WordPress you can track video statistics for your Reels.
Using Statistics AddOn
First make sure addOn is activated together with main Video Reel plugin.
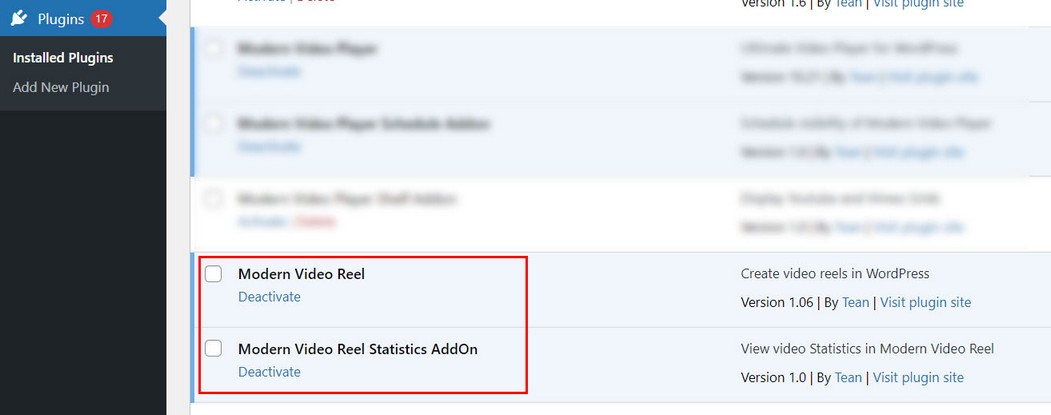
Also, make sure you have the latest compatible version of main Video Reel plugin.
Access Statistics settings in Reel Manager / Edit Reel / Statistics tab.

Register plugin inside Reel manager / Edit Reel / Statistics tab
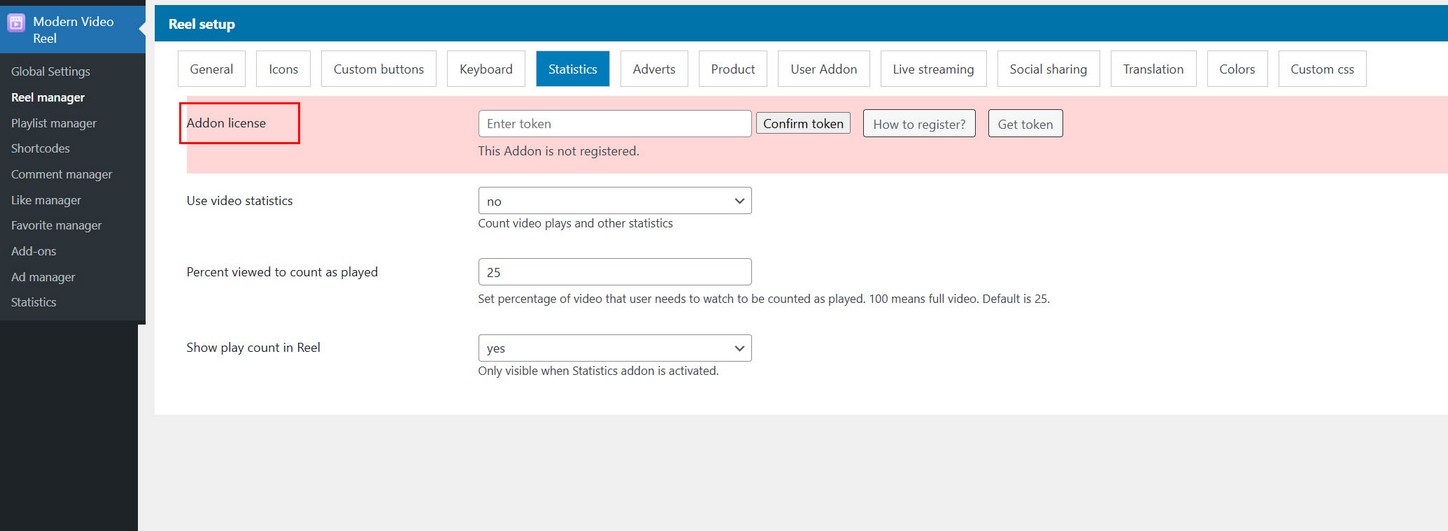
Registration is done the same way as registering main plugin.
Statistics will be available in the plugin menu once this Addon is activated.
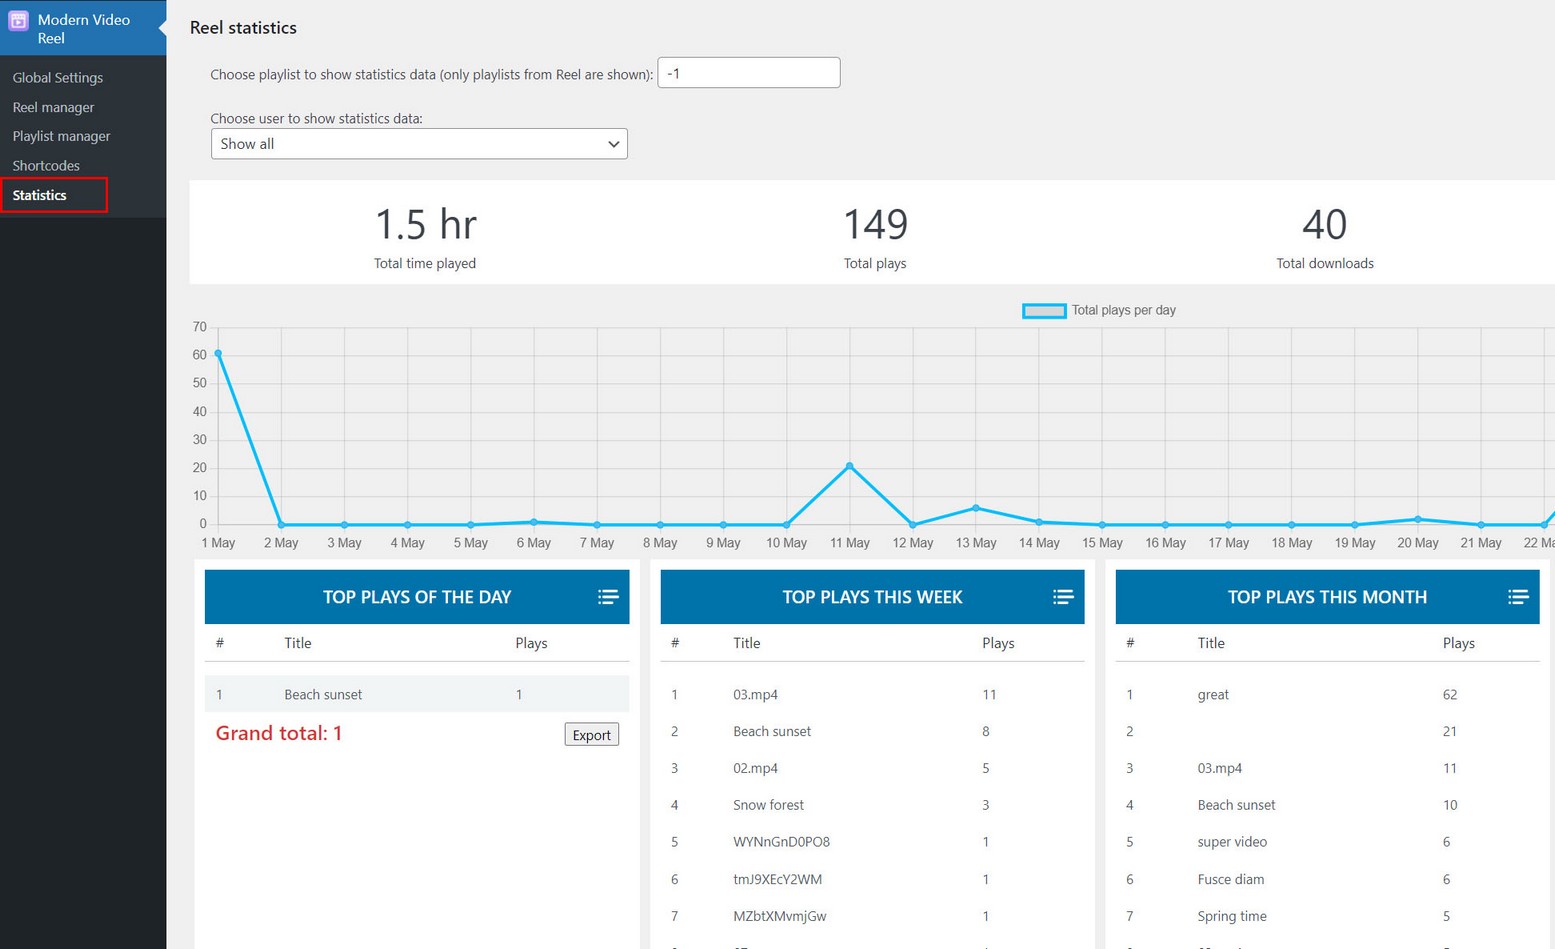
Notes
Although Modern Video Reel is compatible with playlists from Modern Video Player, Statistics will be shown only for playlists from Modern Video Reel, not Modern Video Player!
Live Streaming addon
Live Streaming AddOn is available on the following link
Using Live Streaming AddOn for Modern Video Reel WordPress plugin, you can display HLS and MPEG DASH live streaming media inside the Reel.
Using Live Streaming AddOn
First make sure addOn is activated together with main Video Reel plugin.
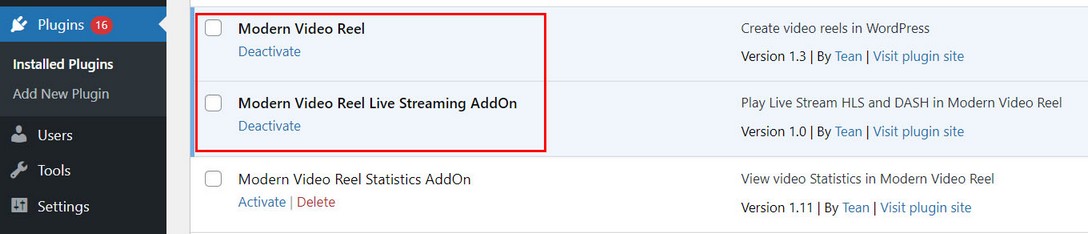
Also, make sure you have the latest compatible version of main Video Reel plugin.
Register plugin inside Reel manager / Edit Reel / Live Streaming tab
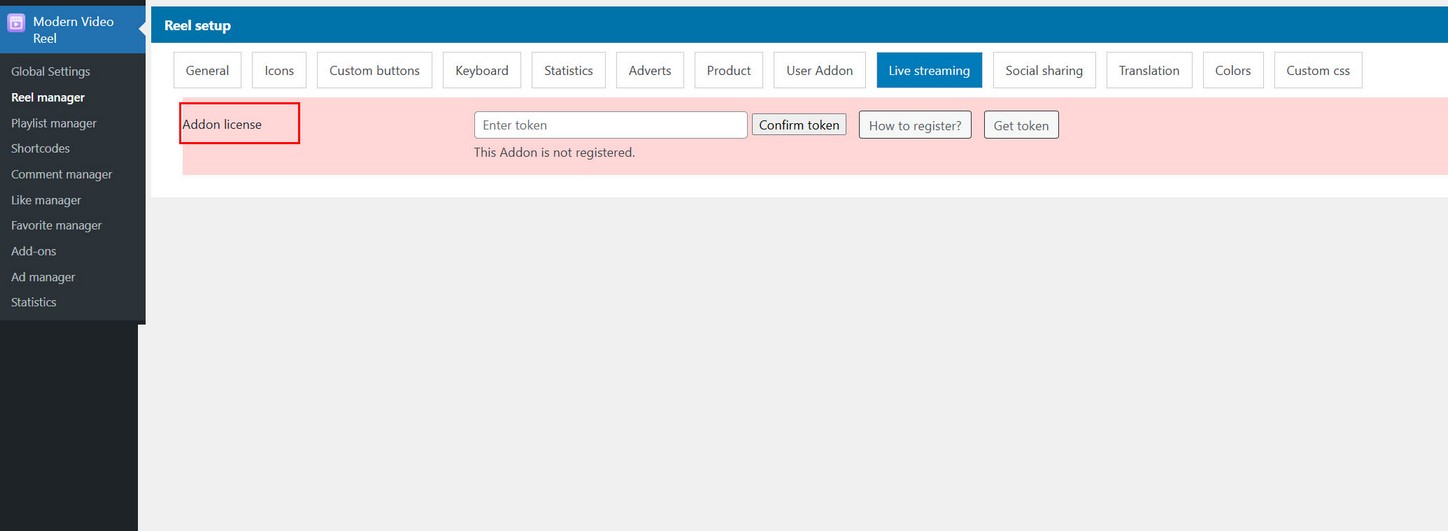
Registration is done the same way as registering main plugin.
Adding Live stream media to Reel
Live stream media will be available in Playlist manager / Edit playlist / Add media dialog screen:
You can add individual media (for example direct link to HLS m3u8 file) or load a folder of Live stream media.
For more details view Live Streaming section.
Troubleshooting
IOS video wont start playing with sound
IOS prevents subsequest video players to autoplay with sound, meaning video cannot start with sound on IOS. This would work in the same player, however Reel uses new player for each video (and its not possible differently because of the layout).
Autoplay
Autoplay is disabled since recent browser changes and requires user interaction with the page before (like a click or keypress) to start playback:
https://developers.google.com/web/updates/2017/09/autoplay-policy-changesThis means autoplay is only possible muted! Sometimes browser may allow autoplay with sound after user has interacted with the page (excluding mobile browsers).
Vimeo video or playlist doesnt load
If you use Vimeo videos with API, its necessary to set API keys properly. If this is not done correctly, or there is simply some delay from Vimeo website after setting new API keys, make sure you have done this process correctly.
Snap scrolling does not work
If you try to replicate this example with Snap Scroll https://interactivepixel.net/env/mvp_reel/content/reel_snap.html , and this does not work, this may be due to your theme or 3rd party plugins use wheel event in page and prevent normal scroll, like for example:
window.addEventListener('wheel', event => {
      event.preventDefault()//prevents normal scroll

});
PHP zip extension not installed or enabled! Export reel and playlist feature cannot be used.
Reel and playlist export feature requires PHP zip extension enabled.
If you get this message in settings, check in cPanel on the server if you can enable zip php extension.
Contact
How to contact us?
If you have any questions after purchase, send a message at http://codecanyon.net/user/Tean#contact, and provide your PURCHASE CODE.
Using Comments
Comments can be enabled per Reel, meaning some Reels can use comments, while other not.
Enable comments inside Reel manager / Edit Reel / User Addon tab
Comment icon inside the Reel appears in vertical icon list:
Clicking comment icon, comments panel opens above the Reel item:
Features
Commenting is unlimited, meaning there are main comments and comment replies.
Comments include pagination for faster loading when there are many comments.
Comments can be reported (by registered WordPress users). Admin has its own menu in the plugin where he can see and manage all comments.
When user receives a reply to his comment, an email can be sent to user.
Comments can be sorted by date or popularity.
Comments manager
Admin has its own menu in the plugin where he can see and manage all comments.
Comment votes
Registered WordPress users can vote on comments.
Comment report
Comment can be reported using menu on the right side of the comment.
Admin can specify report reasons inside Global settings / User Addon tab .
Report dialog when opened will contain those list.
Reported comments will be listed inside Comment manager section.
Pinning Comments
Comments can be pinned to top to make them more visible to audience.
Notes:
- only main comments can be pinned (not replies)
- Admin can always pin comments
- allow specific user(s) to pin their own comments or all (per Reel)
- one comment can be pinned at a time
Disable Comments
Comments can be disabled for specific video.
Disable comments in Playlist manager / Add media dialog:
Comments disabled read more link.
Set url link to open when comments are disabled and comments button is clicked in Reel manager / Edit Reel / Reel setup / User addon tab: